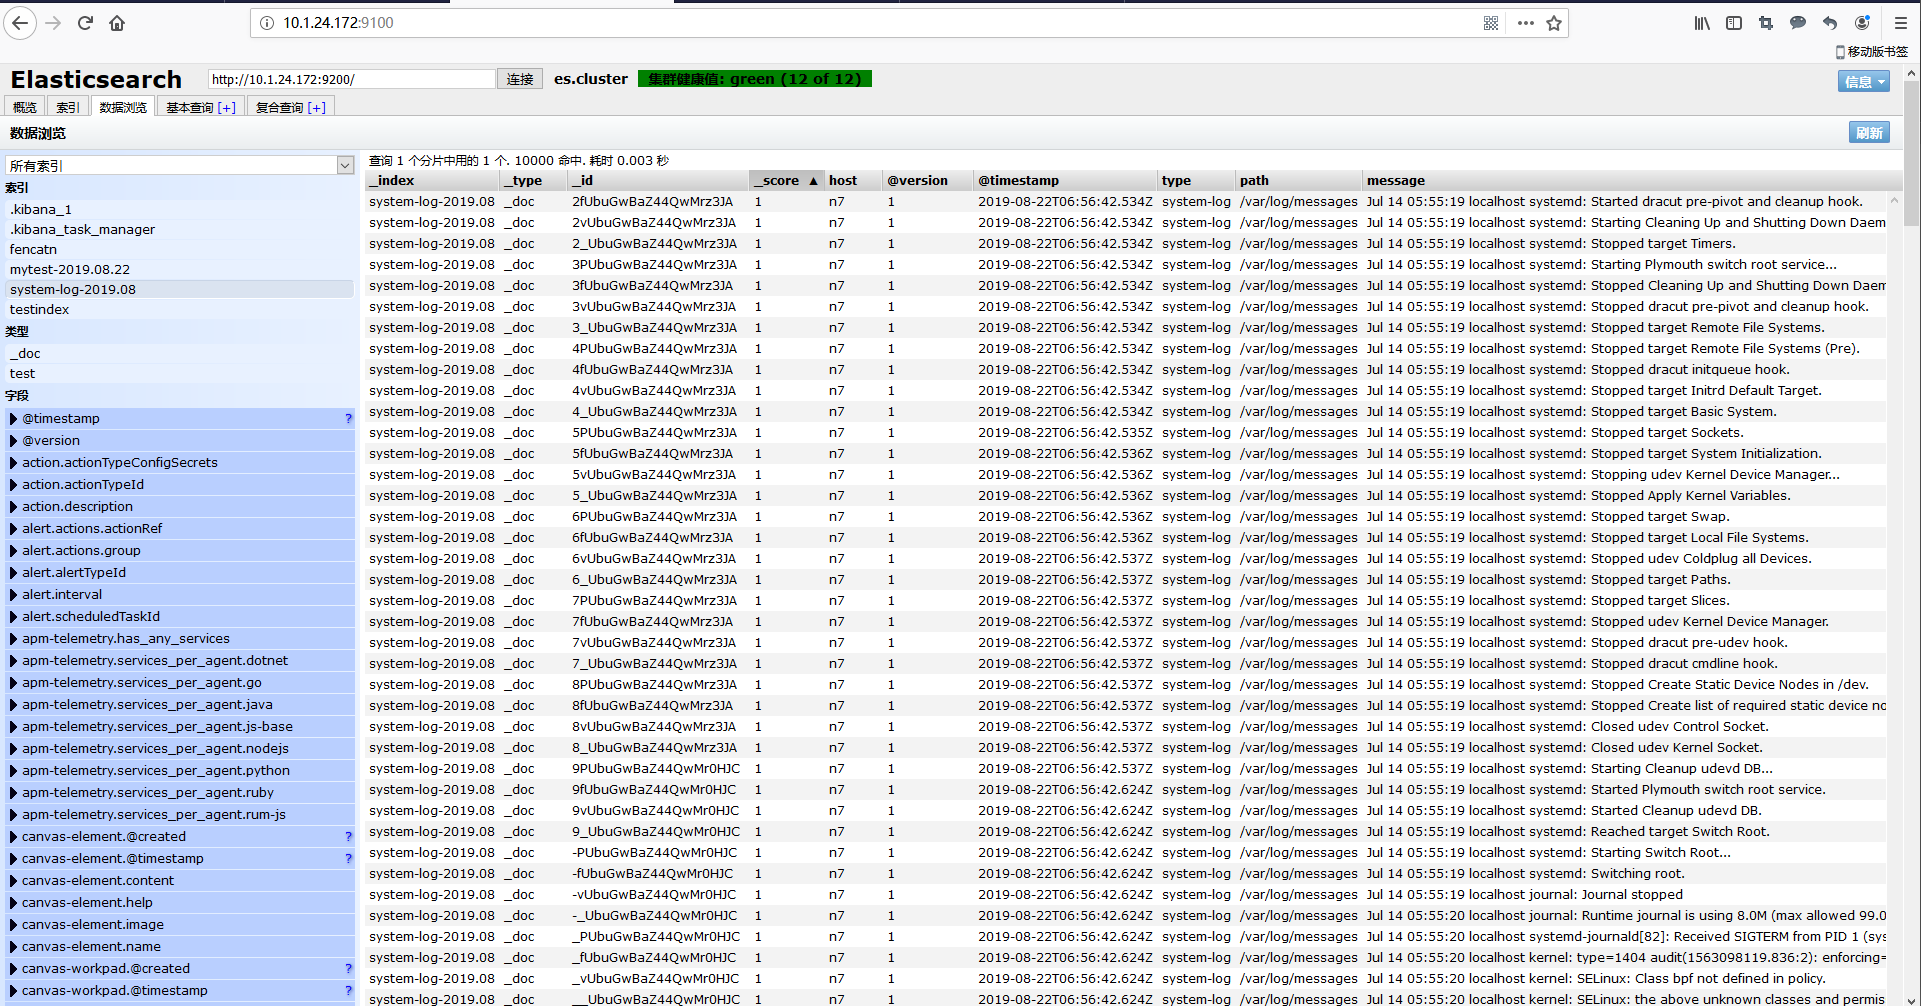
nginx按IP控制访问

nginx拒绝或允许指定IP,是使用模块HTTP访问控制模块(HTTP Access).
控制规则按照声明的顺序进行检查,首条匹配IP的访问规则将被启用。 location / {
deny 192.168.1.1;
allow 192.168.1.0/24;
allow 10.1.1.0/16;
deny all;
}
上面的例子中仅允许192.168.1.0/24和10.1.1.0/16网络段访问这个location字段,但192.168.1.1是个例外。
注意规则的匹配顺序,如果你使用过apache你可能会认为你可以随意控制规则的顺序并且他们能够正常的工作,但实际上不行。

下面的这个例子将拒绝掉所有的连接:

location / {
#这里将永远输出403错误。
deny all;
#这些指令不会被启用,因为到达的连接在第一条已经被拒绝
deny 192.168.1.1;
allow 192.168.1.0/24;
allow 10.1.1.0/1
}

发表在 Nginx | 标签为 | 留下评论

解决wordpress 302循环重定向

我在用nginx转发内网wordpress的时候,css等样式加载不出来,点登陆,一堆302重定向报错:(ip已经隐去)

X.X.X.X - - [26/Sep/2019:14:28:23 +0800] "GET /wp-login.php HTTP/1.1" 302 5 "https://blog.fencatn.net/" "Mozilla/5.0 (Windows NT 10.0; Win64; x64) AppleWebKit/537.36 (KHTML, like Gecko) Chrome/76.0.3809.132 Safari/537.36 OPR/63.0.3368.94" "Y.Y.Y.Y"

这个报错困扰我很久,网上各种查,今天终于找到个靠谱的,按他的方法解决了,我粘贴下原文,并感谢原作者:

https://www.hida.in/2019/09/03/wordpress-wp-admin-302循环重定向/

阿里云的虚拟机过期了,更换为ECS。wordpress用的是docker镜像,在nginx代理后面。配置好后,首页部分静态资源因为不是https没有加载,显示不正常,我怀疑是网站配置问题,就先忽略了。控制台页面无法打开,循环重定向,查询很多方法无效。后来在dockerhub上的wordpress页面发现nginx需要添加一个选项,按照说明添加后就可以正常访问了。下面就是添加的内容。

proxy_set_header X-Forwarded-Proto https;

方法就是去nginx转发器上添加

proxy_set_header X-Forwarded-Proto https;

发表在 Nginx, wordpress | 标签为 , | 留下评论

centos7系统内核优化

安装centos 7 系统之后要做的几件事

#修改主机名
hostnamectl –static set-hostname fencatn
写本地hosts
vim /etc/hosts
127.0.0.1 fencatn
x.x.x.x fencatn

#下面是使用iptables
systemctl stop firewalld.service
systemctl disable firewalld.service
yum -y install iptables-services

创建普通用户,给sudo权限
adduser fencatn
passwd fencatn

vim /etc/ssh/sshd_config

Port 12345
PermitRootLogin no
systemctl restart sshd.services

visudo
fencatn ALL = (root) NOPASSWD: fencatn
Cmnd_Alias fencatn = ALL

#加大打开文件数的限制(open files)
ulimit -n
ulimit -a
vi /etc/security/limits.conf
最后添加
* soft nofile 1024000
* hard nofile 1024000
hive – nofile 1024000
hive – nproc 1024000

用户进程限制
[root@fencatn ~]# sed -i ‘s#4096#65535#g’ /etc/security/limits.d/20-nproc.conf #加大普通用户限制 也可以改为unlimited
[root@fencatn ~]# egrep -v “^$|^#” /etc/security/limits.d/20-nproc.conf
* soft nproc 65535
root soft nproc unlimited

reboot

vim /etc/sysctl.conf
#CTCDN系统优化参数
#关闭ipv6
net.ipv6.conf.all.disable_ipv6 = 1
net.ipv6.conf.default.disable_ipv6 = 1
#决定检查过期多久邻居条目
net.ipv4.neigh.default.gc_stale_time=120
#使用arp_announce / arp_ignore解决ARP映射问题
net.ipv4.conf.default.arp_announce = 2
net.ipv4.conf.all.arp_announce=2
net.ipv4.conf.lo.arp_announce=2
# 避免放大攻击
net.ipv4.icmp_echo_ignore_broadcasts = 1
# 开启恶意icmp错误消息保护
net.ipv4.icmp_ignore_bogus_error_responses = 1
#关闭路由转发
net.ipv4.ip_forward = 0
net.ipv4.conf.all.send_redirects = 0
net.ipv4.conf.default.send_redirects = 0
#开启反向路径过滤
net.ipv4.conf.all.rp_filter = 1
net.ipv4.conf.default.rp_filter = 1
#处理无源路由的包
net.ipv4.conf.all.accept_source_route = 0
net.ipv4.conf.default.accept_source_route = 0
#关闭sysrq功能
kernel.sysrq = 0
#core文件名中添加pid作为扩展名
kernel.core_uses_pid = 1
# 开启SYN洪水攻击保护
net.ipv4.tcp_syncookies = 1
#修改消息队列长度
kernel.msgmnb = 65536
kernel.msgmax = 65536
#设置最大内存共享段大小bytes
kernel.shmmax = 68719476736
kernel.shmall = 4294967296
#timewait的数量,默认180000
net.ipv4.tcp_max_tw_buckets = 6000
net.ipv4.tcp_sack = 1
net.ipv4.tcp_window_scaling = 1
net.ipv4.tcp_rmem = 4096 87380 4194304
net.ipv4.tcp_wmem = 4096 16384 4194304
net.core.wmem_default = 8388608
net.core.rmem_default = 8388608
net.core.rmem_max = 16777216
net.core.wmem_max = 16777216
#每个网络接口接收数据包的速率比内核处理这些包的速率快时,允许送到队列的数据包的最大数目
net.core.netdev_max_backlog = 262144
#限制仅仅是为了防止简单的DoS 攻击
net.ipv4.tcp_max_orphans = 3276800
#未收到客户端确认信息的连接请求的最大值
net.ipv4.tcp_max_syn_backlog = 262144
net.ipv4.tcp_timestamps = 0
#内核放弃建立连接之前发送SYNACK 包的数量
net.ipv4.tcp_synack_retries = 1
#内核放弃建立连接之前发送SYN 包的数量
net.ipv4.tcp_syn_retries = 1
#启用timewait 快速回收
net.ipv4.tcp_tw_recycle = 1
#开启重用。允许将TIME-WAIT sockets 重新用于新的TCP 连接
net.ipv4.tcp_tw_reuse = 1
net.ipv4.tcp_mem = 94500000 915000000 927000000
net.ipv4.tcp_fin_timeout = 1
#当keepalive 起用的时候,TCP 发送keepalive 消息的频度。缺省是2 小时
net.ipv4.tcp_keepalive_time = 1800
net.ipv4.tcp_keepalive_probes = 3
net.ipv4.tcp_keepalive_intvl = 15
#允许系统打开的端口范围
net.ipv4.ip_local_port_range = 1024 65000
#修改防火墙表大小,默认65536
net.netfilter.nf_conntrack_max=655350
net.netfilter.nf_conntrack_tcp_timeout_established=1200
# 确保无人能修改路由表
net.ipv4.conf.all.accept_redirects = 0
net.ipv4.conf.default.accept_redirects = 0
net.ipv4.conf.all.secure_redirects = 0
net.ipv4.conf.default.secure_redirects = 0

sysctl -p

# 同步时间
ntpdate time.nist.gov
hwclock -w #先同步一遍时间到硬件时间

发表在 LinuxBasic | 标签为 | 留下评论

H3C三层交换机配置命令

H3C三层交换机配置命令
[H3C]dis cur ;显示当前配置
[H3C]display current-configuration ;显示当前配置
[H3C]display interfaces ;显示接口信息
[H3C]display vlan all ;显示路由信息
[H3C]display version ;显示版本信息
[H3C]super password ;修改特权用户密码
[H3C]sysname ;交换机命名
[H3C]interface ethernet 0/1 ;进入接口视图
[H3C]interface vlan x ;进入接口视图
[H3C-Vlan-interfacex]ip address 10.65.1.1 255.255.0.0 ;配置VLAN的IP地址
[H3C]ip route-static 0.0.0.0 0.0.0.0 10.65.1.2 ;静态路由=网关
[H3C]rip ;三层交换支持
[H3C]local-user ftp 增加用户名
[H3C]user-interface vty 0 4 ;进入虚拟终端
[S3026-ui-vty0-4]authentication-mode password ;设置口令模式
[S3026-ui-vty0-4]set authentication-mode password simple 222 ;设置口令
[S3026-ui-vty0-4]user privilege level 3 ;用户级别
[H3C]interface ethernet 0/1 ;进入端口模式
[H3C]int e0/1 ;进入端口模式
[H3C-Ethernet0/1]duplex {half|full|auto} ;配置端口工作状态
[H3C-Ethernet0/1]speed {10|100|auto} ;配置端口工作速率
[H3C-Ethernet0/1]flow-control ;配置端口流控
[H3C-Ethernet0/1]mdi {across|auto|normal} ;配置端口平接扭接
[H3C-Ethernet0/1]port link-type {trunk|access|hybrid} ;设置端口工作模式
[H3C-Ethernet0/1]port access vlan 3 ;当前端口加入到VLAN
[H3C-Ethernet0/2]port trunk permit vlan {ID|All} ;设trunk允许的VLAN
[H3C-Ethernet0/3]port trunk pvid vlan 3 ;设置trunk端口的PVID
[H3C-Ethernet0/1]undo shutdown ;激活端口
[H3C-Ethernet0/1]shutdown ;关闭端口
[H3C-Ethernet0/1]quit ;返回
[H3C]vlan 3 ;创建VLAN
[H3C-vlan3]port ethernet 0/1 ;在VLAN中增加端口
[H3C-vlan3]port e0/1 ;简写方式
[H3C-vlan3]port ethernet 0/1 to ethernet 0/4 ;在VLAN中增加端口
[H3C-vlan3]port e0/1 to e0/4 ;简写方式
[H3C]monitor-port <interface_type interface_num> ;指定镜像端口
[H3C]port mirror <interface_type interface_num> ;指定被镜像端口
[H3C]port mirror int_list observing-port int_type int_num ;指定镜像和被镜像
[H3C]description string ;指定VLAN描述字符
[H3C]description ;删除VLAN描述字符
[H3C]display vlan [vlan_id] ;查看VLAN设置
[H3C]stp {enable|disable} ;设置生成树,默认关闭
[H3C]stp priority 4096 ;设置交换机的优先级
[H3C]stp root {primary|secondary} ;设置为根或根的备份
[H3C-Ethernet0/1]stp cost 200 ;设置交换机端口的花费
[H3C]link-aggregation e0/1 to e0/4 ingress|both ; 端口的聚合
[H3C]undo link-aggregation e0/1|all ; 始端口为通道号
[SwitchA-vlanx]isolate-user-vlan enable ;设置主vlan
[SwitchA]isolate-user-vlan <x> secondary <list> ;设置主vlan包括的子vlan
[H3C-Ethernet0/2]port hybrid pvid vlan <id> ;设置vlan的pvid
[H3C-Ethernet0/2]port hybrid pvid ;删除vlan的pvid
[H3C-Ethernet0/2]port hybrid vlan vlan_id_list untagged ;设置无标识的vlan
如果包的vlan id与PVId一致,则去掉vlan信息. 默认PVID=1。
所以设置PVID为所属vlan id, 设置可以互通的vlan为untagged.

发表在 H3C | 标签为 | 留下评论

linux命令行使用curl获取外网IP方法

linux命令行使用curl获取外网IP方法:

[root@n1 ~]# curl ipinfo.io
{
“ip”: “182.139.182.78”,
“city”: “Zitong”,
“region”: “Sichuan”,
“country”: “CN”,
“loc”: “30.7502,103.6966”,
“org”: “AS4134 CHINANET-BACKBONE”,
“timezone”: “Asia/Shanghai”,
“readme”: “https://ipinfo.io/missingauth”
}

[root@n1 ~]# curl https://ip.cn
{“ip”: “182.139.182.78”, “country”: “四川省成都市”, “city”: “电信”}

[root@n1 ~]# curl cip.cc
IP : 182.139.182.78
地址 : 中国 四川 成都
运营商 : 电信

数据二 : 四川省成都市 | 电信

数据三 : 中国四川省成都市 | 电信

URL : http://www.cip.cc/182.139.182.78

[root@n1 ~]# curl myip.ipip.net
当前 IP:182.139.182.78 来自于:中国 四川 成都 电信

[root@n1 ~]# curl ifconfig.me
182.139.182.78

[root@n1 ~]# curl http://members.3322.org/dyndns/getip
182.139.182.78

[root@n1 ~]# curl ipv4.icanhazip.com
182.139.182.78

网址如下:
ip.cn
ipinfo.io
cip.cc
ifconfig.me
myip.ipip.net

ipv4.icanhazip.com(推荐这个,速度最快,其他基本是国内的)

发表在 LinuxBasic | 标签为 | 留下评论

Nginx通过二级目录(路径)映射不同的反向代理

转载自https://blog.csdn.net/maliao1123/article/details/53909006

①、同一个域名需要反向代理到前台和后台(不同机器和端口);

②、需要采用IP+端口的模式,嵌入到APP作为DNS污染后的备选方案。

server {
listen 80;
server_name demo.domain.com;
#通过访问service二级目录来访问后台
location /service/ {
#DemoBackend1后面的斜杠是一个关键,没有斜杠的话就会传递service到后端节点导致404
proxy_pass http://DemoBackend1/;
proxy_redirect off;
proxy_set_header Host $host;
proxy_set_header X-Real-IP $remote_addr;
proxy_set_header X-Forwarded-For $proxy_add_x_forwarded_for;
}
#其他路径默认访问前台网站
location / {
proxy_pass http://DemoBackend2;
proxy_redirect off;
proxy_set_header Host $host;
proxy_set_header X-Real-IP $remote_addr;
proxy_set_header X-Forwarded-For $proxy_add_x_forwarded_for;
}
}

#简单的负载均衡节点配置
upstream DemoBackend1 {
server 192.168.1.1;
server 192.168.1.2;
ip_hash;
}
upstream DemoBackend2 {
server 192.168.2.1;
server 192.168.2.2;
ip_hash;
}

#新增的IP映射配置
server {
listen 80;
server_name 192.168.1.10 192.168.2.10 192.168.3.10;
location /mail_api/ {
proxy_pass http://DemoBackend/; #后面的斜杠不能少,作用是不往后端传递/mail-api 这个路径
proxy_redirect off;
proxy_set_header Host mailapi.domain.com; #传递不同的host给后方节点,实现IP和域名均可以访问
proxy_set_header X-Real-IP $remote_addr;
proxy_set_header X-Forwarded-For $proxy_add_x_forwarded_for;
}
location /other_api1/ {
proxy_pass http://DemoBackend/;
proxy_redirect off;
proxy_set_header Host otherapi1.domain.com;
proxy_set_header X-Real-IP $remote_addr;
proxy_set_header X-Forwarded-For $proxy_add_x_forwarded_for;
}
#还可以添加更多映射,通过不同的路径来映射不同的API,最后对于直接访问IP则返回403,防网络上的扫码探测
location / {
return 403;
}
}

#原有的域名映射
server {
listen 80;
server_name mailapi.domain.com;
location / {
proxy_pass http://DemoBackend;
proxy_redirect off;
proxy_set_header Host $host;
proxy_set_header X-Real-IP $remote_addr;
proxy_set_header X-Forwarded-For $proxy_add_x_forwarded_for;
}
}
server {
listen 80;
server_name otherapi1.domain.com;
location / {
proxy_pass http://DemoBackend;
proxy_redirect off;
proxy_set_header Host $host;
proxy_set_header X-Real-IP $remote_addr;
proxy_set_header X-Forwarded-For $proxy_add_x_forwarded_for;
}
}
#简单的节点配置(当这些API都用到同一个Backend时,上述代码中的proxy_set_header传递的host就起到了关键性作用!)
upstream DemoBackend {
server 192.168.10.1;
server 192.168.10.2;
ip_hash;
}
最终实现的效果就是:你要通过IP请求邮件API,只要请求 http://192.168.1.1/mail_api/ 即可,而不需要开放多余端口。而且,后续要新增更多API,只需要定义不同的二级路径即可,这些二级路径的辨识度可比端口要好得多!

Ps:正如代码中的注释,示例代码只用了一个 DemoBackend 节点配置,为的是分享另一个小技巧:当后端节点承载了多个站点而且都是监听80端口时(比如某些小公司同一个IIS服务器部署了N个站点),反向代理中的proxy_set_header参数,可以自定义传递一个host域名给后端节点,从而正确响应预期内容!

我之前供职的公司节点用的是IIS服务器,前端用Nginx反向代理,IIS服务器上有多个站点,站点之间部分会通过 rewrite 规则联系起来。

打个比方:比如A网站有个专题内容(www.a.com/zt/)是通过IIS伪静态映射到了B网站(content.b.com)。也就是访问到http://www.a.com/zt/,其实最后是通过A网站映射到了B网站上面。

后来发现IIS有个伪静态BUG,会经常奔溃,就要我用前端的Nginx来实现直接映射,而不再走IIS的A网站中转。

那么这个需求就正好用到了 proxy_set_header 技巧,一看就懂:

Shell
server {
listen 80;
server_name www.a.com;
location /zt/ {
proxy_pass http://ABackend; #都是相同的节点,此示例代码我就不写upstream了
proxy_redirect off;
proxy_set_header Host www.b.com; #这里就是关键性作用,传递b域名给后端IIS
proxy_set_header X-Real-IP $remote_addr;
proxy_set_header X-Forwarded-For $proxy_add_x_forwarded_for;
}
}

#upstream略..
很明显,通过传递自定义域名,就可以实现通过A网站访问Nginx,返回B网站内容,和反向代理谷歌的原理是一致的。

当然,上文为了实现 IP 和域名都可以访问,这个proxy_set_header 设置也是必须的。说白了就是在反代过程中,对后端服务器伪装(传递)了一个自定域名,让后端响应该域名预期内容。

发表在 Nginx | 标签为 | 留下评论

宝塔面板部署NextCloud逐一解决后台安全及设置警告

这个博主有很多关于nextcloud的资料,我只是转载一下:

宝塔面板部署NextCloud逐一解决后台安全及设置警告

发表在 Nextcloud | 标签为 | 留下评论

qcow2格式中lazy_refcounts的作用

原文地址:https://lists.gnu.org/archive/html/qemu-devel/2012-06/msg03825.html

[Qemu-devel] [RFC 5/7] qcow2: implement lazy refcounts


From: Stefan Hajnoczi
Subject: [Qemu-devel] [RFC 5/7] qcow2: implement lazy refcounts
Date: Fri, 22 Jun 2012 16:08:44 +0100

Lazy refcounts is a performance optimization for qcow2 that postpones
refcount metadata updates and instead marks the image dirty.  In the
case of crash or power failure the image will be left in a dirty state
and repaired next time it is opened.

Reducing metadata I/O is important for cache=writethrough and
cache=directsync because these modes guarantee that data is on disk
after each write (hence we cannot take advantage of caching updates in
RAM).  Refcount metadata is not needed for guest->file block address
translation and therefore does not need to be on-disk at the time of
write completion - this is the motivation behind the lazy refcount
optimization.

The lazy refcount optimization must be enabled at image creation time:

  qemu-img create -f qcow2 -o compat=1.1,lazy_refcounts=on a.qcow2 10G
  qemu-system-x86_64 -drive if=virtio,file=a.qcow2,cache=writethrough

Signed-off-by: Stefan Hajnoczi <address@hidden>
---
 block/qcow2-cluster.c |    5 +++-
 block/qcow2.c         |   67 ++++++++++++++++++++++++++++++++++++++++++++++---
 block/qcow2.h         |    8 ++++++
 block_int.h           |   26 ++++++++++---------
 4 files changed, 89 insertions(+), 17 deletions(-)

diff --git a/block/qcow2-cluster.c b/block/qcow2-cluster.c
index d7e0e19..e179211 100644
--- a/block/qcow2-cluster.c
+++ b/block/qcow2-cluster.c
@@ -662,7 +662,10 @@ int qcow2_alloc_cluster_link_l2(BlockDriverState *bs, 
QCowL2Meta *m)
         qcow2_cache_depends_on_flush(s->l2_table_cache);
     }
 
-    qcow2_cache_set_dependency(bs, s->l2_table_cache, s->refcount_block_cache);
+    if (qcow2_need_accurate_refcounts(s)) {
+        qcow2_cache_set_dependency(bs, s->l2_table_cache,
+                                   s->refcount_block_cache);
+    }
     ret = get_cluster_table(bs, m->offset, &l2_table, &l2_index);
     if (ret < 0) {
         goto err;
diff --git a/block/qcow2.c b/block/qcow2.c
index cc30784..b54955c 100644
--- a/block/qcow2.c
+++ b/block/qcow2.c
@@ -215,6 +215,40 @@ static void report_unsupported_feature(BlockDriverState 
*bs,
 }
 
 /*
+ * Sets the dirty bit and flushes afterwards if necessary.
+ *
+ * The incompatible_features bit is only set if the image file header was
+ * updated successfully.  Therefore it is not required to check the return
+ * value of this function.
+ */
+static int qcow2_mark_dirty(BlockDriverState *bs)
+{
+    BDRVQcowState *s = bs->opaque;
+    uint64_t val;
+    int ret;
+
+    if (s->incompatible_features & QCOW2_INCOMPATIBLE_FEAT_DIRTY) {
+        return 0; /* already dirty */
+    }
+
+    val = cpu_to_be64(s->incompatible_features |
+                      QCOW2_INCOMPATIBLE_FEAT_DIRTY);
+    ret = bdrv_pwrite(bs->file, offsetof(QCowHeader, incompatible_features),
+                      &val, sizeof(val));
+    if (ret < 0) {
+        return ret;
+    }
+    ret = bdrv_flush(bs->file);
+    if (ret < 0) {
+        return ret;
+    }
+
+    /* Only treat image as dirty if the header was updated successfully */
+    s->incompatible_features |= QCOW2_INCOMPATIBLE_FEAT_DIRTY;
+    return 0;
+}
+
+/*
  * Clears the dirty bit and flushes before if necessary.  Only call this
  * function when there are no pending requests, it does not guard against
  * concurrent requests dirtying the image.
@@ -755,6 +789,11 @@ static coroutine_fn int qcow2_co_writev(BlockDriverState 
*bs,
             goto fail;
         }
 
+        if (l2meta.nb_clusters > 0 &&
+            (s->compatible_features & QCOW2_COMPATIBLE_FEAT_LAZY_REFCOUNTS)) {
+            qcow2_mark_dirty(bs);
+        }
+
         cluster_offset = l2meta.cluster_offset;
         assert((cluster_offset & 511) == 0);
 
@@ -1175,6 +1214,11 @@ static int qcow2_create2(const char *filename, int64_t 
total_size,
         header.crypt_method = cpu_to_be32(QCOW_CRYPT_NONE);
     }
 
+    if (flags & BLOCK_FLAG_LAZY_REFCOUNTS) {
+        header.compatible_features |=
+            cpu_to_be64(QCOW2_COMPATIBLE_FEAT_LAZY_REFCOUNTS);
+    }
+
     ret = bdrv_pwrite(bs, 0, &header, sizeof(header));
     if (ret < 0) {
         goto out;
@@ -1288,6 +1332,8 @@ static int qcow2_create(const char *filename, 
QEMUOptionParameter *options)
                     options->value.s);
                 return -EINVAL;
             }
+        } else if (!strcmp(options->name, BLOCK_OPT_LAZY_REFCOUNTS)) {
+            flags |= options->value.n ? BLOCK_FLAG_LAZY_REFCOUNTS : 0;
         }
         options++;
     }
@@ -1298,6 +1344,12 @@ static int qcow2_create(const char *filename, 
QEMUOptionParameter *options)
         return -EINVAL;
     }
 
+    if (version < 3 && (flags & BLOCK_FLAG_LAZY_REFCOUNTS)) {
+        fprintf(stderr, "Lazy refcounts only supported with compatibility "
+                "level 1.1 and above (use compat=1.1 or greater)\n");
+        return -EINVAL;
+    }
+
     return qcow2_create2(filename, sectors, backing_file, backing_fmt, flags,
                          cluster_size, prealloc, options, version);
 }
@@ -1484,10 +1536,12 @@ static coroutine_fn int 
qcow2_co_flush_to_os(BlockDriverState *bs)
         return ret;
     }
 
-    ret = qcow2_cache_flush(bs, s->refcount_block_cache);
-    if (ret < 0) {
-        qemu_co_mutex_unlock(&s->lock);
-        return ret;
+    if (qcow2_need_accurate_refcounts(s)) {
+        ret = qcow2_cache_flush(bs, s->refcount_block_cache);
+        if (ret < 0) {
+            qemu_co_mutex_unlock(&s->lock);
+            return ret;
+        }
     }
     qemu_co_mutex_unlock(&s->lock);
 
@@ -1602,6 +1656,11 @@ static QEMUOptionParameter qcow2_create_options[] = {
         .type = OPT_STRING,
         .help = "Preallocation mode (allowed values: off, metadata)"
     },
+    {
+        .name = BLOCK_OPT_LAZY_REFCOUNTS,
+        .type = OPT_FLAG,
+        .help = "Postpone refcount updates",
+    },
     { NULL }
 };
 
diff --git a/block/qcow2.h b/block/qcow2.h
index 5c7cfb6..b8c0beb 100644
--- a/block/qcow2.h
+++ b/block/qcow2.h
@@ -111,6 +111,9 @@ enum {
 
     QCOW2_INCOMPATIBLE_FEAT_DIRTY   = 0x1,
     QCOW2_INCOMPATIBLE_FEAT_MASK    = QCOW2_INCOMPATIBLE_FEAT_DIRTY,
+
+    QCOW2_COMPATIBLE_FEAT_LAZY_REFCOUNTS = 0x1,
+    QCOW2_COMPATIBLE_FEAT_MASK      = QCOW2_COMPATIBLE_FEAT_LAZY_REFCOUNTS,
 };
 
 typedef struct Qcow2Feature {
@@ -240,6 +243,11 @@ static inline int qcow2_get_cluster_type(uint64_t l2_entry)
     }
 }
 
+/* Check whether refcounts are eager or lazy */
+static inline bool qcow2_need_accurate_refcounts(BDRVQcowState *s)
+{
+    return !(s->incompatible_features & QCOW2_INCOMPATIBLE_FEAT_DIRTY);
+}
 
 // FIXME Need qcow2_ prefix to global functions
 
diff --git a/block_int.h b/block_int.h
index 1fb5352..733aa71 100644
--- a/block_int.h
+++ b/block_int.h
@@ -31,8 +31,9 @@
 #include "qemu-timer.h"
 #include "qapi-types.h"
 
-#define BLOCK_FLAG_ENCRYPT     1
-#define BLOCK_FLAG_COMPAT6     4
+#define BLOCK_FLAG_ENCRYPT          1
+#define BLOCK_FLAG_COMPAT6          4
+#define BLOCK_FLAG_LAZY_REFCOUNTS   8
 
 #define BLOCK_IO_LIMIT_READ     0
 #define BLOCK_IO_LIMIT_WRITE    1
@@ -41,16 +42,17 @@
 #define BLOCK_IO_SLICE_TIME     100000000
 #define NANOSECONDS_PER_SECOND  1000000000.0
 
-#define BLOCK_OPT_SIZE          "size"
-#define BLOCK_OPT_ENCRYPT       "encryption"
-#define BLOCK_OPT_COMPAT6       "compat6"
-#define BLOCK_OPT_BACKING_FILE  "backing_file"
-#define BLOCK_OPT_BACKING_FMT   "backing_fmt"
-#define BLOCK_OPT_CLUSTER_SIZE  "cluster_size"
-#define BLOCK_OPT_TABLE_SIZE    "table_size"
-#define BLOCK_OPT_PREALLOC      "preallocation"
-#define BLOCK_OPT_SUBFMT        "subformat"
-#define BLOCK_OPT_COMPAT_LEVEL  "compat"
+#define BLOCK_OPT_SIZE              "size"
+#define BLOCK_OPT_ENCRYPT           "encryption"
+#define BLOCK_OPT_COMPAT6           "compat6"
+#define BLOCK_OPT_BACKING_FILE      "backing_file"
+#define BLOCK_OPT_BACKING_FMT       "backing_fmt"
+#define BLOCK_OPT_CLUSTER_SIZE      "cluster_size"
+#define BLOCK_OPT_TABLE_SIZE        "table_size"
+#define BLOCK_OPT_PREALLOC          "preallocation"
+#define BLOCK_OPT_SUBFMT            "subformat"
+#define BLOCK_OPT_COMPAT_LEVEL      "compat"
+#define BLOCK_OPT_LAZY_REFCOUNTS    "lazy_refcounts"
 
 typedef struct BdrvTrackedRequest BdrvTrackedRequest;
 
-- 
1.7.10
发表在 kvm | 标签为 | 留下评论

ELK7.3部署与使用-4.filebeat+redis收集nginx访问日志

四、收集NGINX访问
1.1部署nginx服务
自己搞
1.2编辑nginx页面
自己搞
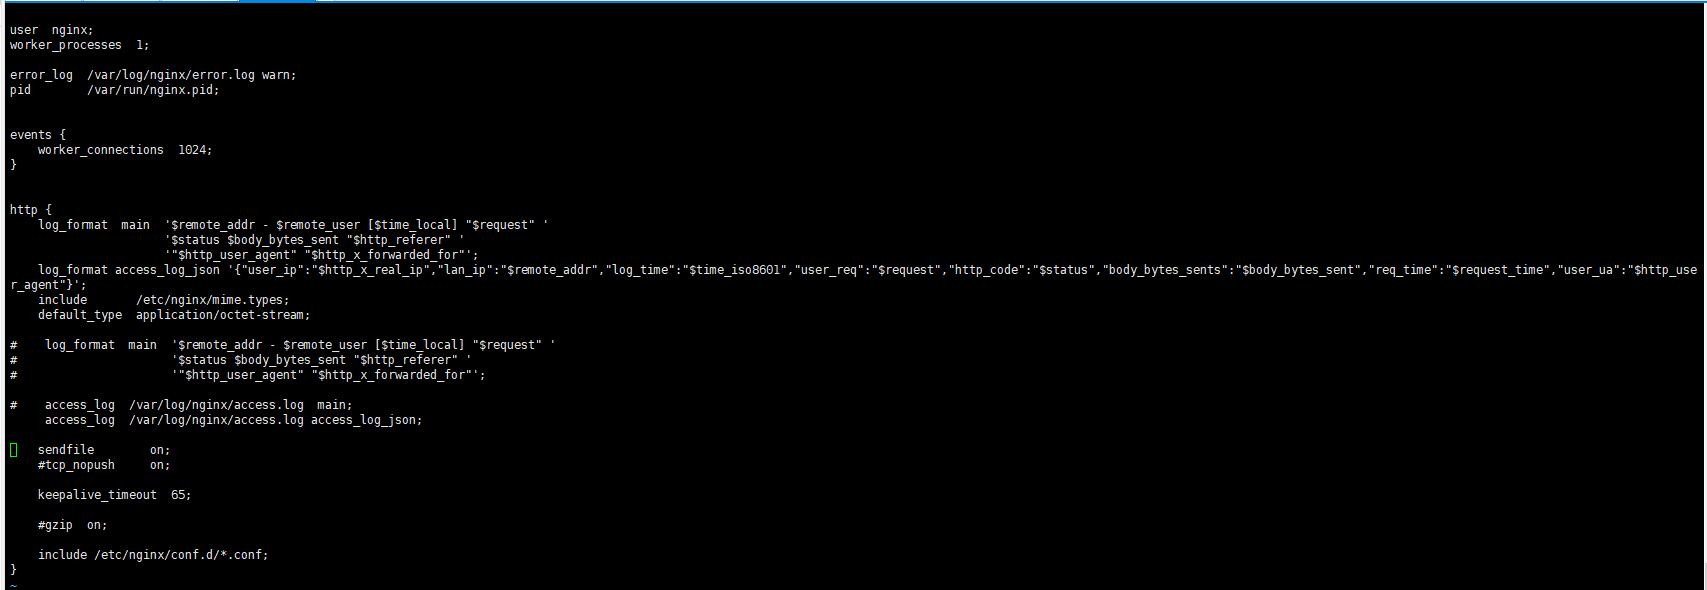
1.3将nginx日志转换为json格式
[root@n8 nginx]# cat /etc/nginx/nginx.conf

user nginx;
worker_processes 1;

error_log /var/log/nginx/error.log warn;
pid /var/run/nginx.pid;

events {
worker_connections 1024;
}

http {
log_format main '$remote_addr - $remote_user [$time_local] "$request" '
'$status $body_bytes_sent "$http_referer" '
'"$http_user_agent" "$http_x_forwarded_for"';
log_format access_log_json '{"user_ip":"$http_x_real_ip","lan_ip":"$remote_addr","log_time":"$time_iso8601","user_req":"$request","http_code":"$status","body_bytes_sents":"$body_bytes_sent","req_time":"$request_time","user_ua":"$http_user_agent"}';
include /etc/nginx/mime.types;
default_type application/octet-stream;

# log_format main '$remote_addr - $remote_user [$time_local] "$request" '
# '$status $body_bytes_sent "$http_referer" '
# '"$http_user_agent" "$http_x_forwarded_for"';

# access_log /var/log/nginx/access.log main;
access_log /var/log/nginx/access.log access_log_json;

sendfile on;
#tcp_nopush on;

keepalive_timeout 65;

#gzip on;

include /etc/nginx/conf.d/*.conf;
}

1.4测试和验证
[root@n8 nginx]# nginx -t
nginx: the configuration file /etc/nginx/nginx.conf syntax is ok
nginx: configuration file /etc/nginx/nginx.conf test is successful
[root@n8 nginx]# nginx -s reload
[root@n8 nginx]# ss -ntlp | grep 80
LISTEN 0 128 *:80 *:* users:(("nginx",pid=18349,fd=6),("nginx",pid=17863,fd=6))
LISTEN 0 128 127.0.0.1:8081 *:* users:(("docker-proxy",pid=1574,fd=4))
LISTEN 0 80 :::3306 :::* users:(("mysqld",pid=1690,fd=19))
随便访问一下,或者用ab测试一下,然后确认日志格式
[root@n8 nginx]# tail -f /var/log/nginx/access.log
{"user_ip":"-","lan_ip":"10.1.24.253","log_time":"2019-08-22T18:00:36+08:00","user_req":"GET / HTTP/1.1","http_code":"304","body_bytes_sents":"0","req_time":"0.000","user_ua":"Mozilla/5.0 (Windows NT 10.0; Win64; x64; rv:68.0) Gecko/20100101 Firefox/68.0"}
{"user_ip":"-","lan_ip":"10.1.24.253","log_time":"2019-08-22T18:00:37+08:00","user_req":"GET / HTTP/1.1","http_code":"304","body_bytes_sents":"0","req_time":"0.000","user_ua":"Mozilla/5.0 (Windows NT 10.0; Win64; x64; rv:68.0) Gecko/20100101 Firefox/68.0"}
{"user_ip":"-","lan_ip":"10.1.24.253","log_time":"2019-08-22T18:00:38+08:00","user_req":"GET / HTTP/1.1","http_code":"304","body_bytes_sents":"0","req_time":"0.000","user_ua":"Mozilla/5.0 (Windows NT 10.0; Win64; x64; rv:68.0) Gecko/20100101 Firefox/68.0"}
{"user_ip":"-","lan_ip":"10.1.24.253","log_time":"2019-08-22T18:00:40+08:00","user_req":"GET / HTTP/1.1","http_code":"304","body_bytes_sents":"0","req_time":"0.000","user_ua":"Mozilla/5.0 (Windows NT 10.0; Win64; x64; rv:68.0) Gecko/20100101 Firefox/68.0"}
{"user_ip":"-","lan_ip":"10.1.24.253","log_time":"2019-08-22T18:00:43+08:00","user_req":"GET /dsafh HTTP/1.1","http_code":"404","body_bytes_sents":"153","req_time":"0.000","user_ua":"Mozilla/5.0 (Windows NT 10.0; Win64; x64; rv:68.0) Gecko/20100101 Firefox/68.0"}
{"user_ip":"-","lan_ip":"10.1.24.253","log_time":"2019-08-22T18:00:50+08:00","user_req":"GET /status HTTP/1.1","http_code":"404","body_bytes_sents":"153","req_time":"0.000","user_ua":"Mozilla/5.0 (Windows NT 10.0; Win64; x64; rv:68.0) Gecko/20100101 Firefox/68.0"}

至此,nginx部署完成

2、部署redis
我笔记本内存有限,本来想每个节点部署一个服务,现在看来不行,我想了一下把redis放在logstash节点吧,然后我现在列一下每个节点已有的服务
10.1.24.172 n5 elasticsearch head
10.1.24.57 n6 elasticsearch
10.1.24.71 n7 logstash redis
10.1.24.186 n8 kibana nginx

我是源码安装的redis,epel源上的版本太老是3.0,现在最新的是5.0,你按你自己的喜好
[root@n7 ~]# wget http://download.redis.io/releases/redis-5.0.5.tar.gz
--2019-08-22 18:48:07-- http://download.redis.io/releases/redis-5.0.5.tar.gz
Resolving download.redis.io (download.redis.io)... 109.74.203.151
Connecting to download.redis.io (download.redis.io)|109.74.203.151|:80... connected.
HTTP request sent, awaiting response... 200 OK
Length: 1975750 (1.9M) [application/x-gzip]
Saving to: ‘redis-5.0.5.tar.gz’

100%[=======================================================================================================================================================================================================>] 1,975,750 342KB/s in 8.4s

2019-08-22 18:48:17 (230 KB/s) - ‘redis-5.0.5.tar.gz’ saved [1975750/1975750]

[root@n7 ~]# ll
total 170796
-rw-------. 1 root root 1331 Jul 14 17:40 anaconda-ks.cfg
-rw-r--r-- 1 root root 172911005 Aug 22 11:35 logstash-7.3.0.rpm
-rw-r--r-- 1 root root 1975750 May 16 00:26 redis-5.0.5.tar.gz
[root@n7 ~]# tar -xf redis-5.0.5.tar.gz -C /usr/local/
[root@n7 ~]# cd /usr/local/
[root@n7 local]# ls
bin etc games include lib lib64 libexec redis-5.0.5 sbin share src
[root@n7 local]# mv redis-5.0.5/ redis
[root@n7 local]# ls
bin etc games include lib lib64 libexec redis sbin share src
[root@n7 local]# cd redis/
[root@n7 redis]# ls
00-RELEASENOTES BUGS CONTRIBUTING COPYING deps INSTALL Makefile MANIFESTO README.md redis.conf runtest runtest-cluster runtest-moduleapi runtest-sentinel sentinel.conf src tests utils
[root@n7 redis]# make
cd src && make all
make出错的,自己检查依赖
[root@n7 redis]# yum install gcc gcc-c++ automake pcre pcre-devel zlip zlib-devel openssl openssl-devel
我的也报错,但是是分配器的问题
[root@n7 redis]# make
cd src && make all
make[1]: Entering directory `/usr/local/redis/src'
CC Makefile.dep
make[1]: Leaving directory `/usr/local/redis/src'
make[1]: Entering directory `/usr/local/redis/src'
CC adlist.o
In file included from adlist.c:34:0:
zmalloc.h:50:31: fatal error: jemalloc/jemalloc.h: No such file or directory
#include <jemalloc/jemalloc.h>
^
compilation terminated.
make[1]: *** [adlist.o] Error 1
make[1]: Leaving directory `/usr/local/redis/src'
make: *** [all] Error 2

指定分配器,就OK了
[root@n7 redis]# make MALLOC=libc
cd src && make all
all/article/details/45914867make[1]: Entering directory `/usr/local/redis/src’
rm -rf redis-server redis-sentinel redis-cli redis-benchmark redis-check-rdb redis-check-aof *.o *.gcda *.gcno *.gcov redis.info lcov-html Makefile.dep dict-benchmark
(cd ../deps && make distclean)
make[2]: Entering directory `/usr/local/redis/deps’
(cd hiredis && make clean) > /dev/null || true
(cd linenoise && make clean) > /dev/null || true
(cd lua && make clean) > /dev/null || true
——————-
Hint: It’s a good idea to run ‘make test’ 😉

这个可以去查README
Allocator  
———  
 
Selecting a non-default memory allocator when building Redis is done by setting  
the `MALLOC` environment variable. Redis is compiled and linked against libc  
malloc by default, with the exception of jemalloc being the default on Linux  
systems. This default was picked because jemalloc has proven to have fewer  
fragmentation problems than libc malloc.  
 
To force compiling against libc malloc, use:  
 
    % make MALLOC=libc  
 
To compile against jemalloc on Mac OS X systems, use:  
 
    % make MALLOC=jemalloc

说关于分配器allocator, 如果有MALLOC  这个 环境变量, 会有用这个环境变量的 去建立Redis。
而且libc 并不是默认的 分配器, 默认的是 jemalloc, 因为 jemalloc 被证明 有更少的 fragmentation problems 比libc。
但是如果你又没有jemalloc 而只有 libc 当然 make 出错。 所以加这么一个参数。

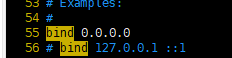
修改redis配置文件,可以看到新版本的redis默认做了很多优化
[root@n7 redis]# grep -v “^#” redis.conf | grep -v “^$”
bind 0.0.0.0
protected-mode yes
port 6379
tcp-backlog 511
timeout 0
tcp-keepalive 300
daemonize no
supervised no
pidfile /var/run/redis_6379.pid
loglevel notice
logfile “”
databases 16
always-show-logo yes
save 900 1
save 300 10
save 60 10000
stop-writes-on-bgsave-error yes
rdbcompression yes
rdbchecksum yes
dbfilename dump.rdb
dir ./
replica-serve-stale-data yes
replica-read-only yes
repl-diskless-sync no
repl-diskless-sync-delay 5
repl-disable-tcp-nodelay no
replica-priority 100
lazyfree-lazy-eviction no
lazyfree-lazy-expire no
lazyfree-lazy-server-del no
replica-lazy-flush no
appendonly no
appendfilename “appendonly.aof”
appendfsync everysec
no-appendfsync-on-rewrite no
auto-aof-rewrite-percentage 100
auto-aof-rewrite-min-size 64mb
aof-load-truncated yes
aof-use-rdb-preamble yes
lua-time-limit 5000
slowlog-log-slower-than 10000
slowlog-max-len 128
latency-monitor-threshold 0
notify-keyspace-events “”
hash-max-ziplist-entries 512
hash-max-ziplist-value 64
list-max-ziplist-size -2
list-compress-depth 0
set-max-intset-entries 512
zset-max-ziplist-entries 128
zset-max-ziplist-value 64
hll-sparse-max-bytes 3000
stream-node-max-bytes 4096
stream-node-max-entries 100
activerehashing yes
client-output-buffer-limit normal 0 0 0
client-output-buffer-limit replica 256mb 64mb 60
client-output-buffer-limit pubsub 32mb 8mb 60
hz 10
dynamic-hz yes
aof-rewrite-incremental-fsync yes
rdb-save-incremental-fsync yes

把bind这一行改为0.0.0.0

设置快捷方式
[root@n7 redis]# ln -sv /usr/local/redis/src/redis-server /usr/bin/
‘/usr/bin/redis-server’ -> ‘/usr/local/redis/src/redis-server’
[root@n7 redis]# ln -sv /usr/local/redis/src/redis-cli /usr/bin/
‘/usr/bin/redis-cli’ -> ‘/usr/local/redis/src/redis-cli’
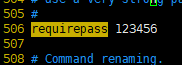
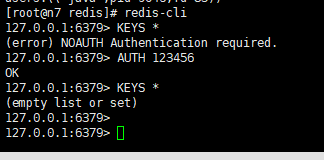
设置redis访问密码
生产环境必须设置redis连接密码,直接改配置文件

启动redis
redis-server /usr/local/redis/redis.conf &

如果没有配置为service服务,可以通过以下方式重启
[root@linux-host6 redis]# /usr/bin/redis-cli shutdown
[root@linux-host6 redis]# /usr/bin/redis-server /usr/local/redis/redis.conf

配置了密码,需要认证,否则没法操作
[root@n7 redis]# redis-cli
127.0.0.1:6379> KEYS *
(error) NOAUTH Authentication required.
127.0.0.1:6379> AUTH 123456
OK
127.0.0.1:6379> KEYS *
(empty list or set)
127.0.0.1:6379>

3nginx服务器安装filebeat
我是在kibana上面安装的nginx,我们切换到kibana服务器
filebeat我已经提前下好了,你自己去官网去下,注意版本号要一致
[root@n7 ~]# ll
total 195240
-rw——-. 1 root root 1331 Jul 14 17:40 anaconda-ks.cfg
-rw-r–r– 1 root root 25029215 Aug 22 19:24 filebeat-7.3.0-x86_64.rpm
-rw-r–r– 1 root root 172911005 Aug 22 11:35 logstash-7.3.0.rpm
-rw-r–r– 1 root root 1975750 May 16 00:26 redis-5.0.5.tar.gz
[root@n7 ~]# yum install -y filebeat-7.3.0-x86_64.rpm

filebeat收集nginx日志,并写入redis
Filebeat 支持将数据直接写入到 redis 服务器,本步骤为写入到 redis 当中的一个可以,另外 filebeat 还支持写入到 elasticsearch、logstash 等服务器。
[root@n7 ~]# grep -v “#” /etc/filebeat/filebeat.yml | grep -v “^$”
filebeat.inputs:
– type: log
enabled: false
paths:
– /var/log/*.log
exclude_lines: [‘^DBG’,”^$”]
exclude_files: [‘.gz$’]
document_type: “nginx-log”
filebeat.config.modules:
path: ${path.config}/modules.d/*.yml
reload.enabled: false
setup.template.settings:
index.number_of_shards: 1
setup.kibana:
setup.kibana:
output.redis:
hosts: [“10.1.24.71:6379”]
key: “nginx-log”
db: 4
timeout: 5
password:123456
processors:
– add_host_metadata: ~
– add_cloud_metadata: ~

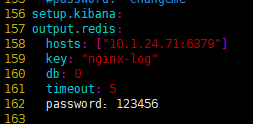
注意是要增加redis的配置,注释掉elasticsearch的配置

启动filebeat
[root@n8 ~]# systemctl start filebeat
[root@n8 ~]# systemctl enable filebeat
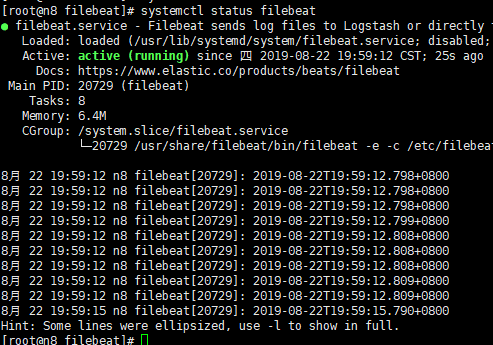
[root@n8 ~]# systemctl status filebeat
我第一次启动报错了,但是坑爹的是看不到日志

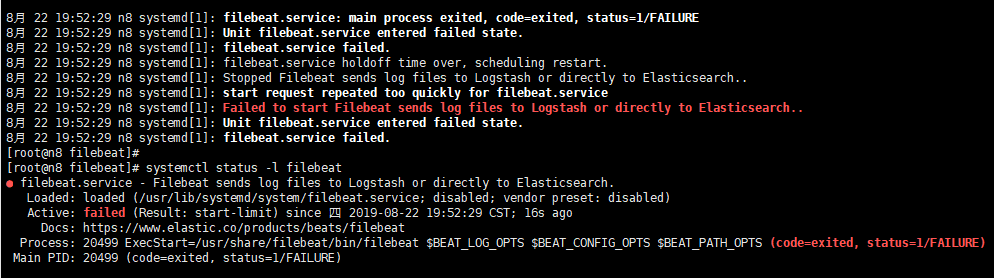
光看这个有毛用啊,后来网上搜了一下,需要到/var/log/message去查看日志

看到没,日志提示我162行出错,果然我把冒号:写成中文状态的冒号了,难怪说没有变颜色,改回来,重启服务就OK了

用浏览器访问nginx,首先确认nginx要有日志,我就是大意了,没访问nginx本来就没日志,我还去redis查半天
[root@n8 filebeat]# systemctl restart nginx
[root@n8 filebeat]# tail -f /var/log/nginx/access.log
{“user_ip”:”-“,”lan_ip”:”192.168.131.1″,”log_time”:”2019-08-23T12:56:35+08:00″,”user_req”:”GET / HTTP/1.1″,”http_code”:”304″,”body_bytes_sents”:”0″,”req_time”:”0.000″,”user_ua”:”Mozilla/5.0 (Windows NT 10.0; Win64; x64; rv:68.0) Gecko/20100101 Firefox/68.0″}
{“user_ip”:”-“,”lan_ip”:”192.168.131.1″,”log_time”:”2019-08-23T12:56:37+08:00″,”user_req”:”GET / HTTP/1.1″,”http_code”:”304″,”body_bytes_sents”:”0″,”req_time”:”0.000″,”user_ua”:”Mozilla/5.0 (Windows NT 10.0; Win64; x64; rv:68.0) Gecko/20100101 Firefox/68.0″}
确认nginx有日志之后,再去redis去查

注意,下面的日志我改动过了,改动的db是4
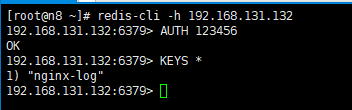
[root@n8 ~]# redis-cli -h 192.168.131.132
192.168.131.132:6379> AUTH 123456
OK
192.168.131.132:6379> KEYS *
1) “nginx-log”
192.168.131.132:6379>

注意选择的DB要和你在filebeat里面写入的库要一致

4、logstash服务器读取redis上存储的日志
4.1配置收集规则
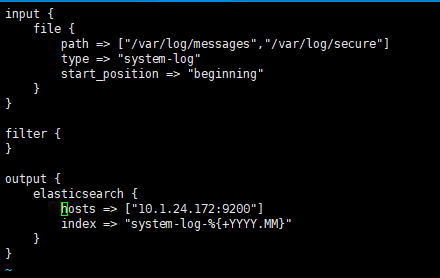
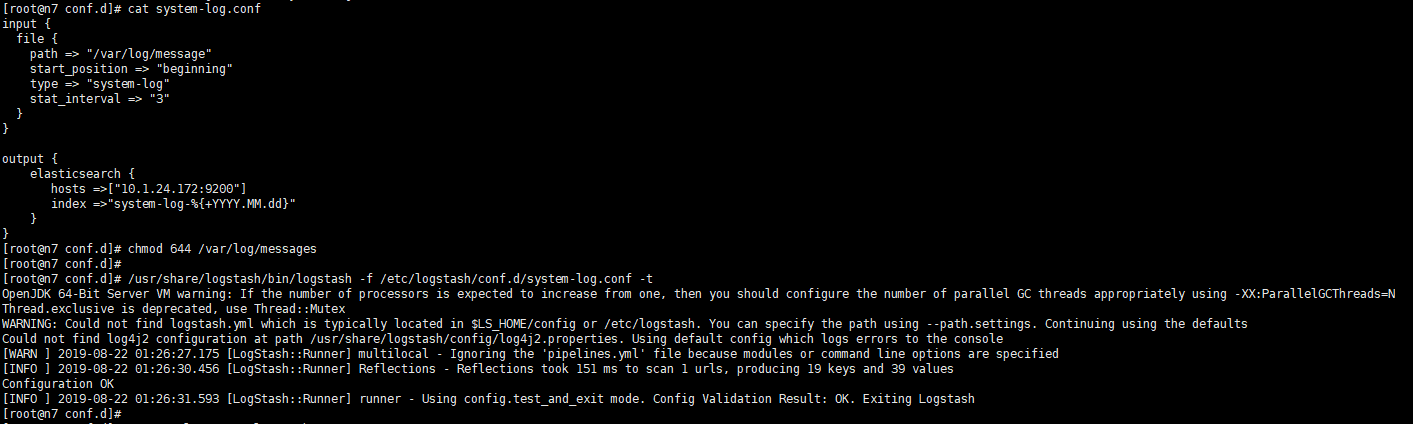
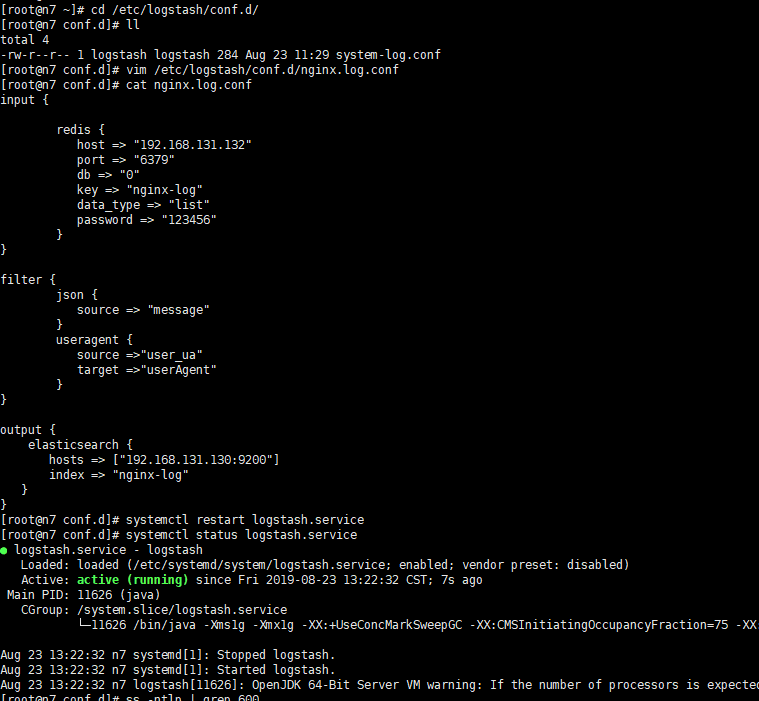
[root@n7 conf.d]# vim /etc/logstash/conf.d/nginx.log.conf
[root@n7 conf.d]# cat nginx-log.conf
input {

redis {
host => “192.168.131.132”
port => “6379”
db => “4”
key => “nginx-log”
data_type => “list”
password => “123456”
}
}

filter {
mutate {
rename => { “[host][name]” => “host” }
}
}

output {
elasticsearch {
hosts => [“192.168.131.130:9200”]
index => “nginx-log”
}
}

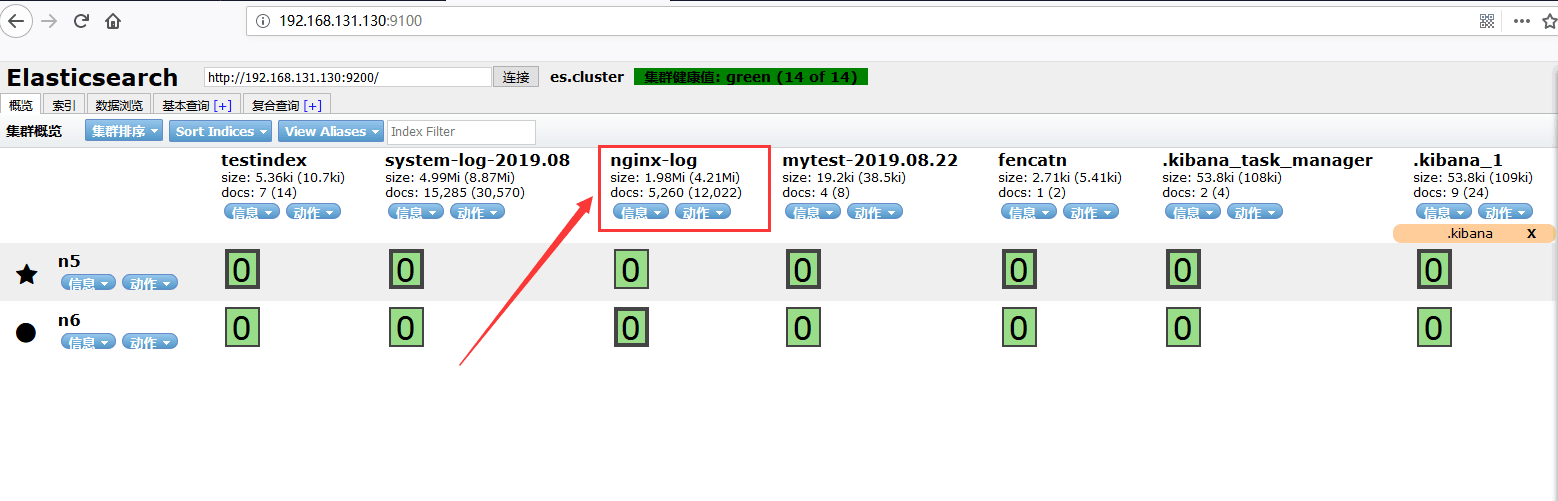
重启,并检查head插件是否有定义的索引
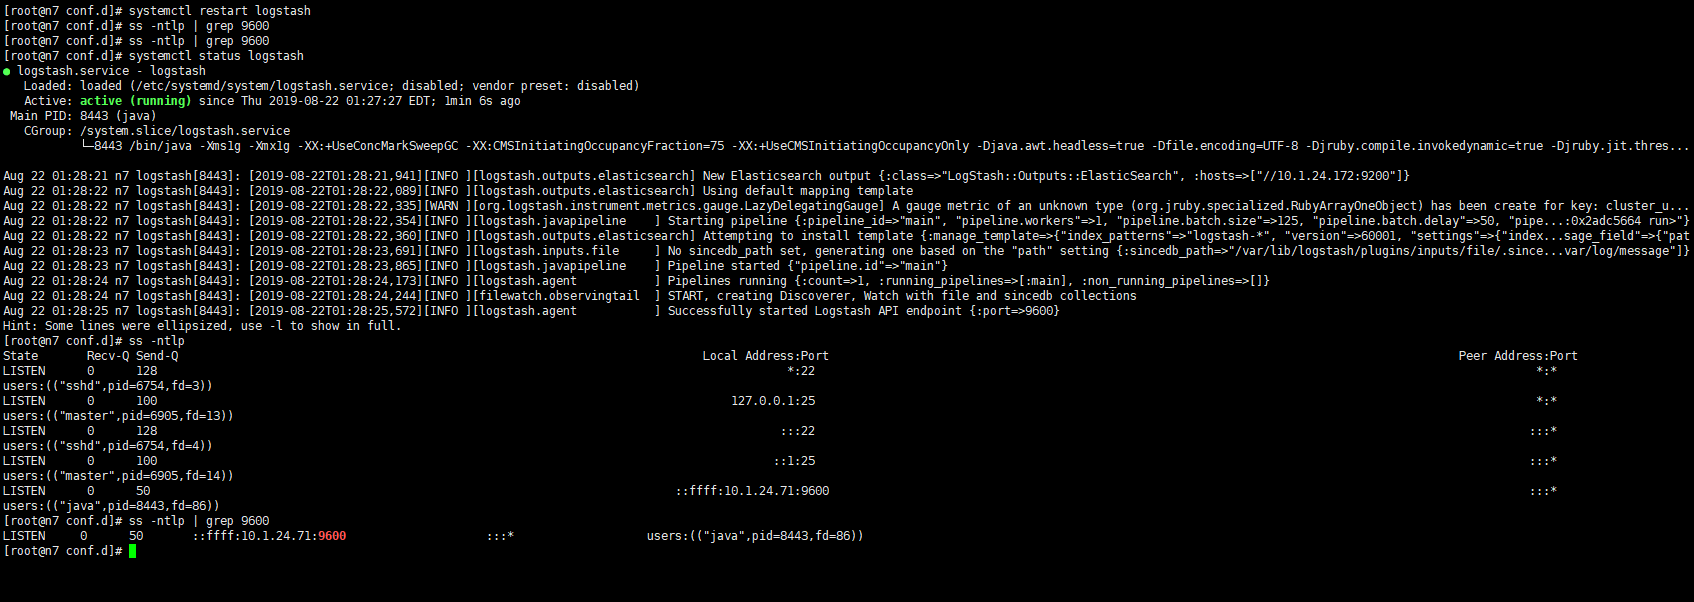
[root@n7 conf.d]# systemctl restart logstash.service
[root@n7 conf.d]# systemctl status logstash.service

注意,上面这几步,只是让你体验一下,实际上我入了很多的坑,其中一个就是logstash的配置文件,网上五花八门,最后还是只能用上面这个最原始,很多人写出来的都不能用,我最开始用的是原作者的,是下面这个,我检查半天始终看不出来哪里有问题,但是重启logstash的时候就是一堆报错,无奈只有放弃

以下是原作者的注释:

[root@linux-host3 ~]# vim /etc/logstash/conf.d/nginx-log.conf

input {

redis {
host => “192.168.66.20”
port => “6379”
db => “1”
key => “nginx-log”
data_type => “list”
password => “123456”
}
}

filter {
json {
source => “message”
}
useragent {
source =>”user_ua” #这个表示对message里面的哪个字段进行分析
target =>”userAgent” #agent将收集出的user agent的信息配置到了单独的字段中
}
}

output {
elasticsearch {
hosts => [“192.168.66.15:9200”]
index => “nginx-log”
}
}

这里有个人就遇到了和我一样的报错
logstash 给elasticsearch 发送自定义日志数据,出现错误:Could not index event to Elasticsearch…有大神知道问题所在吗?
原文地址在 https://elasticsearch.cn/question/4692
这个都算好的了,我最开始是不停报错,最后改成了上面的配置文件才解决,希望大家多练习一下吧!
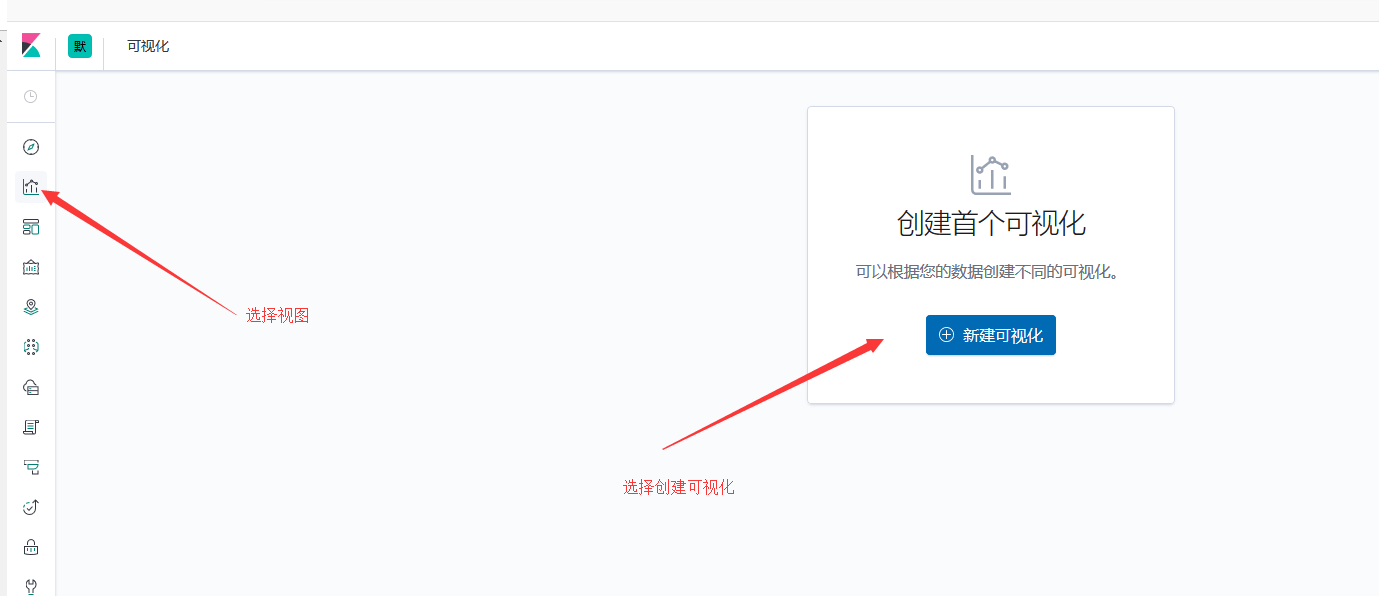
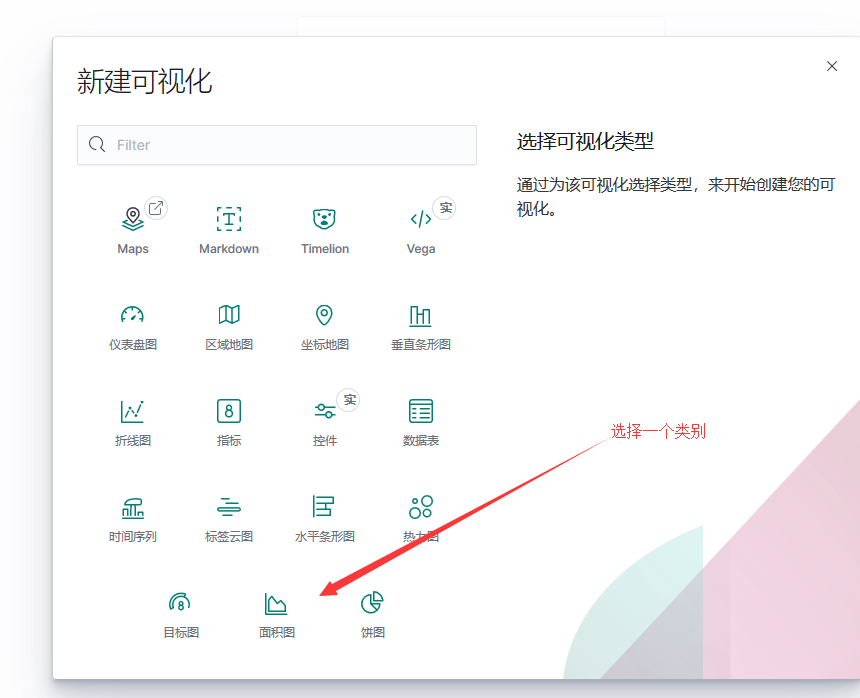
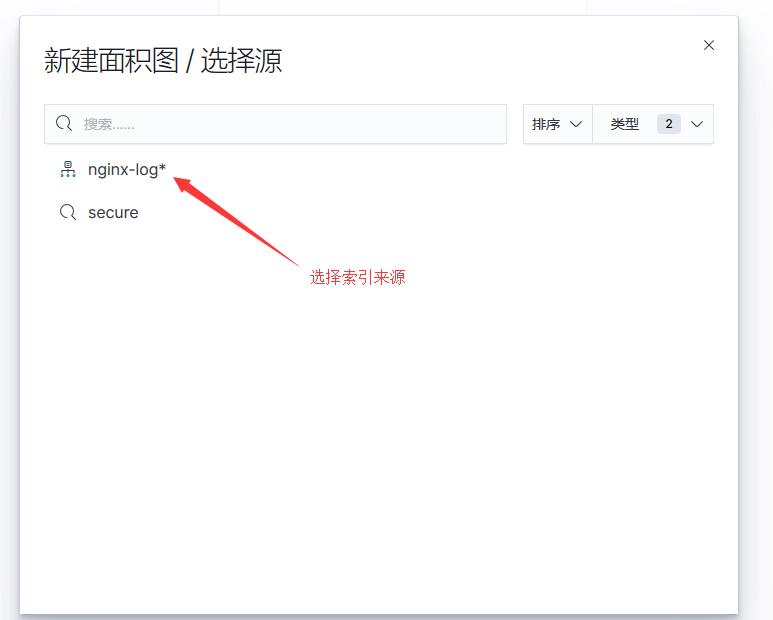
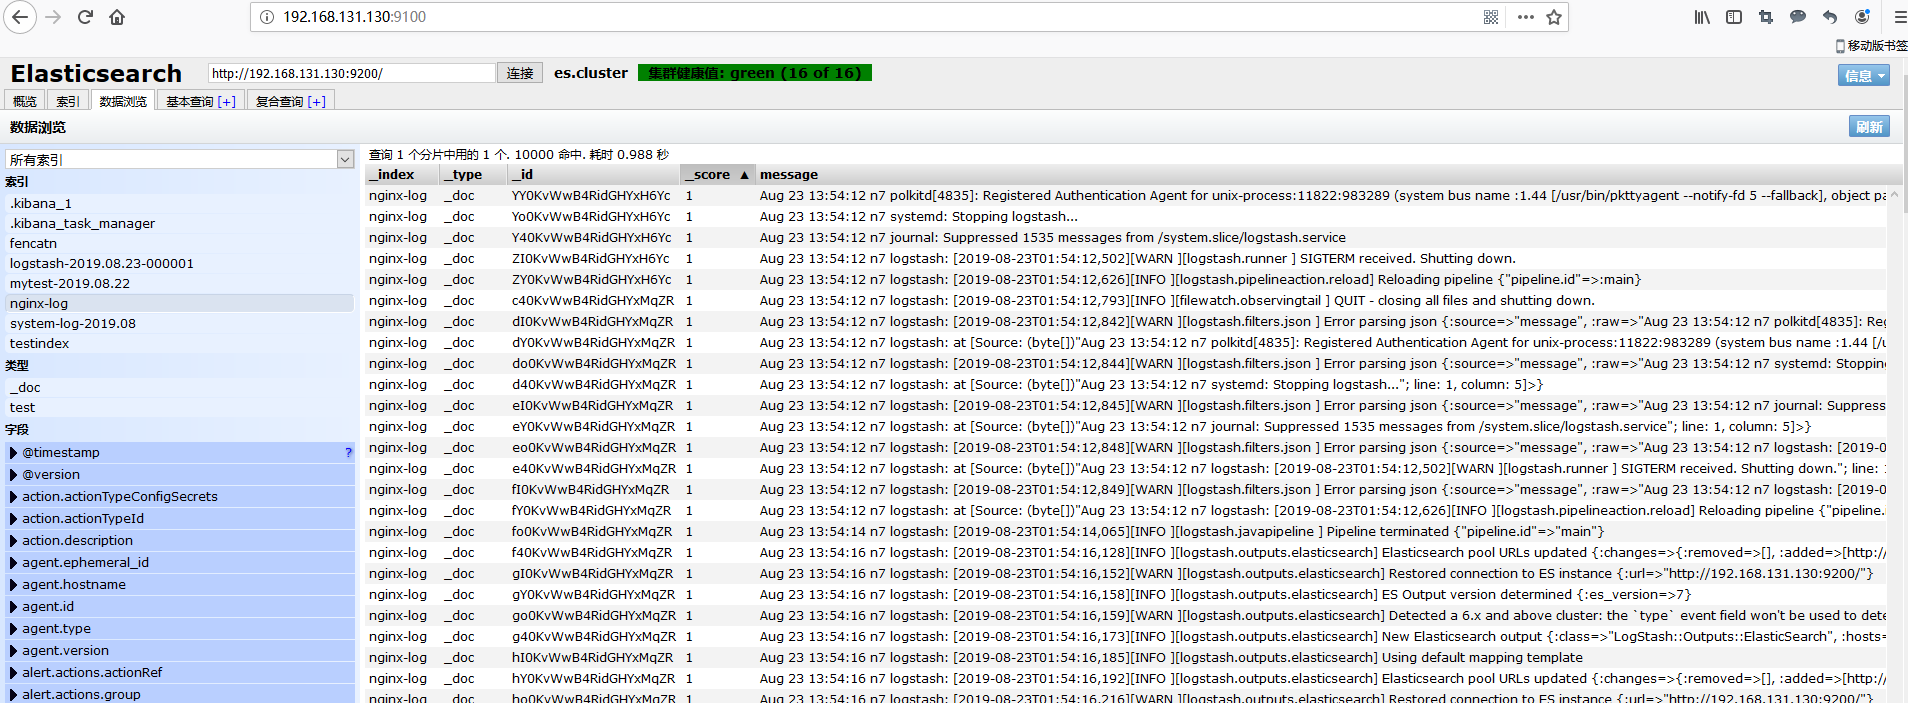
5使用kibana展示

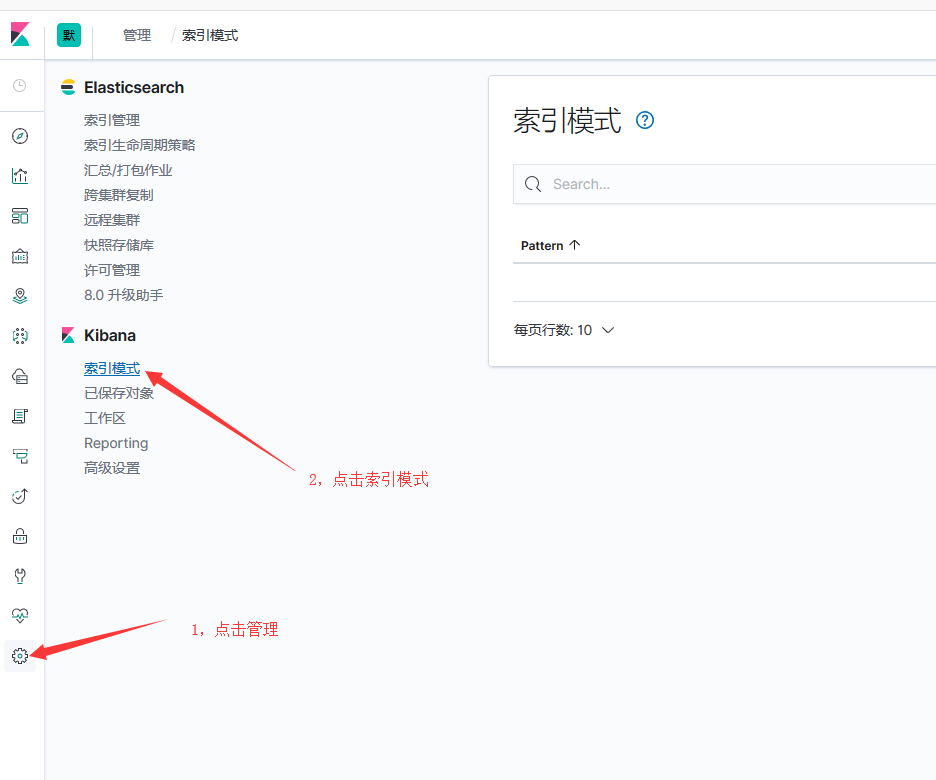
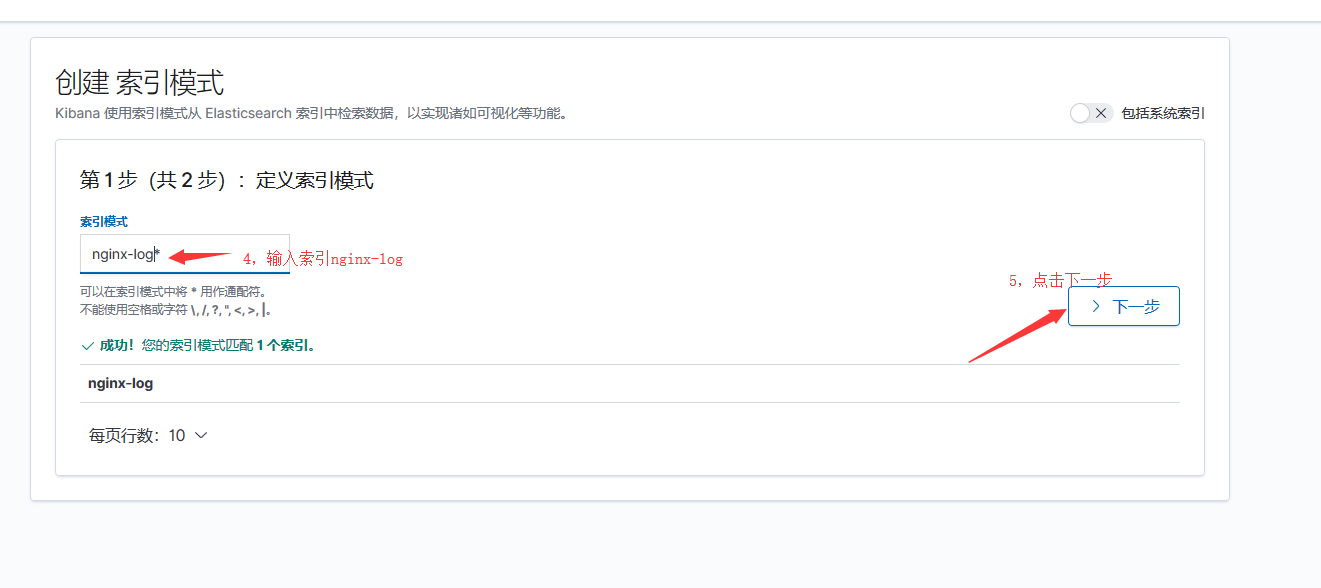
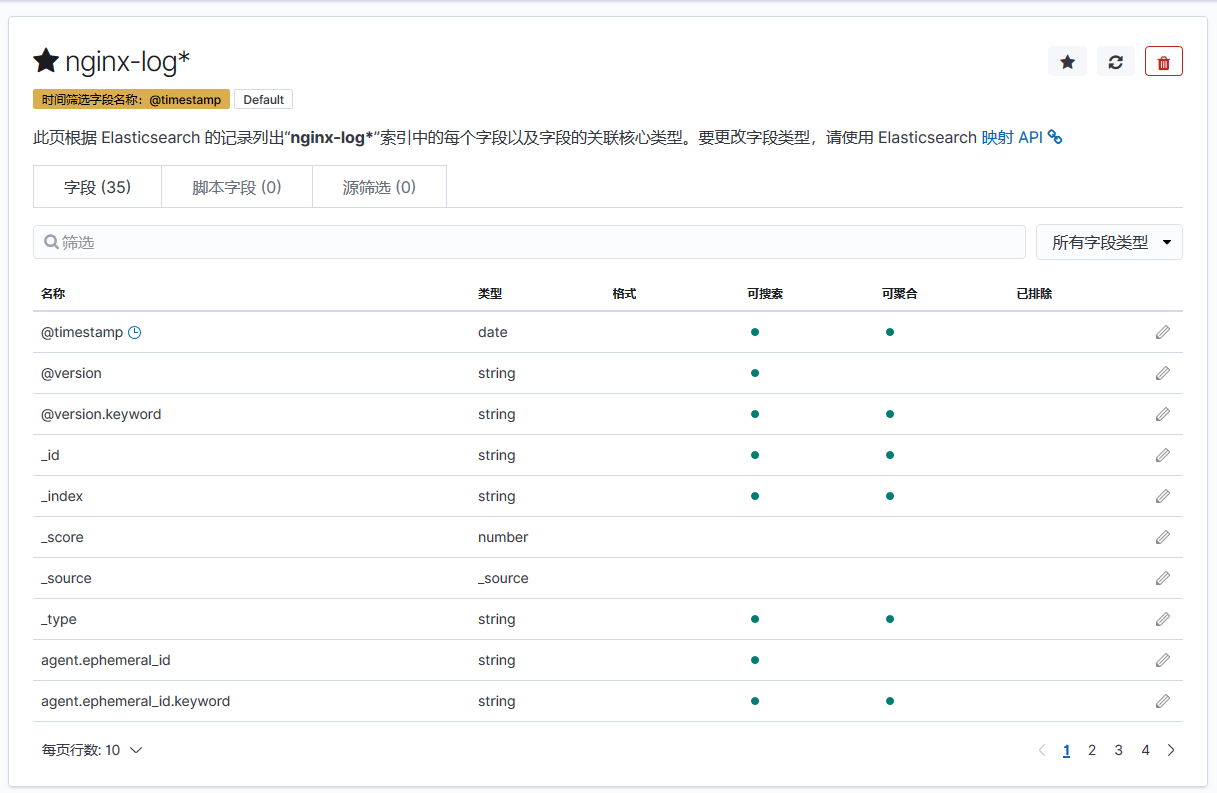
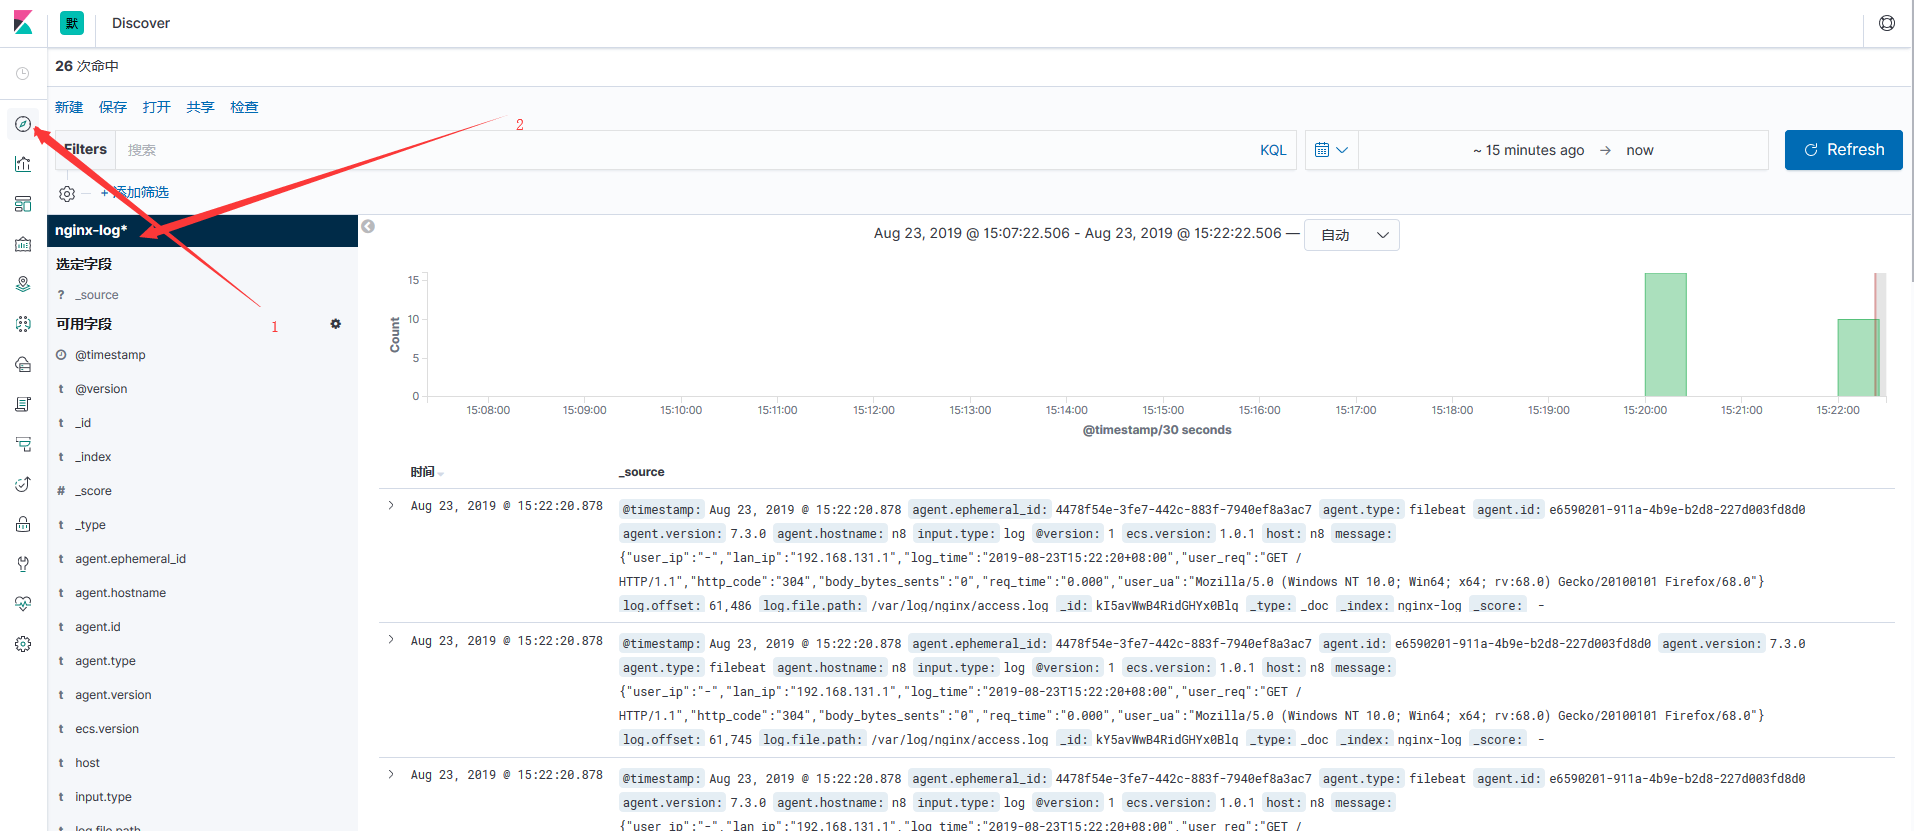
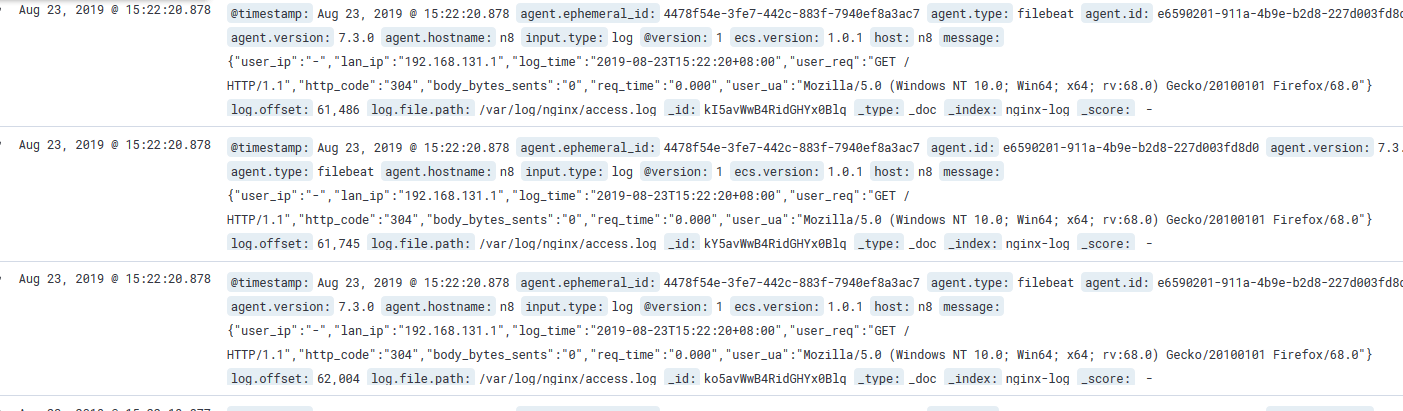
注意观察上面的日志,不能有报错,比如有不能索引之类,出问题,那就赶快去检查logstash写对了没有

发表在 ELK | 标签为 | 留下评论

ELK7.3部署与使用-3.kibana部署

1\环境
2安装kibana
[root@n8 ~]#
[root@n8 ~]# ll
总用量 235284
-rw——-. 1 root root 1331 7月 14 17:40 anaconda-ks.cfg
-rw-r–r– 1 root root 240920951 8月 22 13:04 kibana-7.3.0-x86_64.rpm
-rw-r–r– 1 root root 153 8月 15 10:23 ntp.conf
[root@n8 ~]# yum install -y kibana-7.3.0-x86_64.rpm
已加载插件:fastestmirror
正在检查 kibana-7.3.0-x86_64.rpm: kibana-7.3.0-1.x86_64
kibana-7.3.0-x86_64.rpm 将被安装
正在解决依赖关系
–> 正在检查事务
—> 软件包 kibana.x86_64.0.7.3.0-1 将被 安装
–> 解决依赖关系完成

依赖关系解决

=================================================================================================================================================================================================================================================
Package 架构 版本 源 大小
=================================================================================================================================================================================================================================================
正在安装:
kibana x86_64 7.3.0-1 /kibana-7.3.0-x86_64 626 M

事务概要
=================================================================================================================================================================================================================================================
安装 1 软件包

总计:626 M
安装大小:626 M
Downloading packages:
Running transaction check
Running transaction test
Transaction test succeeded
Running transaction
正在安装 : kibana-7.3.0-1.x86_64 1/1
验证中 : kibana-7.3.0-1.x86_64 1/1

已安装:
kibana.x86_64 0:7.3.0-1

完毕!
[root@n8 ~]#

2配置kibana
[root@n8 ~]# cd /etc/kibana/
[root@n8 kibana]# ll
总用量 8
-rw-r–r– 1 root root 5150 7月 25 03:07 kibana.yml
[root@n8 kibana]# cp kibana.yml kibana.yml.bak
[root@n8 kibana]# vim kibana.yml
[root@n8 kibana]# grep “^[a-Z]” /etc/kibana/kibana.yml
server.port: 5601
server.host: “10.1.24.186”
elasticsearch.hosts: [“http://10.1.24.172:9200”]
i18n.locale: “zh-CN”

3\启动并验证
[root@n8 kibana]#

说明
[root@xx ~]# grep “^[a-Z]” /etc/kibana/kibana.yml
server.port: 5601
server.host: “0.0.0.0”
elasticsearch.hosts: [“http://x.x.x.x:9200”]
i18n.locale: “zh-CN” #kibana7官方支持中文
[root@n8 kibana]# systemctl start kibana
[root@n8 kibana]# systemctl status kiabana
Unit kiabana.service could not be found.
[root@n8 kibana]# systemctl status kibana
● kibana.service – Kibana
Loaded: loaded (/etc/systemd/system/kibana.service; disabled; vendor preset: disabled)
Active: active (running) since 四 2019-08-22 13:13:51 CST; 9s ago
Main PID: 10068 (node)
Tasks: 11
Memory: 228.8M
CGroup: /system.slice/kibana.service
└─10068 /usr/share/kibana/bin/../node/bin/node –no-warnings –max-http-header-size=65536 /usr/share/kibana/bin/../src/cli -c /etc/kibana/kibana.yml

8月 22 13:13:51 n8 systemd[1]: Started Kibana.
8月 22 13:13:54 n8 kibana[10068]: {“type”:”log”,”@timestamp”:”2019-08-22T05:13:54Z”,”tags”:[“info”,”plugins-system”],”pid”:10068,”message”:”Setting up [1] plugins: [translations]”}
8月 22 13:13:54 n8 kibana[10068]: {“type”:”log”,”@timestamp”:”2019-08-22T05:13:54Z”,”tags”:[“info”,”plugins”,”translations”],”pid”:10068,”message”:”Setting up plugin”}
8月 22 13:13:54 n8 kibana[10068]: {“type”:”log”,”@timestamp”:”2019-08-22T05:13:54Z”,”tags”:[“info”,”plugins-system”],”pid”:10068,”message”:”Starting [1] plugins: [translations]”}
[root@n8 kibana]# ss -ntlp | grep 5601
LISTEN 0 128 10.1.24.186:5601 *:* users:((“node”,pid=10068,fd=18))

4\登陆浏览器查看kibana状态

5\配置logstash收集系统日志
在 Logstash 服务器配置片段文件,将系统日志发送给 ES 服务器
[root@n7 ~]# cd /etc/logstash/conf.d/
[root@n7 conf.d]# pwd
/etc/logstash/conf.d
[root@n7 conf.d]# ls
[root@n7 conf.d]# vim system-log.conf
[root@n7 conf.d]# ll
total 4
-rw-r–r– 1 root root 257 Aug 22 01:23 system-log.conf

[root@n7 conf.d]# cat /etc/logstash/conf.d/system-log.conf
input {
file {
path => [“/var/log/messages”,”/var/log/secure”]
type => “system-log”
start_position => “beginning”
}
}

filter {
}

output {
elasticsearch {
hosts => [“10.1.24.172:9200”]
index => “system-log-%{+YYYY.MM}”
}
}
[root@n7 conf.d]#

[root@n7 conf.d]# chmod 644 /var/log/messages
[root@n7 conf.d]#

说明如下
[root@xx conf.d]# vim system-log.conf
input {
file {
path => “/var/log/message” #日志路径,默认权限为600,需要进行授权
start_position => “beginning” #第一次从头收集,之后从新添加的日志收集
type => “system-log” #定义事件唯一类型
stat_interval => “3” #日志收集的间隔时间
}
}

output {
elasticsearch {
hosts =>[“10.1.24.172:9200″] #输出到ES服务器
index =>”system-log-%{+YYYY.MM.dd}”
}
}

5.1检测语法
[root@n7 conf.d]# /usr/share/logstash/bin/logstash -f /etc/logstash/conf.d/system-log.conf -t
OpenJDK 64-Bit Server VM warning: If the number of processors is expected to increase from one, then you should configure the number of parallel GC threads appropriately using -XX:ParallelGCThreads=N
Thread.exclusive is deprecated, use Thread::Mutex
WARNING: Could not find logstash.yml which is typically located in $LS_HOME/config or /etc/logstash. You can specify the path using –path.settings. Continuing using the defaults
Could not find log4j2 configuration at path /usr/share/logstash/config/log4j2.properties. Using default config which logs errors to the console
[WARN ] 2019-08-22 01:26:27.175 [LogStash::Runner] multilocal – Ignoring the ‘pipelines.yml’ file because modules or command line options are specified
[INFO ] 2019-08-22 01:26:30.456 [LogStash::Runner] Reflections – Reflections took 151 ms to scan 1 urls, producing 19 keys and 39 values
Configuration OK
[INFO ] 2019-08-22 01:26:31.593 [LogStash::Runner] runner – Using config.test_and_exit mode. Config Validation Result: OK. Exiting Logstash

5.2重启logstash
[root@n7 conf.d]# systemctl restart logstash
[root@n7 conf.d]# systemctl status logstash
● logstash.service – logstash
Loaded: loaded (/etc/systemd/system/logstash.service; disabled; vendor preset: disabled)
Active: active (running) since Thu 2019-08-22 01:27:27 EDT; 1min 6s ago
Main PID: 8443 (java)
CGroup: /system.slice/logstash.service
└─8443 /bin/java -Xms1g -Xmx1g -XX:+UseConcMarkSweepGC -XX:CMSInitiatingOccupancyFraction=75 -XX:+UseCMSInitiatingOccupancyOnly -Djava.awt.headless=true -Dfile.encoding=UTF-8 -Djruby.compile.invokedynamic=true -Djruby.jit.thres…

Aug 22 01:28:21 n7 logstash[8443]: [2019-08-22T01:28:21,941][INFO ][logstash.outputs.elasticsearch] New Elasticsearch output {:class=>”LogStash::Outputs::ElasticSearch”, :hosts=>[“//10.1.24.172:9200″]}
Aug 22 01:28:22 n7 logstash[8443]: [2019-08-22T01:28:22,089][INFO ][logstash.outputs.elasticsearch] Using default mapping template
Aug 22 01:28:22 n7 logstash[8443]: [2019-08-22T01:28:22,335][WARN ][org.logstash.instrument.metrics.gauge.LazyDelegatingGauge] A gauge metric of an unknown type (org.jruby.specialized.RubyArrayOneObject) has been create for key: cluster_u…
Aug 22 01:28:22 n7 logstash[8443]: [2019-08-22T01:28:22,354][INFO ][logstash.javapipeline ] Starting pipeline {:pipeline_id=>”main”, “pipeline.workers”=>1, “pipeline.batch.size”=>125, “pipeline.batch.delay”=>50, “pipe…:0x2adc5664 run>”}
Aug 22 01:28:22 n7 logstash[8443]: [2019-08-22T01:28:22,360][INFO ][logstash.outputs.elasticsearch] Attempting to install template {:manage_template=>{“index_patterns”=>”logstash-*”, “version”=>60001, “settings”=>{“index…sage_field”=>{“pat
Aug 22 01:28:23 n7 logstash[8443]: [2019-08-22T01:28:23,691][INFO ][logstash.inputs.file ] No sincedb_path set, generating one based on the “path” setting {:sincedb_path=>”/var/lib/logstash/plugins/inputs/file/.since…var/log/message”]}
Aug 22 01:28:23 n7 logstash[8443]: [2019-08-22T01:28:23,865][INFO ][logstash.javapipeline ] Pipeline started {“pipeline.id”=>”main”}
Aug 22 01:28:24 n7 logstash[8443]: [2019-08-22T01:28:24,173][INFO ][logstash.agent ] Pipelines running {:count=>1, :running_pipelines=>[:main], :non_running_pipelines=>[]}
Aug 22 01:28:24 n7 logstash[8443]: [2019-08-22T01:28:24,244][INFO ][filewatch.observingtail ] START, creating Discoverer, Watch with file and sincedb collections
Aug 22 01:28:25 n7 logstash[8443]: [2019-08-22T01:28:25,572][INFO ][logstash.agent ] Successfully started Logstash API endpoint {:port=>9600}
Hint: Some lines were ellipsized, use -l to show in full.
[root@n7 conf.d]# ss -ntlp
State Recv-Q Send-Q Local Address:Port Peer Address:Port
LISTEN 0 128 *:22 *:* users:((“sshd”,pid=6754,fd=3))
LISTEN 0 100 127.0.0.1:25 *:* users:((“master”,pid=6905,fd=13))
LISTEN 0 128 :::22 :::* users:((“sshd”,pid=6754,fd=4))
LISTEN 0 100 ::1:25 :::* users:((“master”,pid=6905,fd=14))
LISTEN 0 50 ::ffff:10.1.24.71:9600 :::* users:((“java”,pid=8443,fd=86))
[root@n7 conf.d]# ss -ntlp | grep 9600
LISTEN 0 50 ::ffff:10.1.24.71:9600 :::* users:((“java”,pid=8443,fd=86))
[root@n7 conf.d]#

6\在ES插件head页面查看
打开网页访问
http://10.1.24.172:9100/

发表在 ELK | 标签为 | 留下评论