四、收集NGINX访问
1.1部署nginx服务
自己搞
1.2编辑nginx页面
自己搞
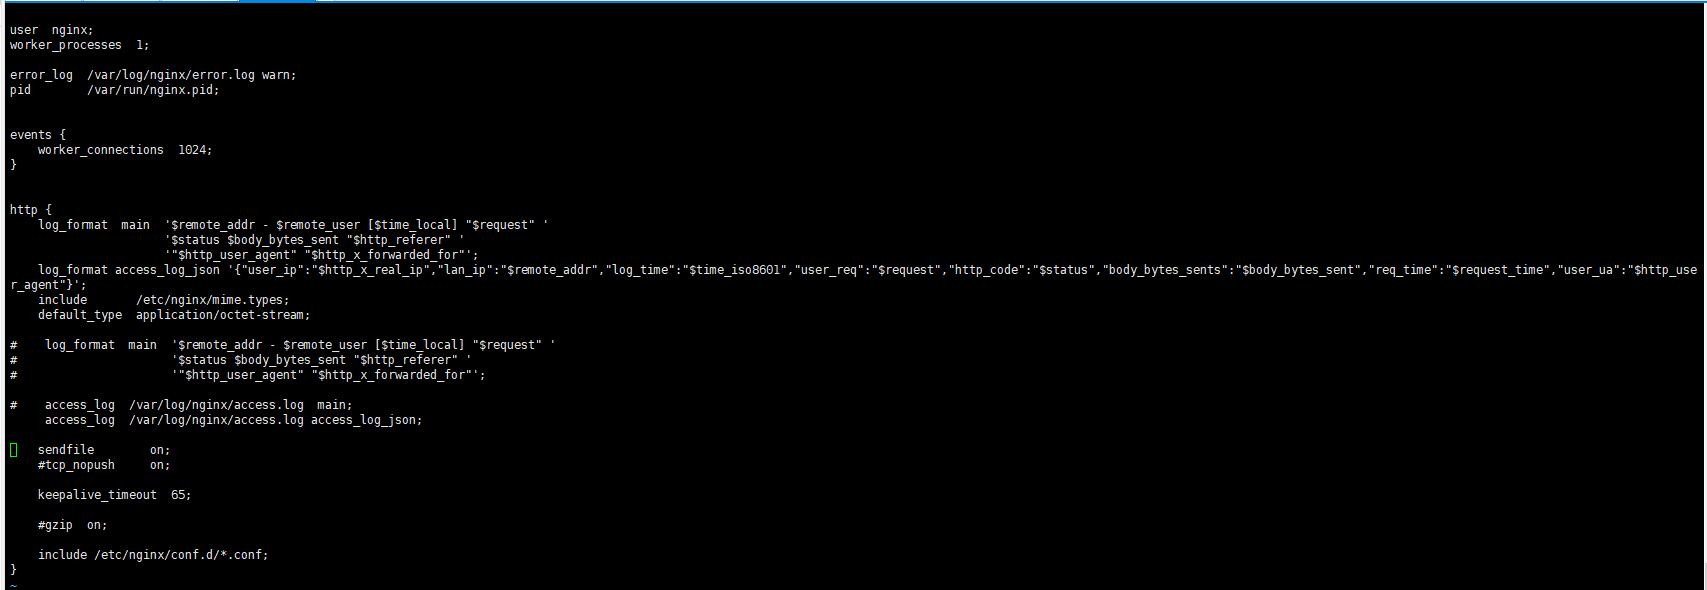
1.3将nginx日志转换为json格式
[root@n8 nginx]# cat /etc/nginx/nginx.conf

user nginx;
worker_processes 1;

error_log /var/log/nginx/error.log warn;
pid /var/run/nginx.pid;

events {
worker_connections 1024;
}

http {
log_format main '$remote_addr - $remote_user [$time_local] "$request" '
'$status $body_bytes_sent "$http_referer" '
'"$http_user_agent" "$http_x_forwarded_for"';
log_format access_log_json '{"user_ip":"$http_x_real_ip","lan_ip":"$remote_addr","log_time":"$time_iso8601","user_req":"$request","http_code":"$status","body_bytes_sents":"$body_bytes_sent","req_time":"$request_time","user_ua":"$http_user_agent"}';
include /etc/nginx/mime.types;
default_type application/octet-stream;

# log_format main '$remote_addr - $remote_user [$time_local] "$request" '
# '$status $body_bytes_sent "$http_referer" '
# '"$http_user_agent" "$http_x_forwarded_for"';

# access_log /var/log/nginx/access.log main;
access_log /var/log/nginx/access.log access_log_json;

sendfile on;
#tcp_nopush on;

keepalive_timeout 65;

#gzip on;

include /etc/nginx/conf.d/*.conf;
}
1.4测试和验证
[root@n8 nginx]# nginx -t
nginx: the configuration file /etc/nginx/nginx.conf syntax is ok
nginx: configuration file /etc/nginx/nginx.conf test is successful
[root@n8 nginx]# nginx -s reload
[root@n8 nginx]# ss -ntlp | grep 80
LISTEN 0 128 *:80 *:* users:(("nginx",pid=18349,fd=6),("nginx",pid=17863,fd=6))
LISTEN 0 128 127.0.0.1:8081 *:* users:(("docker-proxy",pid=1574,fd=4))
LISTEN 0 80 :::3306 :::* users:(("mysqld",pid=1690,fd=19))
随便访问一下,或者用ab测试一下,然后确认日志格式
[root@n8 nginx]# tail -f /var/log/nginx/access.log
{"user_ip":"-","lan_ip":"10.1.24.253","log_time":"2019-08-22T18:00:36+08:00","user_req":"GET / HTTP/1.1","http_code":"304","body_bytes_sents":"0","req_time":"0.000","user_ua":"Mozilla/5.0 (Windows NT 10.0; Win64; x64; rv:68.0) Gecko/20100101 Firefox/68.0"}
{"user_ip":"-","lan_ip":"10.1.24.253","log_time":"2019-08-22T18:00:36+08:00","user_req":"GET / HTTP/1.1","http_code":"304","body_bytes_sents":"0","req_time":"0.000","user_ua":"Mozilla/5.0 (Windows NT 10.0; Win64; x64; rv:68.0) Gecko/20100101 Firefox/68.0"}
{"user_ip":"-","lan_ip":"10.1.24.253","log_time":"2019-08-22T18:00:36+08:00","user_req":"GET / HTTP/1.1","http_code":"304","body_bytes_sents":"0","req_time":"0.000","user_ua":"Mozilla/5.0 (Windows NT 10.0; Win64; x64; rv:68.0) Gecko/20100101 Firefox/68.0"}
{"user_ip":"-","lan_ip":"10.1.24.253","log_time":"2019-08-22T18:00:37+08:00","user_req":"GET / HTTP/1.1","http_code":"304","body_bytes_sents":"0","req_time":"0.000","user_ua":"Mozilla/5.0 (Windows NT 10.0; Win64; x64; rv:68.0) Gecko/20100101 Firefox/68.0"}
{"user_ip":"-","lan_ip":"10.1.24.253","log_time":"2019-08-22T18:00:37+08:00","user_req":"GET / HTTP/1.1","http_code":"304","body_bytes_sents":"0","req_time":"0.000","user_ua":"Mozilla/5.0 (Windows NT 10.0; Win64; x64; rv:68.0) Gecko/20100101 Firefox/68.0"}
{"user_ip":"-","lan_ip":"10.1.24.253","log_time":"2019-08-22T18:00:37+08:00","user_req":"GET / HTTP/1.1","http_code":"304","body_bytes_sents":"0","req_time":"0.000","user_ua":"Mozilla/5.0 (Windows NT 10.0; Win64; x64; rv:68.0) Gecko/20100101 Firefox/68.0"}
{"user_ip":"-","lan_ip":"10.1.24.253","log_time":"2019-08-22T18:00:38+08:00","user_req":"GET / HTTP/1.1","http_code":"304","body_bytes_sents":"0","req_time":"0.000","user_ua":"Mozilla/5.0 (Windows NT 10.0; Win64; x64; rv:68.0) Gecko/20100101 Firefox/68.0"}
{"user_ip":"-","lan_ip":"10.1.24.253","log_time":"2019-08-22T18:00:40+08:00","user_req":"GET / HTTP/1.1","http_code":"304","body_bytes_sents":"0","req_time":"0.000","user_ua":"Mozilla/5.0 (Windows NT 10.0; Win64; x64; rv:68.0) Gecko/20100101 Firefox/68.0"}
{"user_ip":"-","lan_ip":"10.1.24.253","log_time":"2019-08-22T18:00:43+08:00","user_req":"GET /dsafh HTTP/1.1","http_code":"404","body_bytes_sents":"153","req_time":"0.000","user_ua":"Mozilla/5.0 (Windows NT 10.0; Win64; x64; rv:68.0) Gecko/20100101 Firefox/68.0"}
{"user_ip":"-","lan_ip":"10.1.24.253","log_time":"2019-08-22T18:00:50+08:00","user_req":"GET /status HTTP/1.1","http_code":"404","body_bytes_sents":"153","req_time":"0.000","user_ua":"Mozilla/5.0 (Windows NT 10.0; Win64; x64; rv:68.0) Gecko/20100101 Firefox/68.0"}

至此,nginx部署完成
2、部署redis
我笔记本内存有限,本来想每个节点部署一个服务,现在看来不行,我想了一下把redis放在logstash节点吧,然后我现在列一下每个节点已有的服务
10.1.24.172 n5 elasticsearch head
10.1.24.57 n6 elasticsearch
10.1.24.71 n7 logstash redis
10.1.24.186 n8 kibana nginx
我是源码安装的redis,epel源上的版本太老是3.0,现在最新的是5.0,你按你自己的喜好
[root@n7 ~]# wget http://download.redis.io/releases/redis-5.0.5.tar.gz
--2019-08-22 18:48:07-- http://download.redis.io/releases/redis-5.0.5.tar.gz
Resolving download.redis.io (download.redis.io)... 109.74.203.151
Connecting to download.redis.io (download.redis.io)|109.74.203.151|:80... connected.
HTTP request sent, awaiting response... 200 OK
Length: 1975750 (1.9M) [application/x-gzip]
Saving to: ‘redis-5.0.5.tar.gz’

100%[=======================================================================================================================================================================================================>] 1,975,750 342KB/s in 8.4s

2019-08-22 18:48:17 (230 KB/s) - ‘redis-5.0.5.tar.gz’ saved [1975750/1975750]

[root@n7 ~]# ll
total 170796
-rw-------. 1 root root 1331 Jul 14 17:40 anaconda-ks.cfg
-rw-r--r-- 1 root root 172911005 Aug 22 11:35 logstash-7.3.0.rpm
-rw-r--r-- 1 root root 1975750 May 16 00:26 redis-5.0.5.tar.gz
[root@n7 ~]# tar -xf redis-5.0.5.tar.gz -C /usr/local/
[root@n7 ~]# cd /usr/local/
[root@n7 local]# ls
bin etc games include lib lib64 libexec redis-5.0.5 sbin share src
[root@n7 local]# mv redis-5.0.5/ redis
[root@n7 local]# ls
bin etc games include lib lib64 libexec redis sbin share src
[root@n7 local]# cd redis/
[root@n7 redis]# ls
00-RELEASENOTES BUGS CONTRIBUTING COPYING deps INSTALL Makefile MANIFESTO README.md redis.conf runtest runtest-cluster runtest-moduleapi runtest-sentinel sentinel.conf src tests utils
[root@n7 redis]# make
cd src && make all
make出错的,自己检查依赖
[root@n7 redis]# yum install gcc gcc-c++ automake pcre pcre-devel zlip zlib-devel openssl openssl-devel
我的也报错,但是是分配器的问题
[root@n7 redis]# make
cd src && make all
make[1]: Entering directory `/usr/local/redis/src'
CC Makefile.dep
make[1]: Leaving directory `/usr/local/redis/src'
make[1]: Entering directory `/usr/local/redis/src'
CC adlist.o
In file included from adlist.c:34:0:
zmalloc.h:50:31: fatal error: jemalloc/jemalloc.h: No such file or directory
#include <jemalloc/jemalloc.h>
^
compilation terminated.
make[1]: *** [adlist.o] Error 1
make[1]: Leaving directory `/usr/local/redis/src'
make: *** [all] Error 2
指定分配器,就OK了
[root@n7 redis]# make MALLOC=libc
cd src && make all
all/article/details/45914867make[1]: Entering directory `/usr/local/redis/src’
rm -rf redis-server redis-sentinel redis-cli redis-benchmark redis-check-rdb redis-check-aof *.o *.gcda *.gcno *.gcov redis.info lcov-html Makefile.dep dict-benchmark
(cd ../deps && make distclean)
make[2]: Entering directory `/usr/local/redis/deps’
(cd hiredis && make clean) > /dev/null || true
(cd linenoise && make clean) > /dev/null || true
(cd lua && make clean) > /dev/null || true
——————-
Hint: It’s a good idea to run ‘make test’ 😉
这个可以去查README
Allocator
———
Selecting a non-default memory allocator when building Redis is done by setting
the `MALLOC` environment variable. Redis is compiled and linked against libc
malloc by default, with the exception of jemalloc being the default on Linux
systems. This default was picked because jemalloc has proven to have fewer
fragmentation problems than libc malloc.
To force compiling against libc malloc, use:
% make MALLOC=libc
To compile against jemalloc on Mac OS X systems, use:
% make MALLOC=jemalloc
说关于分配器allocator, 如果有MALLOC 这个 环境变量, 会有用这个环境变量的 去建立Redis。
而且libc 并不是默认的 分配器, 默认的是 jemalloc, 因为 jemalloc 被证明 有更少的 fragmentation problems 比libc。
但是如果你又没有jemalloc 而只有 libc 当然 make 出错。 所以加这么一个参数。
修改redis配置文件,可以看到新版本的redis默认做了很多优化
[root@n7 redis]# grep -v “^#” redis.conf | grep -v “^$”
bind 0.0.0.0
protected-mode yes
port 6379
tcp-backlog 511
timeout 0
tcp-keepalive 300
daemonize no
supervised no
pidfile /var/run/redis_6379.pid
loglevel notice
logfile “”
databases 16
always-show-logo yes
save 900 1
save 300 10
save 60 10000
stop-writes-on-bgsave-error yes
rdbcompression yes
rdbchecksum yes
dbfilename dump.rdb
dir ./
replica-serve-stale-data yes
replica-read-only yes
repl-diskless-sync no
repl-diskless-sync-delay 5
repl-disable-tcp-nodelay no
replica-priority 100
lazyfree-lazy-eviction no
lazyfree-lazy-expire no
lazyfree-lazy-server-del no
replica-lazy-flush no
appendonly no
appendfilename “appendonly.aof”
appendfsync everysec
no-appendfsync-on-rewrite no
auto-aof-rewrite-percentage 100
auto-aof-rewrite-min-size 64mb
aof-load-truncated yes
aof-use-rdb-preamble yes
lua-time-limit 5000
slowlog-log-slower-than 10000
slowlog-max-len 128
latency-monitor-threshold 0
notify-keyspace-events “”
hash-max-ziplist-entries 512
hash-max-ziplist-value 64
list-max-ziplist-size -2
list-compress-depth 0
set-max-intset-entries 512
zset-max-ziplist-entries 128
zset-max-ziplist-value 64
hll-sparse-max-bytes 3000
stream-node-max-bytes 4096
stream-node-max-entries 100
activerehashing yes
client-output-buffer-limit normal 0 0 0
client-output-buffer-limit replica 256mb 64mb 60
client-output-buffer-limit pubsub 32mb 8mb 60
hz 10
dynamic-hz yes
aof-rewrite-incremental-fsync yes
rdb-save-incremental-fsync yes
把bind这一行改为0.0.0.0

设置快捷方式
[root@n7 redis]# ln -sv /usr/local/redis/src/redis-server /usr/bin/
‘/usr/bin/redis-server’ -> ‘/usr/local/redis/src/redis-server’
[root@n7 redis]# ln -sv /usr/local/redis/src/redis-cli /usr/bin/
‘/usr/bin/redis-cli’ -> ‘/usr/local/redis/src/redis-cli’
设置redis访问密码
生产环境必须设置redis连接密码,直接改配置文件

启动redis
redis-server /usr/local/redis/redis.conf &
如果没有配置为service服务,可以通过以下方式重启
[root@linux-host6 redis]# /usr/bin/redis-cli shutdown
[root@linux-host6 redis]# /usr/bin/redis-server /usr/local/redis/redis.conf
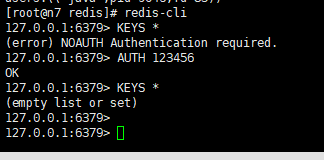
配置了密码,需要认证,否则没法操作
[root@n7 redis]# redis-cli
127.0.0.1:6379> KEYS *
(error) NOAUTH Authentication required.
127.0.0.1:6379> AUTH 123456
OK
127.0.0.1:6379> KEYS *
(empty list or set)
127.0.0.1:6379>
3nginx服务器安装filebeat
我是在kibana上面安装的nginx,我们切换到kibana服务器
filebeat我已经提前下好了,你自己去官网去下,注意版本号要一致
[root@n7 ~]# ll
total 195240
-rw——-. 1 root root 1331 Jul 14 17:40 anaconda-ks.cfg
-rw-r–r– 1 root root 25029215 Aug 22 19:24 filebeat-7.3.0-x86_64.rpm
-rw-r–r– 1 root root 172911005 Aug 22 11:35 logstash-7.3.0.rpm
-rw-r–r– 1 root root 1975750 May 16 00:26 redis-5.0.5.tar.gz
[root@n7 ~]# yum install -y filebeat-7.3.0-x86_64.rpm
filebeat收集nginx日志,并写入redis
Filebeat 支持将数据直接写入到 redis 服务器,本步骤为写入到 redis 当中的一个可以,另外 filebeat 还支持写入到 elasticsearch、logstash 等服务器。
[root@n7 ~]# grep -v “#” /etc/filebeat/filebeat.yml | grep -v “^$”
filebeat.inputs:
– type: log
enabled: false
paths:
– /var/log/*.log
exclude_lines: [‘^DBG’,”^$”]
exclude_files: [‘.gz$’]
document_type: “nginx-log”
filebeat.config.modules:
path: ${path.config}/modules.d/*.yml
reload.enabled: false
setup.template.settings:
index.number_of_shards: 1
setup.kibana:
setup.kibana:
output.redis:
hosts: [“10.1.24.71:6379”]
key: “nginx-log”
db: 4
timeout: 5
password:123456
processors:
– add_host_metadata: ~
– add_cloud_metadata: ~
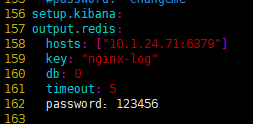
注意是要增加redis的配置,注释掉elasticsearch的配置

启动filebeat
[root@n8 ~]# systemctl start filebeat
[root@n8 ~]# systemctl enable filebeat
[root@n8 ~]# systemctl status filebeat
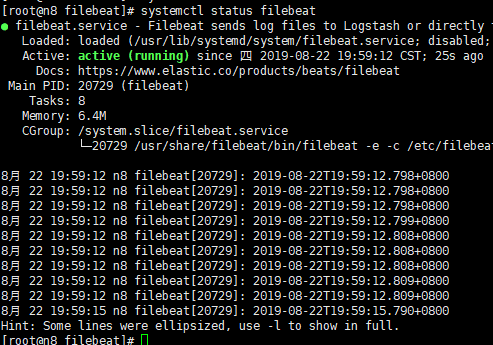
我第一次启动报错了,但是坑爹的是看不到日志

光看这个有毛用啊,后来网上搜了一下,需要到/var/log/message去查看日志

看到没,日志提示我162行出错,果然我把冒号:写成中文状态的冒号了,难怪说没有变颜色,改回来,重启服务就OK了
用浏览器访问nginx,首先确认nginx要有日志,我就是大意了,没访问nginx本来就没日志,我还去redis查半天
[root@n8 filebeat]# systemctl restart nginx
[root@n8 filebeat]# tail -f /var/log/nginx/access.log
{“user_ip”:”-“,”lan_ip”:”192.168.131.1″,”log_time”:”2019-08-23T12:56:35+08:00″,”user_req”:”GET / HTTP/1.1″,”http_code”:”304″,”body_bytes_sents”:”0″,”req_time”:”0.000″,”user_ua”:”Mozilla/5.0 (Windows NT 10.0; Win64; x64; rv:68.0) Gecko/20100101 Firefox/68.0″}
{“user_ip”:”-“,”lan_ip”:”192.168.131.1″,”log_time”:”2019-08-23T12:56:37+08:00″,”user_req”:”GET / HTTP/1.1″,”http_code”:”304″,”body_bytes_sents”:”0″,”req_time”:”0.000″,”user_ua”:”Mozilla/5.0 (Windows NT 10.0; Win64; x64; rv:68.0) Gecko/20100101 Firefox/68.0″}
确认nginx有日志之后,再去redis去查


注意,下面的日志我改动过了,改动的db是4
[root@n8 ~]# redis-cli -h 192.168.131.132
192.168.131.132:6379> AUTH 123456
OK
192.168.131.132:6379> KEYS *
1) “nginx-log”
192.168.131.132:6379>
注意选择的DB要和你在filebeat里面写入的库要一致
4、logstash服务器读取redis上存储的日志
4.1配置收集规则
[root@n7 conf.d]# vim /etc/logstash/conf.d/nginx.log.conf
[root@n7 conf.d]# cat nginx-log.conf
input {
redis {
host => “192.168.131.132”
port => “6379”
db => “4”
key => “nginx-log”
data_type => “list”
password => “123456”
}
}
filter {
mutate {
rename => { “[host][name]” => “host” }
}
}
output {
elasticsearch {
hosts => [“192.168.131.130:9200”]
index => “nginx-log”
}
}
重启,并检查head插件是否有定义的索引
[root@n7 conf.d]# systemctl restart logstash.service
[root@n7 conf.d]# systemctl status logstash.service

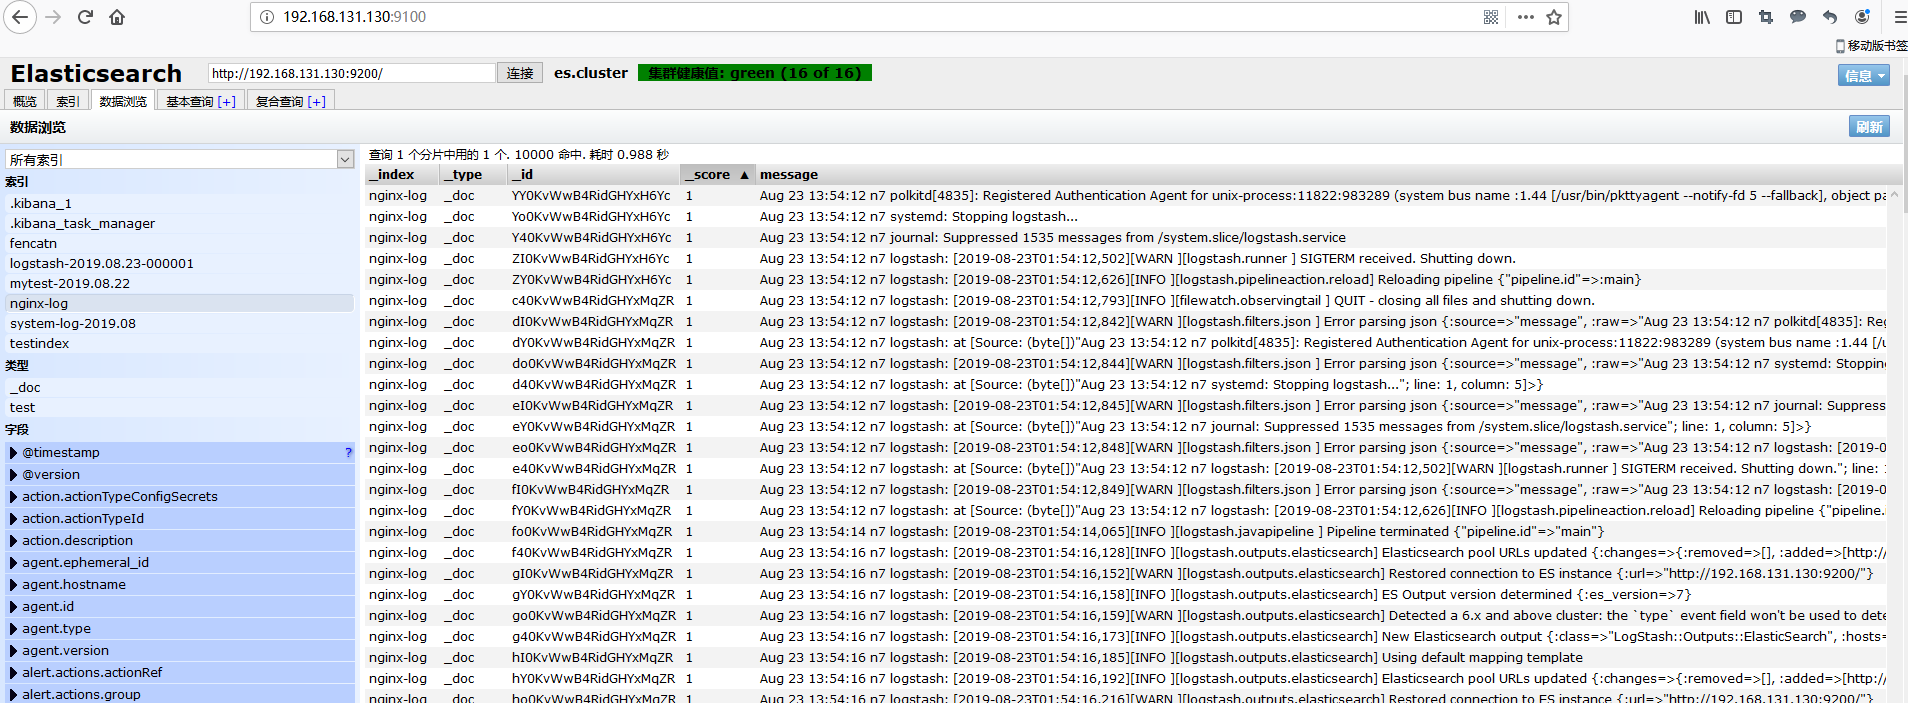
注意,上面这几步,只是让你体验一下,实际上我入了很多的坑,其中一个就是logstash的配置文件,网上五花八门,最后还是只能用上面这个最原始,很多人写出来的都不能用,我最开始用的是原作者的,是下面这个,我检查半天始终看不出来哪里有问题,但是重启logstash的时候就是一堆报错,无奈只有放弃
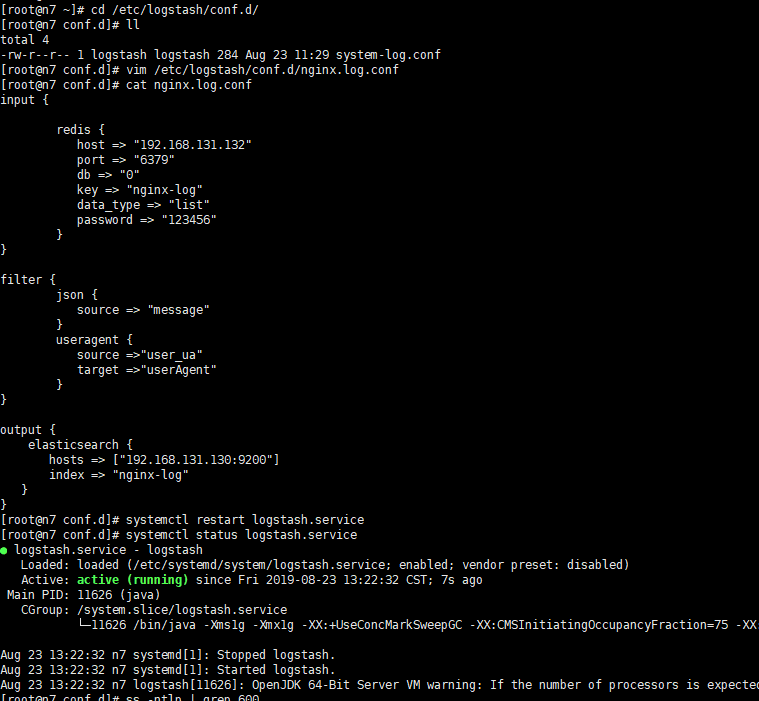
以下是原作者的注释:
[root@linux-host3 ~]# vim /etc/logstash/conf.d/nginx-log.conf
input {
redis {
host => “192.168.66.20”
port => “6379”
db => “1”
key => “nginx-log”
data_type => “list”
password => “123456”
}
}
filter {
json {
source => “message”
}
useragent {
source =>”user_ua” #这个表示对message里面的哪个字段进行分析
target =>”userAgent” #agent将收集出的user agent的信息配置到了单独的字段中
}
}
output {
elasticsearch {
hosts => [“192.168.66.15:9200”]
index => “nginx-log”
}
}
这里有个人就遇到了和我一样的报错
logstash 给elasticsearch 发送自定义日志数据,出现错误:Could not index event to Elasticsearch…有大神知道问题所在吗?
原文地址在 https://elasticsearch.cn/question/4692
这个都算好的了,我最开始是不停报错,最后改成了上面的配置文件才解决,希望大家多练习一下吧!
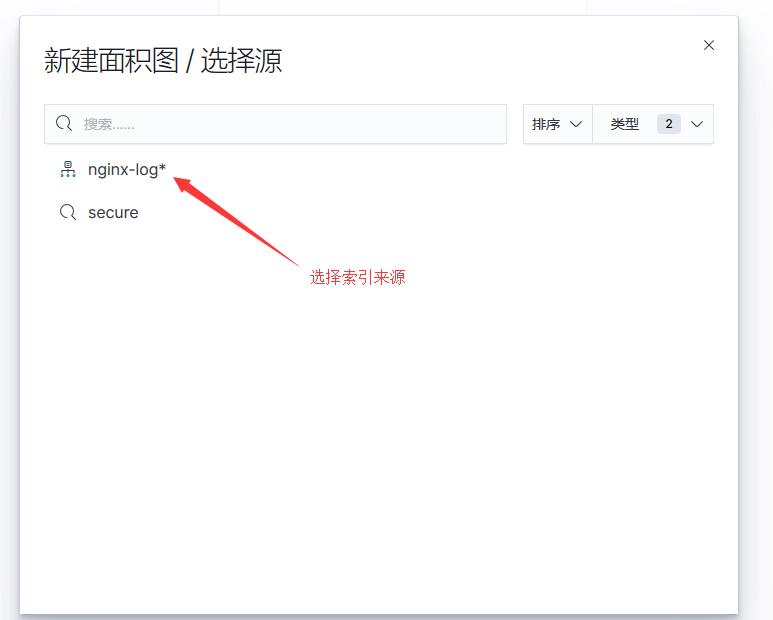
5使用kibana展示
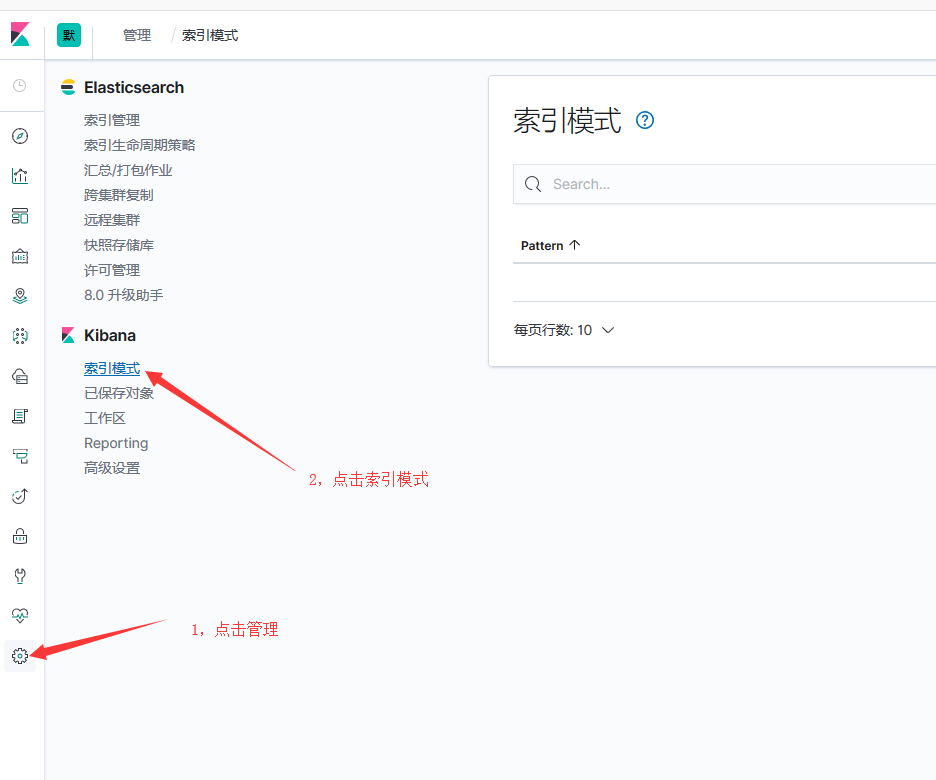


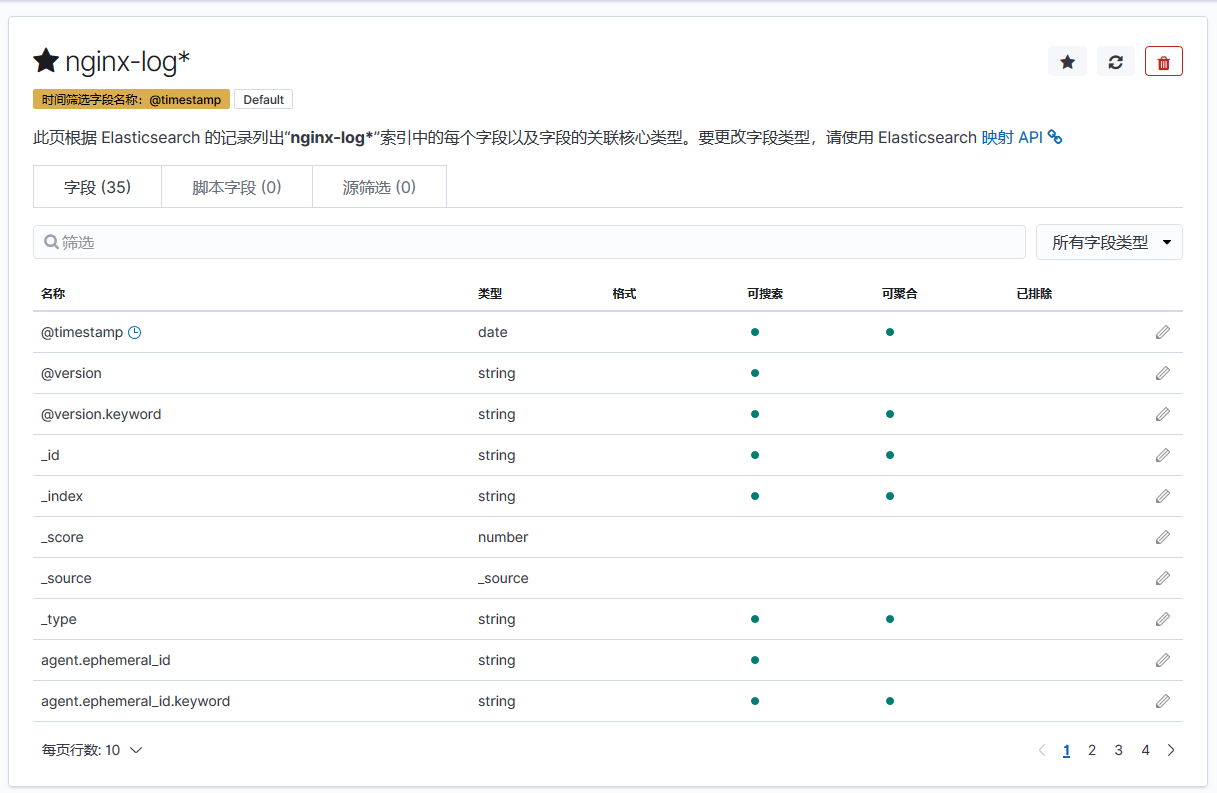
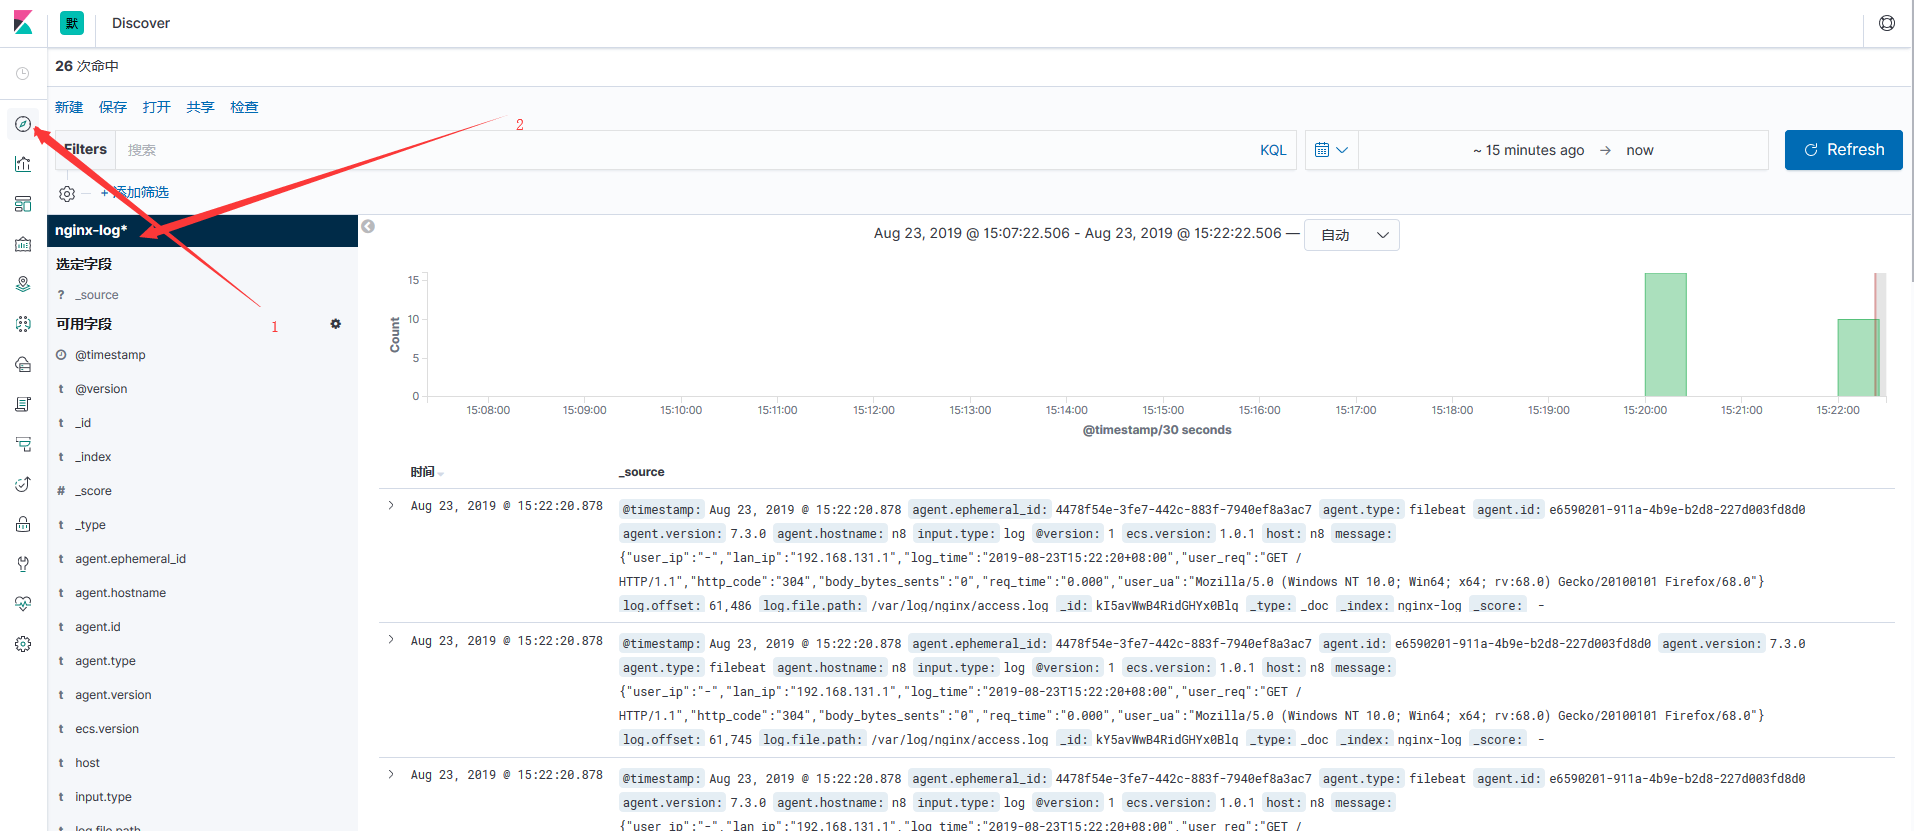

注意观察上面的日志,不能有报错,比如有不能索引之类,出问题,那就赶快去检查logstash写对了没有


