centos安装python3

本文转载自 https://towait.com/blog/how-to-install-python3-on-centos/ 感谢原作者

Centos7默认自带了Python2.7版本,但是因为项目需要使用Python3.x你可以按照此文的三个方法进行安装.

注:本文示例安装版本为Python3.5,

一、Python源代码编译安装
安装必要工具 yum-utils ,它的功能是管理repository及扩展包的工具 (主要是针对repository)

$ sudo yum install yum-utils
使用yum-builddep为Python3构建环境,安装缺失的软件依赖,使用下面的命令会自动处理.

$ sudo yum-builddep python
完成后下载Python3的源码包(笔者以Python3.5为例),Python源码包目录: https://www.python.org/ftp/python/ ,截至发博当日Python3的最新版本为 3.7.0

$ curl -O https://www.python.org/ftp/python/3.5.0/Python-3.5.0.tgz

最后一步,编译安装Python3,默认的安装目录是 /usr/local 如果你要改成其他目录可以在编译(make)前使用 configure 命令后面追加参数 “–prefix=/alternative/path” 来完成修改。

$ tar xf Python-3.5.0.tgz
$ cd Python-3.5.0
$ ./configure
$ make
$ sudo make install
至此你已经在你的CentOS系统中成功安装了python3、pip3、setuptools,查看python版本

$ python3 -V
如果你要使用Python3作为python的默认版本,你需要修改一下 bashrc 文件,增加一行alias参数

alias python=’/usr/local/bin/python3.5′
由于CentOS 7建议不要动/etc/bashrc文件,而是把用户自定义的配置放入/etc/profile.d/目录中,具体方法为

vi /etc/profile.d/python.sh
输入alias参数 alias python=’/usr/local/bin/python3.5’,保存退出

如果非root用户创建的文件需要注意设置权限

chmod 755 /etc/profile.d/python.sh
重启会话使配置生效

source /etc/profile.d/python.sh
二、从EPEL仓库安装
最新的EPEL 7仓库提供了Python3(python 3.4)的安装源,如果你使用CentOS7或更新的版本的系统你也可以按照下面的步骤很轻松的从EPEL仓库安装。

安装最新版本的EPEL

$ sudo yum install epel-release
用yum安装python 3.4:

$ sudo yum install python34
注意:上面的安装方法并未安装pip和setuptools,如果你要安装这两个库可以使用下面的命令:

$ curl -O https://bootstrap.pypa.io/get-pip.py
$ sudo /usr/bin/python3.4 get-pip.py
三、从SCL(Software Collections)仓库安装
最后一种方法是通过Software Collections (SCL) repository来安装,需要注意的是SCL仓库仅支持CentOS 6.5以上版本,最新版的SCL提供了Python3.3版本,具体安装步骤:

$ sudo yum install python33
从SCL中使用python3,你需要一行命令来启用Python3:

$ scl enable python33 <command>
您还可以使用Python编译器来调用一个bash shell:

$ scl enable python33 bash
总结

笔者建议使用前两种方法,老司机使用方法一编译安装;新手使用方法二yum二进制安装,简单方便。

发表在 python | 标签为 | 留下评论

git提交时报错Updates were rejected because the tip of your current branch is behind

今天我向mirror仓库备份代码的时候出现点问题
[root@XXX YYY]# git push mirror qc
Username for ‘http://10.196.12.247’: root
Password for ‘http://[email protected]’:
To http://10.196.12.247/root/XXX.git
! [rejected] qc -> qc (non-fast-forward)
error: failed to push some refs to ‘http://10.196.12.247/root/XXX.git’
hint: Updates were rejected because the tip of your current branch is behind
hint: its remote counterpart. Merge the remote changes (e.g. ‘git pull’)
hint: before pushing again.
hint: See the ‘Note about fast-forwards’ in ‘git push –help’ for details.

出现这样的问题是由于:自己当前版本低于远程仓库版本
有如下几种解决方法:

1.使用强制push的方法:
git push -u origin master -f
这样会使远程修改丢失,一般是不可取的,尤其是多人协作开发的时候。

2.push前先将远程repository修改pull下来
git pull origin master
git push -u origin master

3.若不想merge远程和本地修改,可以先创建新的分支:
git branch [name]
然后push
git push -u origin [name]

发表在 gitlab | 标签为 , | 留下评论

gitlab启用自带的docker registry

gitlab启用自带的docker registry

gitlab安装后默认不开启自带的docker registry。 需要修改/etc/gitlab/gitlab.rb文件,修改以下配置


registry_external_url ‘http://X.X.X.X:4567’
注意,请不要使用5000端口,因为被gitlab所带的nginx默认占用了。配置前查一遍自己的端口占用情况

这里配置不带ssl证书认证的docker registry。修改后执行以下命令重启

sudo gitlab-ctl stop
sudo gitlab-ctl reconfigure
sudo gitlab-ctl start

安装后随便找个项目都能看到packages-container registry,还能看到各种提示信息,比如登录 docker login X.X.X.X:1234

这个内置的registry的用户名和密码账户与gitlab一致,可以和gitlab-runner 配合,在.gitlab-ci.yaml里使用

我们随便找个镜像nginx来演示推送过程

先把nginx拖下来

[root@gitlab-runner ~]# docker pull nginx
Using default tag: latest
latest: Pulling from library/nginx
000eee12ec04: Pull complete 
eb22865337de: Pull complete 
bee5d581ef8b: Pull complete 
Digest: sha256:50cf965a6e08ec5784009d0fccb380fc479826b6e0e65684d9879170a9df8566
Status: Downloaded newer image for nginx:latest
docker.io/library/nginx:latest

然后我们重新打tag,这个非常重要,要推送到哪个仓库,就得把对应的地址写在tag里面,比如我的仓库是 10.196.12.251:4567/root/cicd-toolset 这个地址你刚把registry创建出来上面有,找不到没关系,就是你的项目地址,只不过前面要把仓库的端口号写上去。

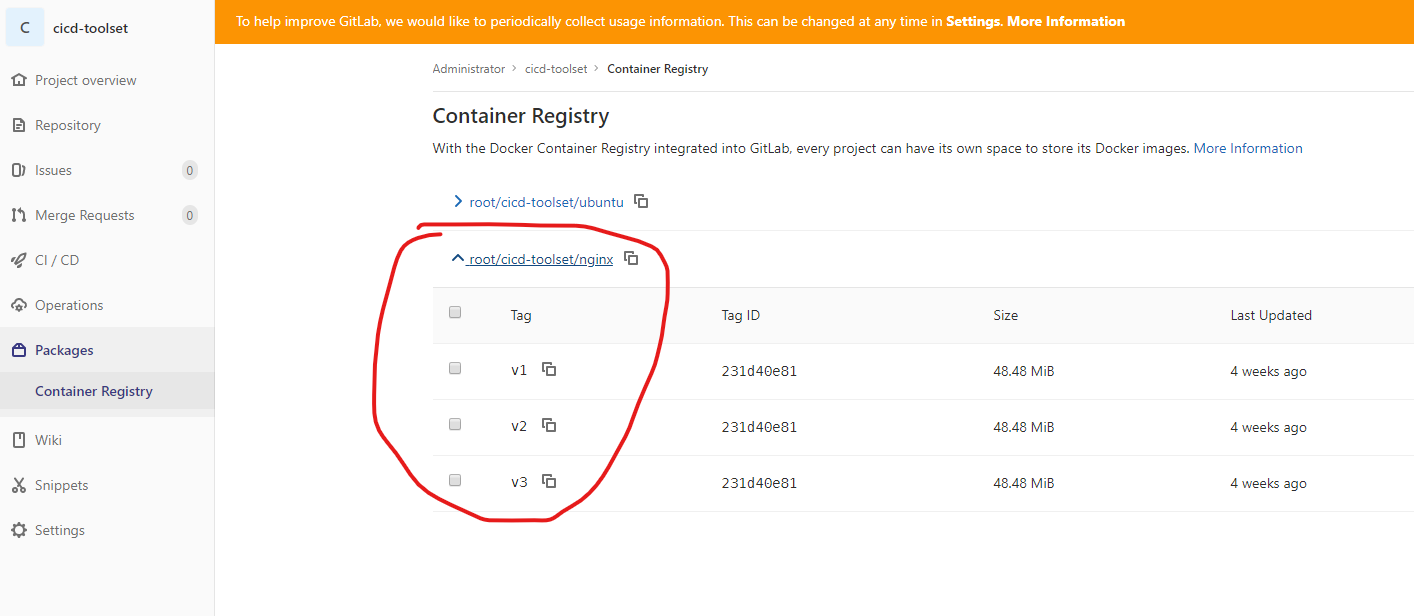
我为了方便打了3个tag v1 v2 v3

[root@gitlab-runner ~]# docker tag nginx:latest 10.196.12.247:4567/root/cicd-toolset/nginx:v1
[root@gitlab-runner ~]# docker tag nginx:latest 10.196.12.247:4567/root/cicd-toolset/nginx:v2
[root@gitlab-runner ~]# docker tag nginx:latest 10.196.12.247:4567/root/cicd-toolset/nginx:v3
[root@gitlab-runner ~]# docker images
REPOSITORY TAG IMAGE ID CREATED SIZE
docker stable 8e347affc72a 11 days ago 222MB
10.196.12.247:4567/root/cicd-toolset/nginx v1 231d40e811cd 4 weeks ago 126MB
10.196.12.247:4567/root/cicd-toolset/nginx v2 231d40e811cd 4 weeks ago 126MB
10.196.12.247:4567/root/cicd-toolset/nginx v3 231d40e811cd 4 weeks ago 126MB
nginx latest 231d40e811cd 4 weeks ago 126MB
最后一步,推送,后两个报错请忽略,因为本来就是一个镜像
[root@gitlab-runner ~]# docker push 10.196.12.247:4567/root/cicd-toolset/nginx:v1
The push refers to repository [10.196.12.247:4567/root/cicd-toolset/nginx]
4fc1aa8003a3: Pushed 
5fb987d2e54d: Pushed 
831c5620387f: Pushed 
v1: digest: sha256:189cce606b29fb2a33ebc2fcecfa8e33b0b99740da4737133cdbcee92f3aba0a size: 948
[root@gitlab-runner ~]# docker push 10.196.12.247:4567/root/cicd-toolset/nginx:v2
The push refers to repository [10.196.12.247:4567/root/cicd-toolset/nginx]
4fc1aa8003a3: Layer already exists 
5fb987d2e54d: Layer already exists 
831c5620387f: Layer already exists 
v2: digest: sha256:189cce606b29fb2a33ebc2fcecfa8e33b0b99740da4737133cdbcee92f3aba0a size: 948
[root@gitlab-runner ~]# docker push 10.196.12.247:4567/root/cicd-toolset/nginx:v3
The push refers to repository [10.196.12.247:4567/root/cicd-toolset/nginx]
4fc1aa8003a3: Layer already exists 
5fb987d2e54d: Layer already exists 
831c5620387f: Layer already exists 
v3: digest: sha256:189cce606b29fb2a33ebc2fcecfa8e33b0b99740da4737133cdbcee92f3aba0a size: 948

去仓库确认一下,镜像都上来了

发表在 Docker, gitlab | 标签为 , | 留下评论

HTTP/Insecure repository: http: server gave HTTP response to HTTPS client

docker push 报错 HTTP/Insecure repository

很简单,去daemon.json里面把 insecure-registries 加上

/etc/docker/daemon.json

{
"insecure-registries": ["10.0.0.15:5000"]
}

对于RHEL/CENTOS系列使用systemd的就按如上方法解决

包括自定义私有仓库也是相同的文件:

{
"insecure-registries": [
"X.X.X.X:1234"
]
}
//有多个仓库就用逗号隔开
{
"insecure-registries": [
"X.X.X.X:1234", 
"Y.Y.Y.Y:1234"
]
}
发表在 Docker | 标签为 | 留下评论

Gitlab报错503

gitlab报错503的情况很多,我记录一下这一次我的排错经历

首先,常规查看gitlab是哪个进程出错了

[root@gitlab ~]# gitlab-ctl status

run: alertmanager: (pid 1424) 3121s; run: log: (pid 1423) 3121s

down: gitaly: 0s, normally up, want up; run: log: (pid 1392) 3121s

run: gitlab-exporter: (pid 1410) 3121s; run: log: (pid 1409) 3121s

run: gitlab-workhorse: (pid 1405) 3121s; run: log: (pid 1403) 3121s

run: grafana: (pid 1422) 3121s; run: log: (pid 1421) 3121s

run: logrotate: (pid 1415) 3121s; run: log: (pid 1414) 3121s

run: nginx: (pid 1416) 3121s; run: log: (pid 1406) 3121s

run: node-exporter: (pid 1408) 3121s; run: log: (pid 1407) 3121s

run: postgres-exporter: (pid 1420) 3121s; run: log: (pid 1419) 3121s

run: postgresql: (pid 1404) 3121s; run: log: (pid 1402) 3121s

run: prometheus: (pid 1426) 3121s; run: log: (pid 1418) 3121s

run: redis: (pid 1390) 3121s; run: log: (pid 1388) 3121s

run: redis-exporter: (pid 1425) 3121s; run: log: (pid 1417) 3121s

run: sidekiq: (pid 1413) 3121s; run: log: (pid 1412) 3121s

run: unicorn: (pid 1395) 3121s; run: log: (pid 1394) 3121s

可以看到是gitaly挂了,那继续查gitaly的日志,查gitlab-shell没问题

[root@gitlab ~]# tail -f /var/log/gitlab/gitaly/gitlab-shell.log

{"method":"POST","url":"http://127.0.0.1:8080/api/v4/internal/allowed","duration":0.129717868,"gitaly_embedded":true,"pid":11574,"level":"info","msg":"finished HTTP request","time":"2019-12-08T22:07:42-05:00"}

{"method":"POST","url":"http://127.0.0.1:8080/api/v4/internal/pre_receive","duration":0.099115893,"gitaly_embedded":true,"pid":11574,"level":"info","msg":"finished HTTP request","time":"2019-12-08T22:07:42-05:00"}

{"method":"POST","url":"http://127.0.0.1:8080/api/v4/internal/post_receive","duration":0.070931364,"gitaly_embedded":true,"pid":11596,"level":"info","msg":"finished HTTP request","time":"2019-12-08T22:07:43-05:00"}

^C

继续,查到current的时候发现问题了

[root@gitlab ~]# cd /var/log/gitlab/gitaly/

[root@gitlab gitaly]# ll

total 22680

-rwxr--r-- 1 root root     2712 Dec  7 02:11 @400000005deb50b42308ae6c.s

-rwxr--r-- 1 root root     1311 Dec  8 02:12 @400000005deca25c2724495c.s

-rw-r--r-- 1 root root     9464 Dec  8 19:20 @400000005deda34c12795ccc.u

-rw-r--r-- 1 root root   148193 Dec  9 00:20 @400000005deddfb10aa81c7c.u

-rw-r--r-- 1 root root     1448 Dec  9 00:46 @400000005dedffdb23a8da54.u

-rw-r--r-- 1 root root 13167183 Dec  9 14:00 @400000005deef40c346c18ec.u

-rw-r--r-- 1 root root  1799877 Dec  9 21:51 @400000005def08f20691d4d4.u

-rwxr--r-- 1 root root   296533 Dec 15 20:31 @400000005df6de5f17d3b17c.s

-rw-r--r-- 1 root root       30 Dec  6 01:59 config

-rw-r--r-- 1 root root  1478904 Dec 15 21:42 current

-rw-r--r-- 1 git  git         0 Dec  8 22:07 gitaly_hooks.log

-rw-r--r-- 1 git  git       639 Dec  8 22:07 gitlab-shell.log

-rw------- 1 root root        0 Dec  6 01:59 lock

-rw-r--r-- 1 root root        0 Dec 15 20:31 state

[root@gitlab gitaly]# tail -f current

{"error":"strconv.Atoi: parsing \"\": invalid syntax","level":"fatal","msg":"find gitaly","time":"2019-12-16T02:42:17Z","wrapper":25383}

{"level":"info","msg":"Wrapper started","time":"2019-12-16T02:42:18Z","wrapper":25394}

{"level":"info","msg":"finding gitaly","pid_file":"/var/opt/gitlab/gitaly/gitaly.pid","time":"2019-12-16T02:42:18Z","wrapper":25394}

{"error":"strconv.Atoi: parsing \"\": invalid syntax","level":"fatal","msg":"find gitaly","time":"2019-12-16T02:42:18Z","wrapper":25394}

{"level":"info","msg":"Wrapper started","time":"2019-12-16T02:42:19Z","wrapper":25401}

{"level":"info","msg":"finding gitaly","pid_file":"/var/opt/gitlab/gitaly/gitaly.pid","time":"2019-12-16T02:42:19Z","wrapper":25401}

{"error":"strconv.Atoi: parsing \"\": invalid syntax","level":"fatal","msg":"find gitaly","time":"2019-12-16T02:42:19Z","wrapper":25401}

{"level":"info","msg":"Wrapper started","time":"2019-12-16T02:42:20Z","wrapper":25410}

{"level":"info","msg":"finding gitaly","pid_file":"/var/opt/gitlab/gitaly/gitaly.pid","time":"2019-12-16T02:42:20Z","wrapper":25410}

{"error":"strconv.Atoi: parsing \"\": invalid syntax","level":"fatal","msg":"find gitaly","time":"2019-12-16T02:42:20Z","wrapper":25410}

{"level":"info","msg":"Wrapper started","time":"2019-12-16T02:42:21Z","wrapper":25419}

{"level":"info","msg":"finding gitaly","pid_file":"/var/opt/gitlab/gitaly/gitaly.pid","time":"2019-12-16T02:42:21Z","wrapper":25419}

{"error":"strconv.Atoi: parsing \"\": invalid syntax","level":"fatal","msg":"find gitaly","time":"2019-12-16T02:42:21Z","wrapper":25419}

{"level":"info","msg":"Wrapper started","time":"2019-12-16T02:42:22Z","wrapper":25426}

{"level":"info","msg":"finding gitaly","pid_file":"/var/opt/gitlab/gitaly/gitaly.pid","time":"2019-12-16T02:42:22Z","wrapper":25426}

{"error":"strconv.Atoi: parsing \"\": invalid syntax","level":"fatal","msg":"find gitaly","time":"2019-12-16T02:42:22Z","wrapper":25426}

{"level":"info","msg":"Wrapper started","time":"2019-12-16T02:42:23Z","wrapper":25433}

{"level":"info","msg":"finding gitaly","pid_file":"/var/opt/gitlab/gitaly/gitaly.pid","time":"2019-12-16T02:42:23Z","wrapper":25433}

{"error":"strconv.Atoi: parsing \"\": invalid syntax","level":"fatal","msg":"find gitaly","time":"2019-12-16T02:42:23Z","wrapper":25433}

{"level":"info","msg":"Wrapper started","time":"2019-12-16T02:42:24Z","wrapper":25440}

{"level":"info","msg":"finding gitaly","pid_file":"/var/opt/gitlab/gitaly/gitaly.pid","time":"2019-12-16T02:42:24Z","wrapper":25440}

{"error":"strconv.Atoi: parsing \"\": invalid syntax","level":"fatal","msg":"find gitaly","time":"2019-12-16T02:42:24Z","wrapper":25440}

^C


看到报错没

{"error":"strconv.Atoi: parsing \"\": invalid syntax","level":"fatal","msg":"find gitaly","time":"2019-12-16T02:42:24Z","wrapper":25440}


搜索这个报错,都说删除这个进程对应的pid文件,照做

[root@gitlab gitaly]# cd /var/opt/gitlab/gitaly/

[root@gitlab gitaly]# ll

total 8

-rw-r----- 1 root git  781 Dec  6 01:59 config.toml

-rw------- 1 git  git    0 Dec  9 00:46 gitaly.pid

srwxr-xr-x 1 git  git    0 Dec  9 00:46 gitaly.socket

drwx------ 2 git  root   6 Dec  6 01:59 internal_sockets

-rw-r--r-- 1 root root  23 Dec  6 01:59 VERSION

[root@gitlab gitaly]# rm -rf gitaly.pid


重启gitlab正常

[root@gitlab gitaly]# gitlab-ctl restart

ok: run: alertmanager: (pid 26304) 0s

ok: run: gitaly: (pid 26315) 0s

ok: run: gitlab-exporter: (pid 26334) 1s

ok: run: gitlab-workhorse: (pid 26337) 0s

ok: run: grafana: (pid 26356) 0s

ok: run: logrotate: (pid 26368) 1s

ok: run: nginx: (pid 26375) 0s

ok: run: node-exporter: (pid 26385) 1s

ok: run: postgres-exporter: (pid 26391) 0s

ok: run: postgresql: (pid 26477) 1s

ok: run: prometheus: (pid 26486) 0s

ok: run: redis: (pid 26497) 0s

ok: run: redis-exporter: (pid 26502) 1s

ok: run: sidekiq: (pid 26509) 1s

ok: run: unicorn: (pid 26520) 0s


再看一次,一切正常了

[root@gitlab gitaly]# gitlab-ctl status

run: alertmanager: (pid 26304) 14s; run: log: (pid 1423) 3337s

run: gitaly: (pid 26315) 13s; run: log: (pid 1392) 3337s

run: gitlab-exporter: (pid 26334) 13s; run: log: (pid 1409) 3337s

run: gitlab-workhorse: (pid 26337) 12s; run: log: (pid 1403) 3337s

run: grafana: (pid 26356) 12s; run: log: (pid 1421) 3337s

run: logrotate: (pid 26368) 12s; run: log: (pid 1414) 3337s

run: nginx: (pid 26375) 12s; run: log: (pid 1406) 3338s

run: node-exporter: (pid 26385) 12s; run: log: (pid 1407) 3338s

run: postgres-exporter: (pid 26391) 11s; run: log: (pid 1419) 3338s

run: postgresql: (pid 26477) 11s; run: log: (pid 1402) 3338s

run: prometheus: (pid 26486) 10s; run: log: (pid 1418) 3338s

run: redis: (pid 26497) 10s; run: log: (pid 1388) 3338s

run: redis-exporter: (pid 26502) 10s; run: log: (pid 1417) 3338s

run: sidekiq: (pid 26509) 9s; run: log: (pid 1412) 3338s

run: unicorn: (pid 26520) 7s; run: log: (pid 1394) 3338s

发表在 gitlab | 标签为 | 留下评论

GIT命令大全

CREAT(创建)
git init
在当前目录下创建一个本(Create a new local repository)
git clone  ssh://[email protected]/repo.git
在远程库克隆一个本地库(Clone an existing repository)

Configuration(配置)
git config [–global] user.name
设置提交时附带的名字(Set the name attached to all your commits)
git config [–global] user.email
设置提交时附带的email(Set the email attached to all your commits)
git config –global color.ui auto
设置命令行输出回执的颜色(Set colorzition of  command line output for all repos)
git config [–global] user.name
获取当前库设置的用户名(Print set name(in current repository or globally))
git config [–global] user.email
获取当前库设置的email(Print set email(in current repository or  globally))

Local Changes(本地操作)
git status
查看工作区内的文件修改(List changed files in your working directory)
git diff
查看已追踪文件的修改(List changed to tracked files)
git add
添加此文件的所有修改在下次提交时(Add all current changed in file to the next commit)
git add .
添加本地库中的所有修改在下次提交的时(Add all current changed to the next commit)
git mv
修改文件名并添加到下次提交当中(Rename file and add it to next commit)
git rm
删除此文件并将此处删除添加到下次提交当中(Delete file and add its deletion to next commit)
git commit -a
提交工作区所有文件(Commit all local changes in tracked files)

Commit History(提交历史)
git log
显示所有的提交日志(Show all commits)
git log -p
这个文件的最后一次提交日志(Shwo changes over time for a specific file)
git log –author=<committer name>
这个提交者最后一次的提交日志(Show changes over time for a specific committer)
git blame <file>
此文件被谁修改了(Who changed what and when in file)
git stash
查看临时的文件变动 (Store changes temporarily)
git stash pop
删除上一次记录储蓄新的改动记录(Remove and apply changes)
git rm –cached <file>
把此文件从过去的提交记录中删除但是保留当前本地的文件(Remvoe file from previous commits but keep it locally)

Branches & Tags(分支和标签)
git branch
本地所有的分支列表(List all existing branches)
git checkout <branch>
切换分支(Switch HEAD branch)
git branch <new branch>
创建新分支(Creat a new branch based on your current HEAD)
git branch –track <new-branch><remote-branch>
创建一个新的分支基于一个远程的分支(Creat a new  tracking branch based on a remote branch)
git branch -d <branch>
删除一个本地分支(Delete a local branch)
git branch origin –delete <branch>
删除一个远程分支(Delete a remote branch)
git push <remote> : <old name>
重命名远程分支名(Rename a branch on remote)git push
git push <remote> <new name>
git tag <tag-name>
给当前提交打一个tag,也可以查看当前标签(Tag the current commit)

Update & Publish(更新和提交)
git remote -v
查看远程库的地址列表(List all currently configured remotes)
git remote show <remote>
查看这个远程库的信息(Show information about a remote)
git remote add <remote> <url>
添加新的远程库(Add new remote repository)
git remote rename <old-name> <new-name>
重命名远程库(Rename a remote)
git fetch <remote>
从远程库更新所有的信息到本地,但是不合并(Download all changes from remote,but don’t merge into HEAD)
git fetch -p <remote>
从远程库更新所有的信息到本地,但是不合并并清理已删除的远程分支(Download all changes fromm remote,but don’t merge in HEAD and clean up deleted branchs from origin)
git pull <remote><branch>
从远程库更新数据并立即合并数据(Download changes and directly merge into HEAD)
git push <remote><branch>
将本地数据同步到远程库中(Publish local changes on a remote)
git remote add –track <remote-branch><remote><url>
追踪一个远程库(Track a remote repository)
git push –tags
同步标签到远程库(Publish your tags
git remote show <remote>
显示远程库信息(Show information about a submodule)

Merge & Rebase(分支合并和重整数据)
git merge <branch>
将其他分支和并到当前分支(Merge branch into your current HEAD)
git rebase <branch>
将亲她分支合并到当前分支并按照提交顺序排序(Rebase your current HEAD onto branch)
git rebase –abort
终止当前合并(Abort a rebase)
git rebase –continue
解决冲突后继续当前合并和重整(Continue a rebase after resolving confilcys)
git mergetool
使用配置的合并工具解决冲突(Resolve conflicts using your configured merge tool)
git add <resolved-file>
手动解决冲突使用编辑器并标记已解决的文件
git rm <resolved-file>

Undo(撤销)
git reset –hard HEAD
丢弃所有的本地修改(Discard all local changes in your working directory)
git checkout HEAD <file>
丢弃此文件的本地修改(Discard local changes in a specific file)
git revert  <commit>
撤销某次的提交内容(Revert a commit by providing a new commit with contrary changes)
git checkout <commit><file>
撤销某次提交的某个文件的内容(Revert a specific file from a previous commit)

重置头指针到过去的某个提交上,版本回退(Reset your HEAD pointer to a previous commit)
git reset –hard  <commit>
回退到某个版本(Discarding local changes)
git reset <commit>
回退到某个版本并保存未追踪的改动
git reset –keep <commit>
回退到某个版本并保存未提交的改动

发表在 gitlab | 标签为 , | 留下评论

windows关闭Hyper-v

关闭Hyper-v
我之前在win上面安装了docker,然后发现docker和vmware不能共存,所以卸载了docker,但是又发现安装docker时开启了hyper-v缺没关闭,vmware不能正常启动,按照以下方法可以解决这个问题:

运行命令(以管理员身份来运行)
bcdedit /set hypervisorlaunchtype off

完成后检查一下

Windows PowerShell
Copyright (C) Microsoft Corporation. All rights reserved.

PS C:\Windows\system32> bcdedit /enum

Windows Boot Manager
--------------------
identifier {bootmgr}
device partition=\Device\HarddiskVolume2
path \EFI\Microsoft\Boot\bootmgfw.efi
description Windows Boot Manager
locale en-US
inherit {globalsettings}
default {current}
resumeobject {fad8a378-1589-11ea-9e3d-931aede0c94c}
displayorder {current}
toolsdisplayorder {memdiag}
timeout 30

Windows Boot Loader
-------------------
identifier {current}
device partition=C:
path \Windows\system32\winload.efi
description Windows 10
locale en-US
inherit {bootloadersettings}
recoverysequence {fad8a37a-1589-11ea-9e3d-931aede0c94c}
displaymessageoverride Recovery
recoveryenabled Yes
isolatedcontext Yes
allowedinmemorysettings 0x15000075
osdevice partition=C:
systemroot \Windows
resumeobject {fad8a378-1589-11ea-9e3d-931aede0c94c}
nx OptIn
bootmenupolicy Standard
hypervisorlaunchtype Off
PS C:\Windows\system32>
发表在 通用 | 标签为 , | 留下评论

AWS的SQS和SNS有什么区别

SNS是分布式发布订阅系统。 当发布者将消息发送给SNS时,消息将被推送给订阅者。 SQS是分布式排队系统。 消息不会被推送到接收者。 接收方必须轮询SQS以接收消息。 多个接收器不能同时接收消息。 任何一个接收器都可以接收消息,处理并删除它。 其他接收器稍后不会收到相同的消息。 与SNS不同,轮询固有地在SQS中引入了一些消息传递延迟,其中消息被立即推送给订户。 SNS支持多个端点,如电子邮件,短信,http端点和SQS。 如果您想要未知的订户数量和类型来接收消息,则需要SNS

您不必总是将SNSSQS结合在一起。 除了SQS,您可以让SNS向电子邮件,短信或http端点发送消息。 将SNSSQS耦合具有优势。 您可能不希望外部服务与主机建立连接(防火墙可能会阻止从外部到主机的所有传入连接)。 你的终点可能会因为大量的消息而死亡。 电子邮件和短信可能不是您快速处理邮件的选择。 通过将SNSSQS耦合,您可以按照自己的节奏接收消息。 它允许客户端脱机,容忍网络和主机故障。 您也可以保证交货。 如果将SNS配置为将消息发送到http端点或电子邮件或SMS,则若干发送消息失败可能会导致消息被丢弃。

SQS主要用于解耦应用程序或集成应用程序。 消息可以在SQS中存储很短的时间(最多14天)。 SNS向几个订户分发了几个消息副本。 例如,假设您要将应用程序生成的数据复制到多个存储系统。 您可以使用SNS并将此数据发送给多个订阅者,每个订阅者将收到的消息复制到不同的存储系统(s3,主机上的硬盘,数据库等)。

What is the difference between Amazon SNS and Amazon SQS? – Stack Overflow

SNS is a distributed publish-subscribe system. Messages are pushed to subscribers as and when they are sent by publishers to SNS. SQS is distributed queuing system. Messages are NOT pushed to receivers. Receivers have to poll SQS to receive messages. Messages can’t be received by multiple receivers at the same time. Any one receiver can receive a message, process and delete it. Other receivers do not receive the same message later. Polling inherently introduces some latency in message delivery in SQS unlike SNS where messages are immediately pushed to subscribers. SNS supports several end points such as email, sms, http end point and SQS. If you want unknown number and type of subscribers to receive messages, you need SNS.

You don’t have to couple SNS and SQS always. You can have SNS send messages to email, sms or http end point apart from SQS. There are advantages to coupling SNS with SQS. You may not want an external service to make connections to your hosts (firewall may block all incoming connections to your host from outside). Your end point may just die because of heavy volume of messages. Email and SMS maybe not your choice of processing messages quickly. By coupling SNS with SQS, you can receive messages at your pace. It allows clients to be offline, tolerant to network and host failures. You also achieve guaranteed delivery. If you configure SNS to send messages to an http end point or email or SMS, several failures to send message may result in message being dropped.

SQS is mainly used to decouple applications or integrate applications. Messages can be stored in SQS for short duration of time (max 14 days). SNS distributes several copies of message to several subscribers. For example, lets say you want to replicate data generated by an application to several storage systems. You could use SNS and send this data to multiple subscribers, each replicating the messages it receives to different storage systems (s3, hard disk on your host, database, etc.).

发表在 aws | 标签为 , , | 留下评论

KVM迁移报错the CPU is incompatible with host CPU: Host CPU does not provide required features

KVM启动虚拟机CPU报错,之前已经写过日志,这里说的是如果你实在找不到对应的CPU架构,那就直接选择”host-model”

比如,我之前的配置文件,cpu对应的配置如下:

<cpu mode='custom' match='exact' check='partial'>
<model fallback='allow'>Skylake-Client</model>
<feature policy='require' name='md-clear'/>
<feature policy='require' name='spec-ctrl'/>
<feature policy='require' name='ssbd'/>
</cpu>

这个配置是我创建模板机默认的,现在我把其中一台虚拟机迁移到另外一台主机就报错了

the CPU is incompatible with host CPU: Host CPU does not provide required features: x2apic, hle, rtm, mpx, rdseed, adx, smap, xsavec, xgetbv1, 3dnowprefetch

那我又不想去查微代码,那就直接改成复制主机模式吧,更改如下:

<cpu mode='host-model' check='partial'>
<model fallback='allow'/>
</cpu>

这一类报错网上有很多说明,我贴一个:

https://bugzilla.redhat.com/show_bug.cgi?id=1609818

重点是最后几位小哥的建议:

Daniel Berrangé 2018-07-30 15:03:30 UTC
Ok your guest has been given the -IBRS variant which requires spec-ctrl

    <model fallback='allow'>Skylake-Client-IBRS</model>

but the host does not support this:

    <model>Skylake-Client</model>

So either don't request this -IBRS CPU for your guest, or you'll need the new microcode.

Comment 9Martin Krajnak 2018-07-30 15:12:43 UTC
Ok, I noticed just now that I have that CPU param, not sure where it came from I was just confused since it worked on different kernel.

So if anyone hits this issue all you have to do is:

1.Open virt-manager
2.Go to parameters of VM
3.Go to cpu section
4.Check "Copy host CPU configuration" and click Apply

that fixed the problem for me

thanks a lot Daniel

Comment 10James Hartsock 2018-09-17 13:52:44 UTC
The virt-install way would be to add '--cpu host', or at least it worked for me.


发表在 kvm | 标签为 | 留下评论

Centos7可用国内阿里和网易base源/epel源

1、Base源
wget http://mirrors.aliyun.com/repo/Centos-7.repo
wget http://mirrors.163.com/.help/CentOS7-Base-163.repo
2、安装epel源,epel源安装成功,比原来多了一个epel.repo和epel-testing.repo文件
yum install -y epel-release
换成阿里的源
wget -O /etc/yum.repos.d/epel-7.repo http://mirrors.aliyun.com/repo/epel-7.repo

发表在 LinuxBasic, yum | 标签为 | 留下评论