GitLab各类型账号的权限

这个官网有详细的说明,建议直接去官网查看

https://docs.gitlab.com/ee/user/permissions.html

Permissions

Users have different abilities depending on the access level they have in a particular group or project. If a user is both in a group’s project and the project itself, the highest permission level is used.

On public and internal projects the Guest role is not enforced. All users will be able to create issues, leave comments, and clone or download the project code.

When a member leaves a team’s project, all the assigned Issues and Merge Requests will be unassigned automatically.

GitLab administrators receive all permissions.

To add or import a user, you can follow the project members documentation.

For information on eligible approvers for Merge Requests, see Eligible approvers.

Principles behind permissions

See our product handbook on permissions

Instance-wide user permissions

By default, users can create top-level groups and change their usernames. A GitLab administrator can configure the GitLab instance to modify this behavior.

Project members permissions

Note: In GitLab 11.0, the Master role was renamed to Maintainer.

The following table depicts the various user permission levels in a project.

Action Guest Reporter Developer Maintainer Owner
Download project ✓ (1)
Leave comments ✓ (1)
View Insights charts 
View approved/blacklisted licenses 
View license management reports  ✓ (1)
View Security reports  ✓ (1)
View project code ✓ (1)
Pull project code ✓ (1)
View GitLab Pages protected by access control
View wiki pages ✓ (1)
See a list of jobs ✓ (3)
See a job log ✓ (3)
Download and browse job artifacts ✓ (3)
Create new issue ✓ (1)
See related issues
Create confidential issue ✓ (1)
View confidential issues (2)
Assign issues
Label issues
Lock issue discussions
Manage issue tracker
Manage related issues 
Create issue from vulnerability 
Manage labels
Create code snippets
See a commit status
See a container registry
See environments
See a list of merge requests
View project statistics
View Error Tracking list
Pull from Maven repository or NPM registry 
Publish to Maven repository or NPM registry 
Create new branches
Push to non-protected branches
Force push to non-protected branches
Remove non-protected branches
Create new merge request
Assign merge requests
Label merge requests
Lock merge request discussions
Manage/Accept merge requests
Create new environments
Stop environments
Add tags
Cancel and retry jobs
Create or update commit status
Update a container registry
Remove a container registry image
Create/edit/delete project milestones
Use security dashboard 
Dismiss vulnerability 
Apply code change suggestions
Create and edit wiki pages
Use environment terminals
Run Web IDE’s Interactive Web Terminals 
Add new team members
Enable/disable branch protection
Push to protected branches
Turn on/off protected branch push for devs
Enable/disable tag protections
Rewrite/remove Git tags
Edit project
Add deploy keys to project
Configure project hooks
Manage Runners
Manage job triggers
Manage variables
Manage GitLab Pages
Manage GitLab Pages domains and certificates
Remove GitLab Pages
Manage clusters
Manage license policy 
Edit comments (posted by any user)
Manage Error Tracking
Delete wiki pages
View project Audit Events
Switch visibility level
Transfer project to another namespace
Remove project
Delete issues
Force push to protected branches [^4]
Remove protected branches [^4]
  • (1): All users are able to perform this action on public and internal projects, but not private projects.
  • (2): Guest users can only view the confidential issues they created themselves
  • (3): If Public pipelines is enabled in Project Settings > CI/CD
  • (4): Not allowed for Guest, Reporter, Developer, Maintainer, or Owner

Project features permissions

Wiki and issues

Project features like wiki and issues can be hidden from users depending on which visibility level you select on project settings.

  • Disabled: disabled for everyone
  • Only team members: only team members will see even if your project is public or internal
  • Everyone with access: everyone can see depending on your project visibility level
  • Everyone: enabled for everyone (only available for GitLab Pages)

Protected branches

To prevent people from messing with history or pushing code without review, we’ve created protected branches. Read through the documentation on protected branches to learn more.

Additionally, you can allow or forbid users with Maintainer and/or Developer permissions to push to a protected branch. Read through the documentation onAllowed to Merge and Allowed to Push settings to learn more.

Cycle Analytics permissions

Find the current permissions on the Cycle Analytics dashboard on the documentation on Cycle Analytics permissions.

Issue Board permissions

Developers and users with higher permission level can use all the functionality of the Issue Board, that is create/delete lists and drag issues around. Read though the documentation on Issue Boards permissions to learn more.

File Locking permissions

PREMIUM
SILVER

The user that locks a file or directory is the only one that can edit and push their changes back to the repository where the locked objects are located.

Read through the documentation on permissions for File Locking to learn more.

Confidential Issues permissions

Confidential issues can be accessed by reporters and higher permission levels, as well as by guest users that create a confidential issue. To learn more, read through the documentation on permissions and access to confidential issues.

Releases permissions

Project Releases can be read by project members with Reporter, Developer, Maintainer, and Owner permissions. Guest users can access Release pages for downloading assets but are not allowed to download the source code nor see repository information such as tags and commits.

Releases can be created, updated, or deleted via Releases APIs by project Developers, Maintainers, and Owners.

Group members permissions

Note: In GitLab 11.0, the Master role was renamed to Maintainer.

Any user can remove themselves from a group, unless they are the last Owner of the group. The following table depicts the various user permission levels in a group.

Action Guest Reporter Developer Maintainer Owner
Browse group
View Insights charts 
View group epic 
Create/edit group epic 
Manage group labels
Create project in group
Create/edit/delete group milestones
Enable/disable a dependency proxy 
Edit group
Create subgroup
Manage group members
Remove group
Delete group epic 
View group Audit Events

Subgroup permissions

When you add a member to a subgroup, they inherit the membership and permission level from the parent group. This model allows access to nested groups if you have membership in one of its parents.

To learn more, read through the documentation on subgroups memberships.

External users permissions

In cases where it is desired that a user has access only to some internal or private projects, there is the option of creating External Users. This feature may be useful when for example a contractor is working on a given project and should only have access to that project.

External users can only access projects to which they are explicitly granted access, thus hiding all other internal or private ones from them. Access can be granted by adding the user as member to the project or group.

They will, like usual users, receive a role in the project or group with all the abilities that are mentioned in the table above. They cannot however create groups or projects, and they have the same access as logged out users in all other cases.

An administrator can flag a user as external through the API or by checking the checkbox on the admin panel. As an administrator, navigate to Admin > Users to create a new user or edit an existing one. There, you will find the option to flag the user as external.

By default new users are not set as external users. This behavior can be changed by an administrator under Admin > Application Settings.

Default internal users

The “Internal users” field allows specifying an e-mail address regex pattern to identify default internal users.

New users whose email address matches the regex pattern will be set to internal by default rather than an external collaborator.

The regex pattern format is Ruby, but it needs to be convertible to JavaScript, and the ignore case flag will be set, e.g. “/regex pattern/i”.

Here are some examples:

  • Use \.internal@domain\.com$ to mark email addresses ending with “[email protected]” internal.
  • Use ^(?:(?!\.ext@domain\.com).)*$\r? to mark users with email addresses NOT including [email protected] internal.

Please be aware that this regex could lead to a DOS attack, see ReDos on Wikipedia.

Auditor users

PREMIUM

Auditor users are given read-only access to all projects, groups, and other resources on the GitLab instance.

An Auditor user should be able to access all projects and groups of a GitLab instance with the permissions described on the documentation on auditor users permissions.

Read more about Auditor users.

Project features

Project features like wiki and issues can be hidden from users depending on which visibility level you select on project settings.

  • Disabled: disabled for everyone
  • Only team members: only team members will see even if your project is public or internal
  • Everyone with access: everyone can see depending on your project visibility level
  • Everyone: enabled for everyone (only available for GitLab Pages)

GitLab CI/CD permissions

Note: In GitLab 11.0, the Master role was renamed to Maintainer.

GitLab CI/CD permissions rely on the role the user has in GitLab. There are four permission levels in total:

  • admin
  • maintainer
  • developer
  • guest/reporter

The admin user can perform any action on GitLab CI/CD in scope of the GitLab instance and project. In addition, all admins can use the admin interface under/admin/runners.

Action Guest, Reporter Developer Maintainer Admin
See commits and jobs
Retry or cancel job
Erase job artifacts and trace ✓ (1)
Remove project
Create project
Change project configuration
Add specific runners
Add shared runners
See events in the system
Admin interface
  • 1: Only if the job was triggered by the user

Job permissions

Note: In GitLab 11.0, the Master role was renamed to Maintainer.

Note: GitLab 8.12 has a completely redesigned job permissions system. Read all about the new model and its implications.

This table shows granted privileges for jobs triggered by specific types of users:

Action Guest, Reporter Developer Maintainer Admin
Run CI job
Clone source and LFS from current project
Clone source and LFS from public projects
Clone source and LFS from internal projects ✓ (1) ✓ (1)
Clone source and LFS from private projects ✓ (2) ✓ (2) ✓ (2)
Pull container images from current project
Pull container images from public projects
Pull container images from internal projects ✓ (1) ✓ (1)
Pull container images from private projects ✓ (2) ✓ (2) ✓ (2)
Push container images to current project
Push container images to other projects
Push source and LFS
  • 1: Only if the user is not an external one
  • 2: Only if the user is a member of the project

New CI job permissions model

GitLab 8.12 has a completely redesigned job permissions system. To learn more, read through the documentation on the new CI/CD permissions model.

Running pipelines on protected branches

The permission to merge or push to protected branches is used to define if a user can run CI/CD pipelines and execute actions on jobs that are related to those branches.

See Security on protected branches for details about the pipelines security model.

LDAP users permissions

Since GitLab 8.15, LDAP user permissions can now be manually overridden by an admin user. Read through the documentation on LDAP users permissions to learn more

发表在 gitlab | 标签为 | 留下评论

linux buff/cache过大,如何清理,附清理脚本

在Linux下经常会遇到buff/cache内存占用过多问题,尤其是使用云主机的时候最严重,由于很多是虚拟内存,因此如果buff/cache占用过大的,free空闲内存就很少,影响使用;

通常内存关系是:

普通机器:total=used+free

虚拟机器:total=used+free+buff/cache

现在给大家演示一下,我找了台虚拟机,当然,现在的buff/cache不是很大

在操作之前,要先sync一下,刷新下缓存,避免出现意外(描述:sync 命令运行 sync 子例程。如果必须停止系统,则运行sync 命令以确保文件系统的完整性。sync 命令将所有未写的系统缓冲区写到磁盘中,包含已修改的 i-Node、已延迟的块 I/O 和读写映射文件)

然后使用命令清除cache缓存

通过3次清除,可以看到内存增加了

这个1、2、3分别是什么意思,自己看官方文档吧

  1. Writing to this will cause the kernel to drop clean caches, dentries and inodes from memory, causing that memory to become free.
  2. To free pagecache:
  3. * echo 1 > /proc/sys/vm/drop_caches
  4. To free dentries and inodes:
  5. * echo 2 > /proc/sys/vm/drop_caches
  6. To free pagecache, dentries and inodes:
  7. * echo 3 > /proc/sys/vm/drop_caches
  8. As this is a non-destructive operation, and dirty objects are notfreeable, the user should run “sync” first in order to make sure allcached objects are freed.
  9. This tunable was added in 2.6.16.

当然,再拓展一下,你也可以写个自动化的脚本,更有意思

1、编写shell定时任务脚本freemem.sh

#! /bin/sh 
used=`free -m | awk 'NR==2' | awk '{print $3}'` 
free=`free -m | awk 'NR==2' | awk '{print $4}'` 
echo "===========================" >> /app/memory/logs/mem.log 
date >> /app/memory/logs/mem.log 
echo "Memory usage before | [Use:${used}MB][Free:${free}MB]" >> /app/memory/logs/mem.log 
if [ $free -le 4000 ] ; then 
sync && echo 1 > /proc/sys/vm/drop_caches 
sync && echo 2 > /proc/sys/vm/drop_caches 
sync && echo 3 > /proc/sys/vm/drop_caches 
used_ok=`free -m | awk 'NR==2' | awk '{print $3}'` 
free_ok=`free -m | awk 'NR==2' | awk '{print $4}'` 
echo "Memory usage after | [Use:${used_ok}MB][Free:${free_ok}MB]" >> /app/memory/logs/mem.log 
echo "OK" >> /app/memory/logs/mem.log 
else 
echo "Not required" >> /app/memory/logs/mem.log 
fi 
exit 1

2、使用crontab -e命令编辑当前用户的crontab
0 6 * * * /usr/local/tomcat/sztFileFront/bin/freemem.sh

3、重启crond服务
/sbin/service crond restart

4、查看crond服务是否重启成功
/sbin/service crond status

发表在 LinuxBasic | 标签为 | 留下评论

linux下free命令详解

linux下free命令详解

转载自https://www.cnblogs.com/ultranms/p/9254160.html,感谢原作者

free 命令显示系统内存的使用情况,包括物理内存、交换内存(swap)和内核缓冲区内存。

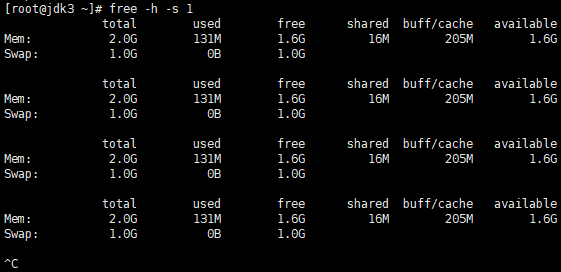
如果加上 -h 选项,输出的结果会友好很多:

有时我们需要持续的观察内存的状况,此时可以使用 -s 选项并指定间隔的秒数:

$ free -h -s 1

上面的命令每隔 1 秒输出一次内存的使用情况,直到你按下 ctrl + c。

由于 free 命令本身比较简单,所以本文的重点会放在如何通过 free 命令了解系统当前的内存使用状况。

输出简介

下面先解释一下输出的内容:
Mem 行(第二行)是内存的使用情况。
Swap 行(第三行)是交换空间的使用情况。
total 列显示系统总的可用物理内存和交换空间大小。
used 列显示已经被使用的物理内存和交换空间。
free 列显示还有多少物理内存和交换空间可用使用。
shared 列显示被共享使用的物理内存大小。
buff/cache 列显示被 buffer 和 cache 使用的物理内存大小。
available 列显示还可以被应用程序使用的物理内存大小。

我想只有在理解了一些基本概念之后,上面的输出才能帮助我们了解系统的内存状况。

buff/cache

先来提一个问题: buffer 和 cache 应该是两种类型的内存,但是 free 命令为什么会把它们放在一起呢?要回答这个问题需要我们做些准备工作。让我们先来搞清楚 buffer 与 cache 的含义。

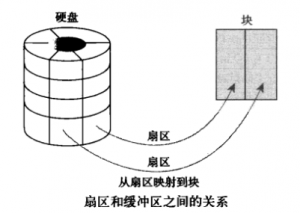
buffer 在操作系统中指 buffer cache, 中文一般翻译为 “缓冲区”。要理解缓冲区,必须明确另外两个概念:”扇区” 和 “块”。扇区是设备的最小寻址单元,也叫 “硬扇区” 或 “设备块”。块是操作系统中文件系统的最小寻址单元,也叫 “文件块” 或 “I/O 块”。每个块包含一个或多个扇区,但大小不能超过一个页面,所以一个页可以容纳一个或多个内存中的块。当一个块被调入内存时,它要存储在一个缓冲区中。每个缓冲区与一个块对应,它相当于是磁盘块在内存中的表示(下图来自互联网):

注意,buffer cache 只有块的概念而没有文件的概念,它只是把磁盘上的块直接搬到内存中而不关心块中究竟存放的是什么格式的文件。

cache 在操作系统中指 page cache,中文一般翻译为 “页高速缓存”。页高速缓存是内核实现的磁盘缓存。它主要用来减少对磁盘的 I/O 操作。具体地讲,是通过把磁盘中的数据缓存到物理内存中,把对磁盘的访问变为对物理内存的访问。页高速缓存缓存的是内存页面。缓存中的页来自对普通文件、块设备文件(这个指的就是 buffer cache 呀)和内存映射文件的读写
页高速缓存对普通文件的缓存我们可以这样理解:当内核要读一个文件(比如 /etc/hosts)时,它会先检查这个文件的数据是不是已经在页高速缓存中了。如果在,就放弃访问磁盘,直接从内存中读取。

这个行为称为缓存命中。如果数据不在缓存中,就是未命中缓存,此时内核就要调度块 I/O 操作从磁盘去读取数据。然后内核将读来的数据放入页高速缓存中。这种缓存的目标是文件系统可以识别的文件(比如 /etc/hosts)。
页高速缓存对块设备文件的缓存就是我们在前面介绍的 buffer cahce。因为独立的磁盘块通过缓冲区也被存入了页高速缓存(缓冲区最终是由页高速缓存来承载的)。

到这里我们应该搞清楚了:无论是缓冲区还是页高速缓存,它们的实现方式都是一样的。缓冲区只不过是一种概念上比较特殊的页高速缓存罢了。
那么为什么 free 命令不直接称为 cache 而非要写成 buff/cache? 这是因为缓冲区和页高速缓存的实现并非天生就是统一的。在 linux 内核 2.4 中才将它们统一。更早的内核中有两个独立的磁盘缓存:页高速缓存和缓冲区高速缓存。前者缓存页面,后者缓存缓冲区。当你知道了这些故事之后,输出中列的名称可能已经不再重要了。

free 与 available

在 free 命令的输出中,有一个 free 列,同时还有一个 available 列。这二者到底有何区别?
free 是真正尚未被使用的物理内存数量。至于 available 就比较有意思了,它是从应用程序的角度看到的可用内存数量。Linux 内核为了提升磁盘操作的性能,会消耗一部分内存去缓存磁盘数据,就是我们介绍的 buffer 和 cache。所以对于内核来说,buffer 和 cache 都属于已经被使用的内存。当应用程序需要内存时,如果没有足够的 free 内存可以用,内核就会从 buffer 和 cache 中回收内存来满足应用程序的请求。所以从应用程序的角度来说,available  = free + buffer + cache。请注意,这只是一个很理想的计算方式,实际中的数据往往有较大的误差。

交换空间(swap space)

swap space 是磁盘上的一块区域,可以是一个分区,也可以是一个文件。所以具体的实现可以是 swap 分区也可以是 swap 文件。当系统物理内存吃紧时,Linux 会将内存中不常访问的数据保存到 swap 上,这样系统就有更多的物理内存为各个进程服务,而当系统需要访问 swap 上存储的内容时,再将 swap 上的数据加载到内存中,这就是常说的换出和换入。交换空间可以在一定程度上缓解内存不足的情况,但是它需要读写磁盘数据,所以性能不是很高。

现在的机器一般都不太缺内存,如果系统默认还是使用了 swap 是不是会拖累系统的性能?理论上是的,但实际上可能性并不是很大。并且内核提供了一个叫做 swappiness 的参数,用于配置需要将内存中不常用的数据移到 swap 中去的紧迫程度。这个参数的取值范围是 0~100,0 告诉内核尽可能的不要将内存数据移到 swap 中,也即只有在迫不得已的情况下才这么做,而 100 告诉内核只要有可能,尽量的将内存中不常访问的数据移到 swap 中。在 ubuntu 系统中,swappiness 的默认值是 60。如果我们觉着内存充足,可以在 /etc/sysctl.conf 文件中设置 swappiness:

vm.swappiness=10

如果系统的内存不足,则需要根据物理内存的大小来设置交换空间的大小。具体的策略网上有很丰富的资料,这里笔者不再赘述。

/proc/meminfo 文件

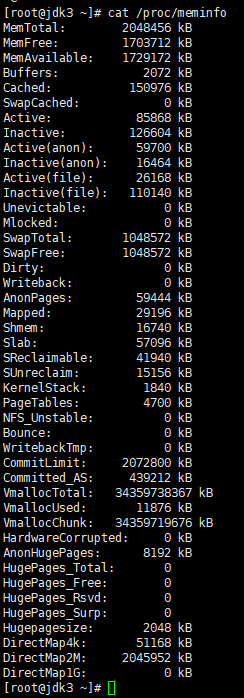
其实 free 命令中的信息都来自于 /proc/meminfo 文件。/proc/meminfo 文件包含了更多更原始的信息,只是看起来不太直观:

$ cat /proc/meminfo


有兴趣的同学可以直接查看这个文件。

总结

free 命令是一个既简单又复杂的命令。简单是因为这个命令的参数少,输出结果清晰。说它复杂则是因为它背后是比较晦涩的操作系统中的概念,如果不清楚这些概念,即便看了 free 命令的输出也 get 不到多少有价值的信息。

发表在 LinuxBasic | 标签为 | 留下评论

Linux中内存buffer和cache的区别

简单说,buffer就是高速缓存,读写数据(块)的数据缓冲区;cache是读取数据(页)的缓冲区,在CPU上面

buffer 与cache 的区别

A buffer is something that has yet to be “written” to disk. A cache is something that has been “read” from the disk and stored for later use.

更详细的解释参考:Difference Between Buffer and Cache

对于共享内存(Shared memory),主要用于在UNIX 环境下不同进程之间共享数据,是进程间通信的一种方法,一般的应用程序不会申请使用共享内存,笔者也没有去验证共享内存对上面等式的影响。如果你有兴趣,请参考:What is Shared Memory?

cache 和 buffer的区别:

Cache:高速缓存,是位于CPU与主内存间的一种容量较小但速度很高的存储器。由于CPU的速度远高于主内存,CPU直接从内存中存取数据要等待一定时间周期,Cache中保存着CPU刚用过或循环使用的一部分数据,当CPU再次使用该部分数据时可从Cache中直接调用,这样就减少了CPU的等待时间,提高了系统的效率。Cache又分为一级Cache(L1 Cache)和二级Cache(L2 Cache),L1 Cache集成在CPU内部,L2 Cache早期一般是焊在主板上,现在也都集成在CPU内部,常见的容量有256KB或512KB L2 Cache。

Buffer:缓冲区,一个用于存储速度不同步的设备或优先级不同的设备之间传输数据的区域。通过缓冲区,可以使进程之间的相互等待变少,从而使从速度慢的设备读入数据时,速度快的设备的操作进程不发生间断。

Free中的buffer和cache:(它们都是占用内存):

buffer : 作为buffer cache的内存,是块设备的读写缓冲区

cache: 作为page cache的内存, 文件系统的cache
如果 cache 的值很大,说明cache住的文件数很多。如果频繁访问到的文件都能被cache住,那么磁盘的读IO bi会非常小。

==============================================================================================
cache是高速缓存,用于CPU和内存之间的缓冲;
buffer是I/O缓存,用于内存和硬盘的缓冲

cache最初用于cpu cache, 主要原因是cpu 与memory, 由于cpu快,memory跟不上,且有些值使用次数多,所以放入
cache中,主要目的是,重复使用, 并且一级\二级物理cache速度快,
buffer 主要用于disk 与 memory, 主要是保护硬盘或减少网络传输的次数(内存数据表现dataSet).当然也可以提高速度(不会立即写入硬盘或直接从硬盘中读出的数据马上显示),重复使用,最初最主要的目的是保护disk,
asp.net的cache有outputcahe与数据cache, 主要目的是 重复使用,提高速度,outputcache主要存储Reader后的页,一般是多次使用同一个HTML,建议不要varybyparam,不要存多version,
数据cache,如dataSet, dataTable, 等
@page buffer=”true”, 使用buffer,让buffer满后再显示读出或写入,(c中文件输出也是如此,主要目的是保护硬盘), 也可以提高下次的访问速度. 在client browse端表现是: true是一次性显示,要么不显示, 中间等, false是一次显示一些,
这在网络输出也是如此表现.
对于文件访问c中默认采用的是buffer = true, 这与asp.net一样,
相当于Response.write();中当buffer满后输出,以减少网络的传输次数
<%@ OutputCache Duration=”60″ VaryByParam=”none”%>, 是将asp.net生成的HTML缓存起来,在指定的时间内不需要重新生成html, control.ascx.也有组件缓存(htmlCach)。 dataSet也是如此。DataCache,
cache和buffer都是缓冲区, 在翻译上,cache翻译成高速缓冲区要好一点(因为主要是为下次访问加速), buffer翻译成缓冲区好点。都是缓冲的作用,可目的有点不同,主要是理解,不需要太咬文嚼字.

cache 和 buffer的区别
1, Buffer是缓冲区
2, Cache 是高速缓存,分library cache; data dictionary cache; database buffer cache
Buffer cache 缓冲区高速缓存,用于缓存从硬盘上读取的数据,减少磁盘I/O.
3, buffer有共享SQL区和PL/SQL区 , 数据库缓冲区高速缓存有独立的subcache
4, pool 是共享池 用于存储最近执行的语句等
5, cache:
A cache is a smaller, higher-speed component that is used to speed up the
access to commonly used data stored in a lower-speed, higher-capacity
component.
database buffer cache:
The database buffer cache is the portion of the SGA that holds copies of data
blocks
read from data files. All user processes concurrently (同时地,兼任地)connected
to the instance share access to the database buffer cache.
buffer cache就是以block为单位读入写出的。

缓存(cache)是把读取过的数据保存起来,重新读取时若命中(找到需要的数据)就不要去读硬盘了,若没有命中就读硬盘。其中的数据会根据读取频率进行组织,把最频繁读取的内容放在最容易找到的位置,把不再读的内容不断往后排,直至从中删除。
缓冲(buffers)是根据磁盘的读写设计的,把分散的写操作集中进行,减少磁盘碎片和硬盘的反复寻道,从而提高系统性能。linux有一个守护进程定期清空缓冲内容(即写如磁盘),也可以通过sync命令手动清空缓冲。举个例子吧:

我这里有一个ext2的U盘,我往里面cp一个3M的MP3,但U盘的灯没有跳动,过了一会儿(或者手动输入sync)U盘的灯
就跳动起来了。卸载设备时会清空缓冲,所以有些时候卸载一个设备时要等上几秒钟。
修改/etc/sysctl.conf中的vm.swappiness右边的数字可以在下次开机时调节swap使用策
略。该数字范围是0~100,数字越大越倾向于使用swap。默认为60,可以改一下试试。
—————————————–
两者都是RAM中的数据。简单来说,buffer是即将要被写入磁盘的,而cache是被从磁盘中
读出来的。
buffer是由各种进程分配的,被用在如输入队列等方面,一个简单的例子如某个进程要求
有多个字段读入,在所有字段被读入完整之前,进程把先前读入的字段放在buffer中保存

cache经常被用在磁盘的I/O请求上,如果有多个进程都要访问某个文件,于是该文件便被
做成cache以方便下次被访问,这样可提供系统性能。
A buffer is something that has yet to be “written” to disk. A cache is
something that has been “read” from the disk and stored for later use.

更详细的解释参考:Difference Between Buffer and Cache

对于共享内存(Shared memory),主要用于在UNIX 环境下不同进程之间共享数据,
是进程间通信的一种方法,一般的应用程序不会申请使用共享内存,笔者也没有去验证共
享内存对上面等式的影响。如果你有兴趣,请参考:What is Shared Memory?
cache 和 buffer的区别:
Cache:高速缓存,是位于CPU与主内存间的一种容量较小但速度很高的存储器。由于
CPU的速度远高于主内存,CPU直接从内存中存取数据要等待一定时间周期, Cache中保存
着CPU刚用过或循环使用的一部分数据,当CPU再次使用该部分数据时可从Cache中直接调
用,这样就减少了CPU的等待时间,提高了系统的效率。Cache又分为一级Cache(L1 Cache)
和二级Cache(L2 Cache),L1 Cache集成在CPU内部,L2 Cache早期一般是焊在主板上,现
在也都集成在CPU内部,常见的容量有256KB或512KB L2 Cache。
Buffer:缓冲区,一个用于存储速度不同步的设备或优先级不同的设备之间传输数据
的区域。通过缓冲区,可以使进程之间的相互等待变少,从而使从速度慢的设备读入数据
时,速度快的设备的操作进程不发生间断。
Free中的buffer和cache:(它们都是占用内存):
buffer : 作为buffer cache的内存,是块设备的读写缓冲区
cache: 作为page cache的内存, 文件系统的cache
如果 cache 的值很大,说明cache住的文件数很多。如果频繁访问到的文件都能被
cache住,那么磁盘的读IO bi会非常小。

发表在 LinuxBasic | 标签为 | 留下评论

Nginx 实现端口转发

什么是端口转发

文章转自:https://www.xiaoz.me/archives/10578 ,感谢原作者

当我们在服务器上搭建一个图书以及一个电影的应用,其中图书应用启动了 8001 端口,电影应用启动了 8002 端口。此时如果我们可以通过

localhost:8001    //图书
localhost:8002    //电影


但我们一般访问应用的时候都是希望不加端口就访问域名,也即两个应用都通过 80 端口访问。但我们知道服务器上的一个端口只能被一个程序使用,这时候如何该怎么办呢?一个常用的方法是用 Nginx 进行端口转发。Nginx 的实现原理是:用 Nginx 监听 80 端口,当有 HTTP 请求到来时,将 HTTP 请求的 HOST 等信息与其配置文件进行匹配并转发给对应的应用。例如当用户访问 book.douban.com 时,Nginx 从配置文件中知道这个是图书应用的 HTTP 请求,于是将此请求转发给 8001 端口的应用处理。当用户访问 movie.douban.com 时,Nginx 从配置文件中知道这个是电影应用的 HTTP 请求,于是将此请求转发给 8002 端口的应用处理。一个简单的 Nginx 配置文件(部分)如下面所示:


#配置负载均衡池
#Demo1负载均衡池
upstream book_pool{
    server 127.0.0.1:8001;
}
#Demo2负载均衡池
upstream movie_pool{
    server 127.0.0.1:8002;
}

#Demo1端口转发
server {
    listen       80;
    server_name  book.chanshuyi.com;
    access_log logs/book.log;
    error_log logs/book.error;
    
    #将所有请求转发给demo_pool池的应用处理
    location / {
        proxy_set_header Host $host;
        proxy_set_header X-Forwarded-For $proxy_add_x_forwarded_for;
        proxy_pass http://book_pool;
    }
}
#Demo2端口转发
server {
    listen       80;
    server_name  movie.chanshuyi.com;
    access_log logs/movie.log;
    error_log logs/movie.error;
    
    #将所有请求转发给demo_pool池的应用处理
    location / {
        proxy_set_header Host $host;
        proxy_set_header X-Forwarded-For $proxy_add_x_forwarded_for;
        proxy_pass http://movie_pool;
    }
}

上面这段配置实现了:

1、当用户访问的域名是:http://book.chanshuyi.com 时,我们自动将其请求转发给端口号为 8001 的 Tomcat 应用处理。

2、当用户访问的域名是:http://movie.chanshuyi.com 时,我们自动将其请求转发给端口号为 8002 的 Tomcat 应用处理。

上面的这种技术实现就是端口转发。端口转发指的是由软件统一监听某个域名上的某个端口(一般是80端口),当访问服务器的域名和端口符合要求时,就按照配置转发给指定的 Tomcat 服务器处理。我们常用的 Nginx 也有端口转发功能。

发表在 Nginx | 标签为 | 留下评论

git多个远程仓库管理

我在项目管理时需要实时备份代码,于是想到部署一个备份仓库用来备份代码,查了下资料,发现这篇文章最全面,搬运了过来,感谢原作者,原连接是

https://www.cnblogs.com/bwar/p/9297343.html

git多个远程仓库

1. 前言

用GitHub管理自己的开源项目有几年了,最近一年更新得比较多,仓库也越来越多越来越大。有时候感觉GitHub太慢,尤其是最近感觉更为明显,于是萌生了再找个国内类似GitHub的代码托管平台的想法,同时我也还想持续更新GitHub上的仓库,于是需要一个本地仓库(我自己的开发机)多个远程仓库(Github、码云、coding)。

2. 一个远程仓库的git config

我的开源项目Nebula一个基于事件驱动的高性能TCP网络框架的git配置文件.git/config如下:

[core]
        repositoryformatversion = 0
        filemode = true
        bare = false
        logallrefupdates = true
[remote "origin"]
        url = https://github.com/Bwar/Nebula.git
        fetch = +refs/heads/*:refs/remotes/origin/*
[branch "master"]
        remote = origin
        merge = refs/heads/master

3. 用git命令行添加多个远程仓库

添加一个名为“mirror”的远程仓库:

git remote add mirror https://gitee.com/Bwar/Nebula.git

执行完这条命令后.git/config文件内容变成了:

[core]
        repositoryformatversion = 0
        filemode = true
        bare = false
        logallrefupdates = true
[remote "origin"]
        url = https://github.com/Bwar/Nebula.git
        fetch = +refs/heads/*:refs/remotes/origin/*
[branch "master"]
        remote = origin
        merge = refs/heads/master
[remote "mirror"]
    url = https://gitee.com/Bwar/Nebula.git
    fetch = +refs/heads/*:refs/remotes/mirror/*

此时已经是一个本地仓库,两个远程仓库。使用下面的命令可以分别从两个远程仓库拉取和推送到两个远程仓库。

git pull origin master 
git pull mirror master
git push origin master 
git push mirror master

4. 一条命令同时更新多个远程仓库

目前我的开源项目只有我一个contributor(计划2018年12月开始引入其他contributor),主要push比较少pull,输入多条命令我都觉得麻烦,一条命令将当前分支同时更新到两个远程仓库才能让我满意。于是改变一下,不用上面的mirror做法,直接在origin中添加一个url来实现一个本地仓库多个远程仓库。

git remote set-url --add origin https://gitee.com/Bwar/Nebula.git

执行这条命令后.git/config内容变成:

[core]
        repositoryformatversion = 0
        filemode = true
        bare = false
        logallrefupdates = true
[remote "origin"]
        url = https://github.com/Bwar/Nebula.git
        url = https://gitee.com/Bwar/Nebula.git
        fetch = +refs/heads/*:refs/remotes/origin/*
[branch "master"]
        remote = origin
        merge = refs/heads/master
[remote "mirror"]
    url = https://gitee.com/Bwar/Nebula.git
    fetch = +refs/heads/*:refs/remotes/mirror/*

之前添加的“mirror”留着或删掉都没关系,这时候我们一条命令即可更新两个远程仓库:

git push origin master

5. 免输入密码操作远程仓库

执行远程仓库操作需要输入密码是件比较麻烦的事情,在配置文件的url里配上用户名和密码即可免掉这样的麻烦,提高操作效率。免输密码操作远程仓库还可以通过ssh方式实现,下面只给出https方式的免输密码配置:

url = https://${user}:${password}@github.com/Bwar/Nebula.git

把上面配置中的“${user}”和“${password}”用你的远程仓库用户名和密码代入即可。

6. 直接修改git配置文件实现多个远程仓库

上面通过git remote命令完成一个本地仓库多个远程仓库配置,这些命令实际上都是通过修改.git/config实现的,其实直接修改配置文件可能会更快,我就是直接修改配置文件完成。最后我的多个远程仓库配置如下:

[core]
        repositoryformatversion = 0
        filemode = true
        bare = false
        logallrefupdates = true
[remote "origin"]
        url = https://${user}:${password}@github.com/Bwar/Nebula.git
        url = https://${user}:${password}@gitee.com/Bwar/Nebula.git
        url = https://${user}:${password}@git.coding.net/Bwar/NebulaBootstrap.git
        fetch = +refs/heads/*:refs/remotes/origin/*
[branch "master"]
        remote = origin
        merge = refs/heads/master

完毕。

发表在 gitlab | 标签为 | 留下评论

centos如何更换时区

centos的设置时区的方式的本质是创建软连接

比如说,一台服务器的时区不正确,查看一下:

[root@eueka project]# date
Tue Jun 11 23:42:26 EDT 2019
[root@eueka project]# ll /etc/localtime 
lrwxrwxrwx. 1 root root 38 Feb 17 04:59 /etc/localtime -> ../usr/share/zoneinfo/America/New_York

可以发现,连接的是美国纽约时间,现在更换成亚洲上海

ln -sf /usr/share/zoneinfo/Asia/Shanghai /etc/localtime

确认一下

[root@eueka project]# ll /etc/localtime 
lrwxrwxrwx 1 root root 33 Jun 12 11:43 /etc/localtime -> /usr/share/zoneinfo/Asia/Shanghai
[root@eueka project]# date
Wed Jun 12 11:44:03 CST 2019


现在时间就正确了

还有哪些时区呢:太多了

[root@eueka project]# ls /usr/share/zoneinfo/
Africa Australia Cuba Etc GMT-0 Indian Kwajalein Navajo posix ROK UTC
America Brazil EET Europe GMT+0 Iran Libya NZ posixrules Singapore WET
Antarctica Canada Egypt GB Greenwich iso3166.tab MET NZ-CHAT PRC Turkey W-SU
Arctic CET Eire GB-Eire Hongkong Israel Mexico Pacific PST8PDT UCT zone1970.tab
Asia Chile EST GMT HST Jamaica MST Poland right Universal zone.tab
Atlantic CST6CDT EST5EDT GMT0 Iceland Japan MST7MDT Portugal ROC US Zulu


[root@eueka project]# ls /usr/share/zoneinfo/Asia/
Aden Bahrain Chongqing Gaza Jerusalem Kuala_Lumpur Novokuznetsk Riyadh Tbilisi Urumqi
Almaty Baku Chungking Harbin Kabul Kuching Novosibirsk Saigon Tehran Ust-Nera
Amman Bangkok Colombo Hebron Kamchatka Kuwait Omsk Sakhalin Tel_Aviv Vientiane
Anadyr Barnaul Dacca Ho_Chi_Minh Karachi Macao Oral Samarkand Thimbu Vladivostok
Aqtau Beirut Damascus Hong_Kong Kashgar Macau Phnom_Penh Seoul Thimphu Yakutsk
Aqtobe Bishkek Dhaka Hovd Kathmandu Magadan Pontianak Shanghai Tokyo Yangon
Ashgabat Brunei Dili Irkutsk Katmandu Makassar Pyongyang Singapore Tomsk Yekaterinburg
Ashkhabad Calcutta Dubai Istanbul Khandyga Manila Qatar Srednekolymsk Ujung_Pandang Yerevan
Atyrau Chita Dushanbe Jakarta Kolkata Muscat Qyzylorda Taipei Ulaanbaatar
Baghdad Choibalsan Famagusta Jayapura Krasnoyarsk Nicosia Rangoon Tashkent Ulan_Bator

那有没有快速确定时区的方法,有的,命令是tzselect

可以看我之前的日志  https://www.fencatn.com/cloud/linux/centos时区查看命令/


发表在 LinuxBasic | 标签为 | 留下评论

CentOS 7 安装 Jenkins

首先还是贴官网路径,照着官网的方法去做不会有错,个人建议不要使用docker,耗费资源更高不说,配置也没有直接安装来得方便。当然,临时使用的话,docker更方便。

https://jenkins.io/zh/doc/book/installing/#linux

原理很简单,配置yum源、yum安装jenkins,配置端口,配置启动用户,将该用户授权给jenkins文件夹,启动jenkins,去浏览器访问jenkins:端口,第一次的密码去提示的文件去找,创建管理员用户,完了。

1.安装

sudo wget -O /etc/yum.repos.d/jenkins.repo https://pkg.jenkins.io/redhat-stable/jenkins.repo
sudo rpm --import https://pkg.jenkins.io/redhat-stable/jenkins.io.key
yum install jenkins

2.配置

vim /etc/sysconfig/jenkins
#监听端口
JENKINS_PORT="8080"

3.配置权限

为了不因为权限出现各种问题,这里直接使用root

修改用户为root

vim /etc/sysconfig/jenkins
#修改配置
$JENKINS_USER="root"

修改目录权限

chown -R root:root /var/lib/jenkins
chown -R root:root /var/cache/jenkins
chown -R root:root /var/log/jenkins

重启

service jenkins restart
ps -ef | grep jenkins

4.启动

systemctl start jenkins

5.安装

cat /var/lib/jenkins/secrets/initialAdminPassword

插件安装选择推荐插件

发表在 jenkins | 标签为 | 留下评论

gitlab仓库存储位置的修改方法

gitlab仓库存储位置的修改方法

gitlab通过rpm包安装后,默认存储位置在/var/opt/gitlab/git-data/repositories,通常需要更改此路径到单独的一个分区来存储仓库的数据。

例如我这里把数据存放到/data/gitlab目录下

创建/data/gitlab目录
mkdir  -p  /data/gitlab

修改gitlab配置文件,找到git_data_dir,可以发现有范例
vim /etc/gitlab/gitlab.rb

377 ### For setting up different data storing directory
378 ###! Docs: https://docs.gitlab.com/omnibus/settings/configuration.html#storing-git-data-in-an-alternative-directory
379 ###! **If you want to use a single non-default directory to store git data use a
380 ###! path that doesn’t contain symlinks.**
381 # git_data_dirs({
382 # “default” => {
383 # “path” => “/mnt/nfs-01/git-data”
384 # }
385 # })

在path右边,写上“/data/gitlab”,当然,也可以是挂载的路径

停止当前gitlab,重新加载配置
gitlab-ctl stop
gitlab-ctl reconfigure

重新加载后,会发现在/data/gitlab目录下多出一个repositories目录

最后启动gitlab即可
gitlab-ctl start

发表在 gitlab | 标签为 | 留下评论

MySQL调优之innodb_buffer_pool_size大小设置

MySQL调优之innodb_buffer_pool_size大小设置

转载自 https://blog.csdn.net/sunny05296/article/details/78916775

MySQL调优之innodb_buffer_pool_size大小设置

相关查看命令
sql> show global variables like ‘innodb_buffer_pool_size’;

sql> show global status like ‘Innodb_buffer_pool_pages_data’;

sql> show global status like ‘Innodb_page_size’;

sql> use mysql;

sql> select @@innodb_buffer_pool_size;

….

MariaDB [(none)]> show global variables like ‘innodb_buffer_pool_size’;

+————————-+———–+
| Variable_name           | Value     |
+————————-+———–+
| innodb_buffer_pool_size | 268435456 |
+————————-+———–+
1 row in set (0.00 sec)

MariaDB [(none)]> show global status like ‘Innodb_buffer_pool_pages_data’;
+——————————-+——-+
| Variable_name                 | Value |
+——————————-+——-+
| Innodb_buffer_pool_pages_data | 6082  |
+——————————-+——-+
1 row in set (0.00 sec)

MariaDB [(none)]> show global status like ‘Innodb_buffer_pool_pages_total’;
+——————————–+——-+
| Variable_name                  | Value |
+——————————–+——-+
| Innodb_buffer_pool_pages_total | 16383 |
+——————————–+——-+
1 row in set (0.00 sec)

MariaDB [(none)]> show global status like ‘Innodb_page_size’;
+——————+——-+
| Variable_name    | Value |
+——————+——-+
| Innodb_page_size | 16384 |
+——————+——-+
1 row in set (0.00 sec)

MariaDB [(none)]>

官方对这个几个参数的解释:
Innodb_buffer_pool_pages_data
The number of pages in the InnoDB buffer pool containing data. The number includes both dirty and
clean pages.

Innodb_buffer_pool_pages_total
The total size of the InnoDB buffer pool, in pages.

Innodb_page_size
InnoDB page size (default 16KB). Many values are counted in pages; the page size enables them to be
easily converted to bytes

调优参考计算方法:
val = Innodb_buffer_pool_pages_data / Innodb_buffer_pool_pages_total * 100%
val > 95% 则考虑增大 innodb_buffer_pool_size, 建议使用物理内存的75%
val < 95% 则考虑减小 innodb_buffer_pool_size, 建议设置为:Innodb_buffer_pool_pages_data * Innodb_page_size * 1.05 / (1024*1024*1024)

设置命令:set global innodb_buffer_pool_size = 2097152; //缓冲池字节大小,单位kb,如果不设置,默认为128M

设置要根据自己的实际情况来设置,如果设置的值不在合理的范围内,并不是设置越大越好,可能设置的数值太大体现不出优化效果,反而造成系统的swap空间被占用,导致操作系统变慢,降低sql查询性能。

修改配置文件的调整方法,修改my.cnf配置:

innodb_buffer_pool_size = 2147483648  #设置2G

innodb_buffer_pool_size = 2G  #设置2G

innodb_buffer_pool_size = 500M  #设置500M

MySQL5.7及以后版本,改参数时动态的,修改后,无需重启MySQL,但是低版本,静态的,修改后,需要重启MySQL。

发表在 mysql | 标签为 | 留下评论